

Easy Garden Box
Happy Monday, friends! It is almost May, and with that, I thought I'd share our garden with you today. We've been in our house for nearly...
Happy Monday, friends! It is almost May, and with that, I thought I'd share our garden with you today. We've been in our house for nearly two years now, but the great majority of that time has been spent working on the interior of our home - working room by room. The kitchen was our last big project and it was finished almost a year ago, but we've spent the last several months just enjoying the state of things before perhaps updating some bathrooms or flooring. Not to mention having added a puppy to the mix, we've been adjusting to having him in our space as well.
Now, however, we feel like it's about time we start showing our outdoor areas some love. We have been good about clean-up in the fall (we live in a forest... just imagine the sheer volume of leaves we have to clean up), and we try our best to keep shrubs and things well groomed, but it has gotten to a point where most of our backyard has gotten away from us. So much has become overgrown and as two people who wouldn't exactly call themselves 'green thumbs,' it's been a bit of a struggle. Right now, about 2/3 of our backyard is a muddy, tilled mess. We are hoping to get it all fertilized and seeded for grass, but because of all the rain we've been getting, it's mostly just a sloppy, goopy, mud pit. Good thing I've got my Hunters!
While we try to get our yard ready for grass, though, we thought we should also take this opportunity to add in a garden box. Why not, right? Everything else is a mess, might as well do it while we're already dirty!
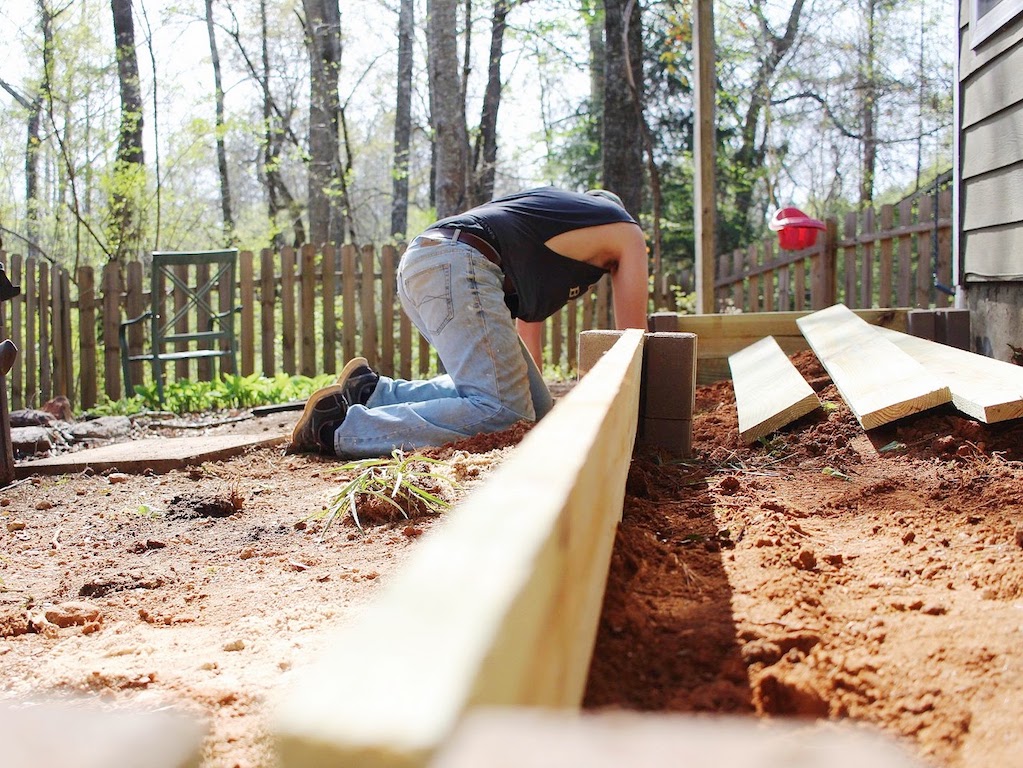
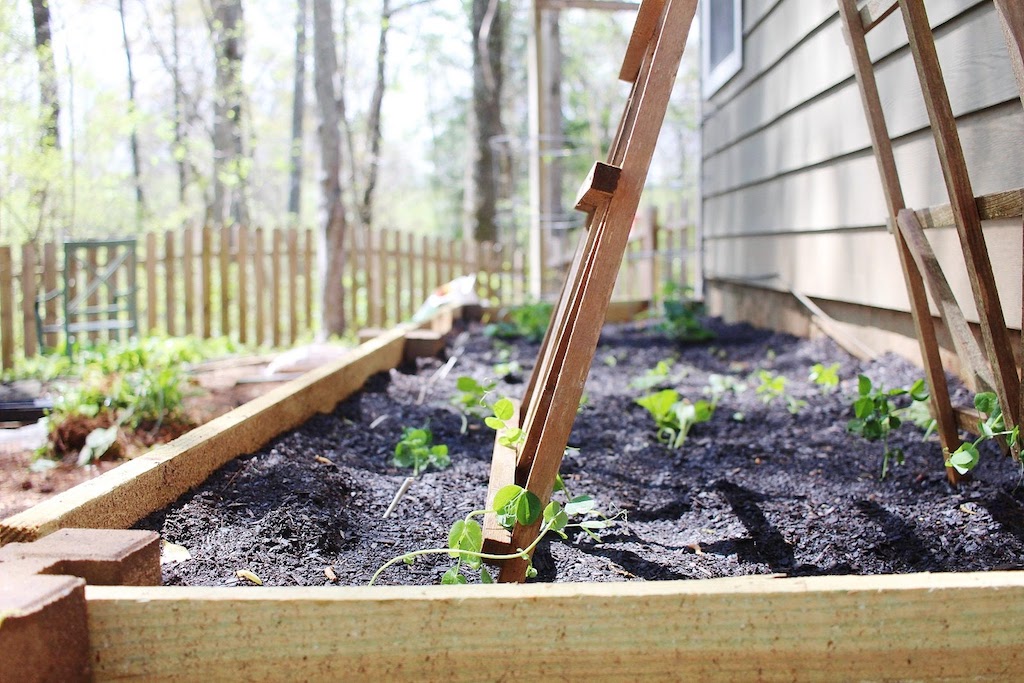
Thankfully, it was incredibly simple thanks to some sand, cement blocks, planks of wood, and some dirt. Here's how we did it:
- We dug out the perimeter and made spaces for the blocks and planks.
- We placed some planks in the slots to be sure they'd come up even with the tops of the blocks. Then we evened things out with sand at the base and made sure our blocks were level with one another. Tom also used some metal poles to put down the center of the blocks and into the ground to keep them in place.
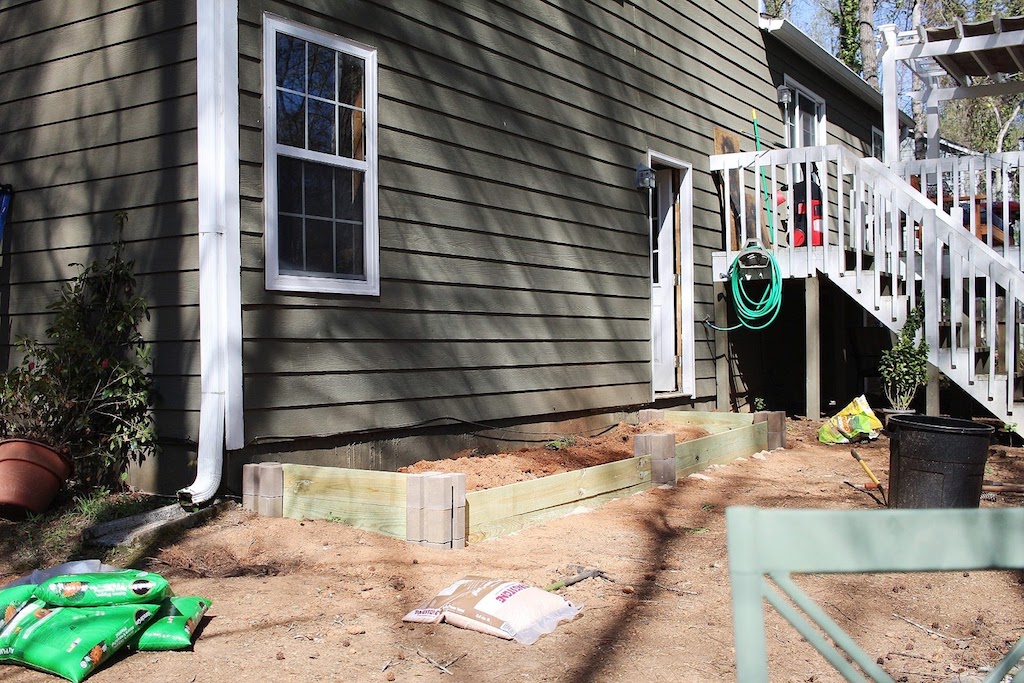
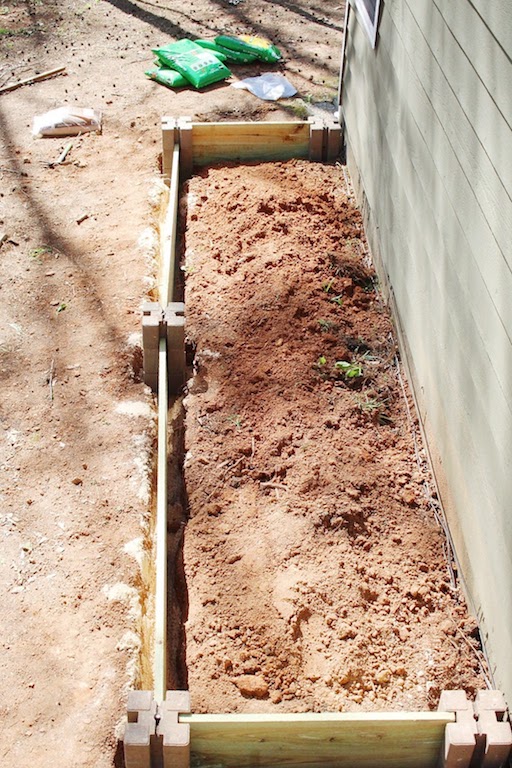
- Tom cut the planks to size and we made sure everything fit just right before filling the sides in with dirt.
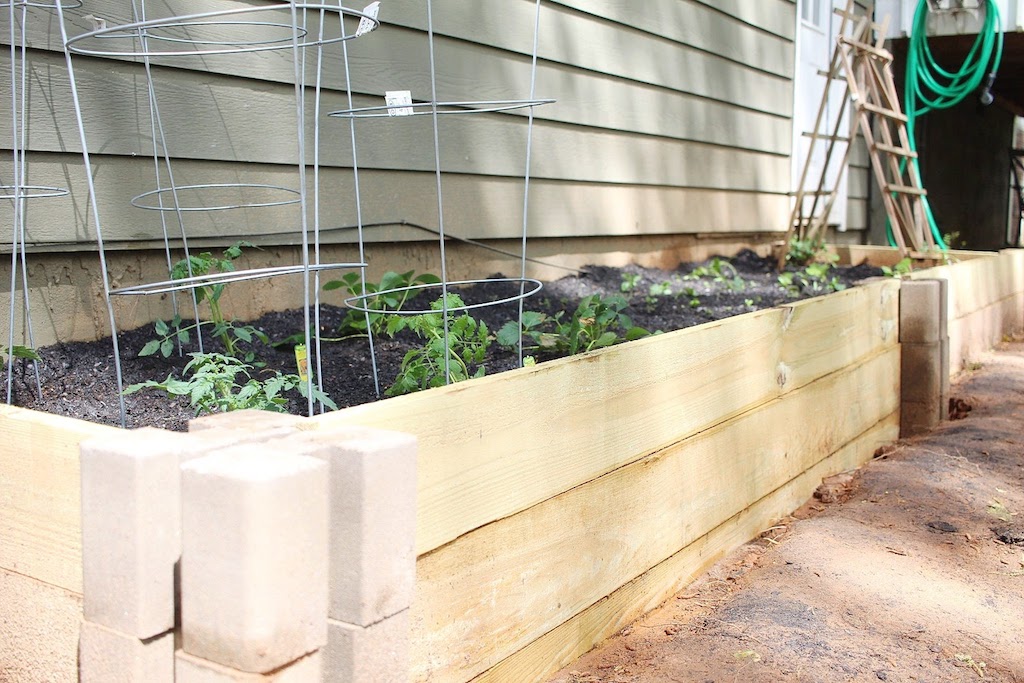
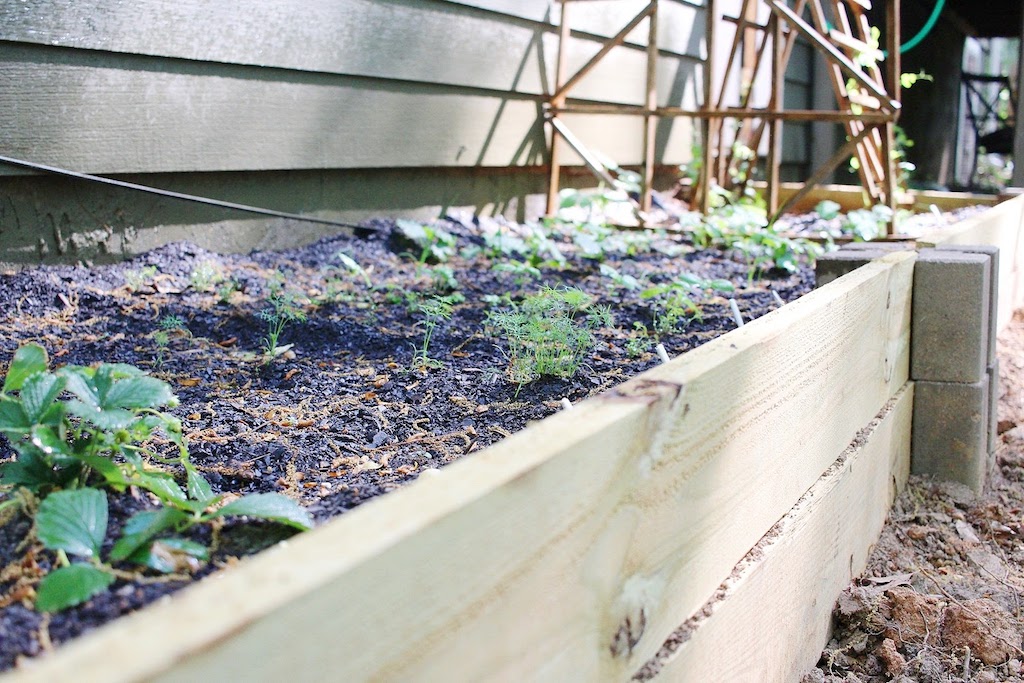
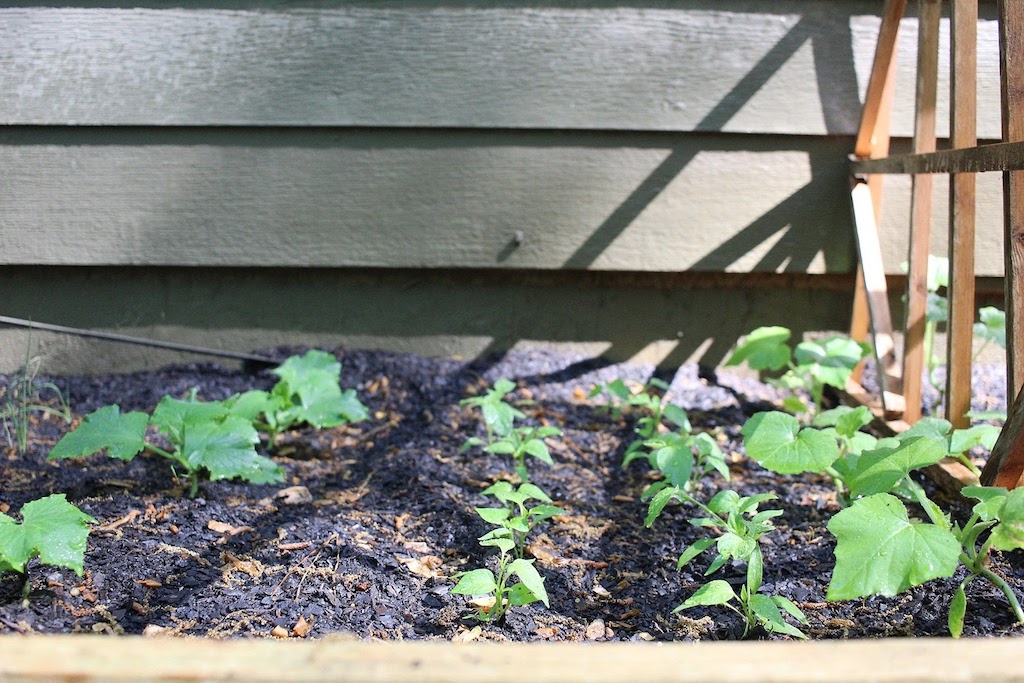
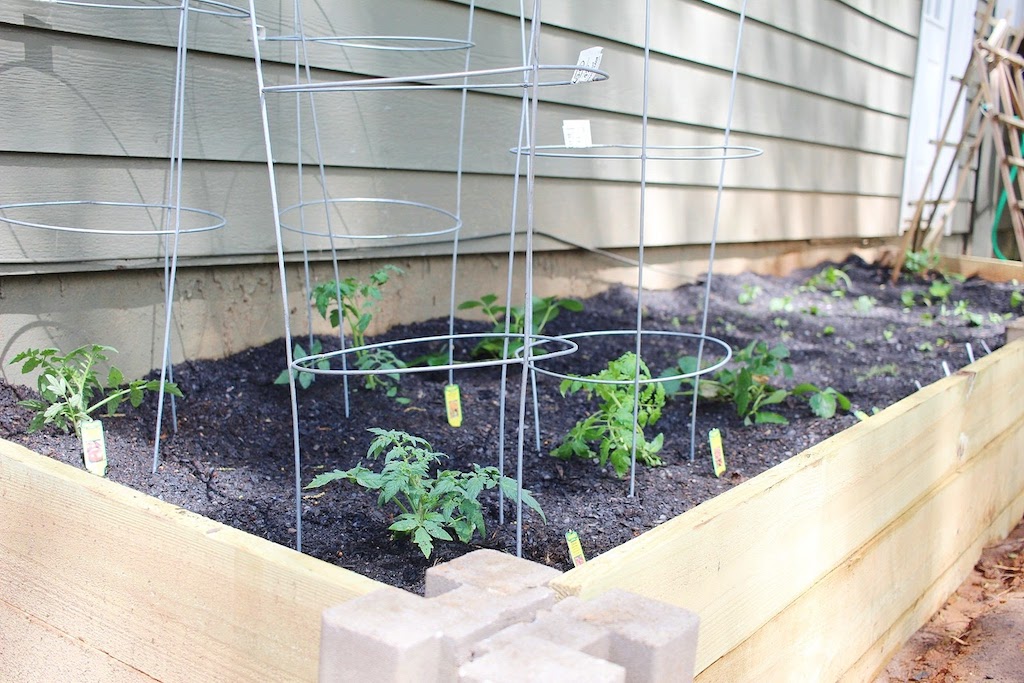
- We layered topsoil into the box and planted our little seedlings in orderly rows.
Here are a few photos! We are so happy with the results and it only took us a Saturday afternoon to finish. Isn't it pretty?

Here is a link to the cement blocks we used - these were such a help!
So far, everything has been growing beautifully. Here's a list of what we have growing:
- Large tomatoes
- Cherry tomatoes
- Strawberries
- Rosemary (not doing so hot, though)
- Dill
- Thyme
- Basil
- Bell Peppers
- Cucumber
- Green onions
- Yellow Squash
- Snap peas
I also thought I'd also include some affiliate links of products that might come in handy:


So what do you think? Pretty simple, but cute, right? We're excited to start reaping the rewards of this little patch of land, and we're hoping our grass comes in just as nicely! Let me know if this garden post was helpful or inspiring for you! Do you have a garden at your place? What're you growing?
Happy Spring, friends!

What They Don't Tell You About DIY Renovations
So I realize this is a really specific kind of post, but as we are now close to the one year anniversary of our finished downstairs renovation...
So I realize this is a really specific kind of post, but as we are now close to the one year anniversary of our finished downstairs renovation, I started to think back to life in those two months without a kitchen.
It also reminded me of all the other rooms we updated one by one and how it affected our everyday life. I wouldn't have changed a thing about the process because we learned so much, and strangely it proved to be fun, but there were definitely some surprising revelations of renovation life.
Here are a few things you may not think about or realize the reality of before starting a renovation adventure:
1. Weird shower schedules
Say you wake up in the morning and start doing some messy labor (painting, demo, etc..) That afternoon you have a meeting or a function, so you shower. Later that night you do some more messy labor. You don't want to crawl into bed covered in sawdust, sooo... shower again. Then do you shower in the morning before work? Maybe, maybe not... There were lots of showers going on.
2. Mistakes, mistakes, and more mistakes
Going in, I think we figured we would be super detailed and never let something fall through the cracks. But it happens. I couldn't tell you how many times something was measured incorrectly over the course of our projects. Or how we didn't spend enough time sanding, leaving terribly obvious mudding on our drywall. But you know what? We learned. A LOT.
3. You'll question your intelligence
On the same topic of making mistakes, you'll also feel like a complete idiot sometimes. The mistakes you make will often times have been totally avoidable had you paid more attention or double checked your measurements. Tom stayed up late into the night after he made a particularly bad mistake that almost wrecked the whole plan (but of course ended up working out fine) and he wallowed for hours just going over where he went wrong. So if you ever feel like a total moron, you're not the only one.
4. You'll be behind schedule
If you stay on schedule and meet EVERY deadline you've set for yourself, you deserve a gold star. But likely, you'll be a day or so behind where you'd like to be. You'll hit a seemingly small roadblock, and suddenly the timeline goes catawampus.
5. Get used to your scrubby renovation clothes
Besides your 9-5 work clothes, it feels like you live in your renovation clothes. Sometimes you don't even wash them until they meet a set standard of filthy. Between work clothes, renovation clothes, and jammies, those renovation clothes somehow feel like the thing you wear the most.
6. Every time you think you got everything at the home store, you didn't
I swear Home Depot was our home away from home. A paint brush would break, we needed more sanding sheets than we thought, we didn't have the kind of screws we were positive we had, etc... Get used to multiple trips to the home store every other day.
7. Cooking? What's that?
Regardless of whether you're doing a kitchen reno or a bedroom reno, nobody feels like cooking after a day filled with drywalling and painting. So when you're preparing your budget, make sure you include "eating out."
8. The cost will surprise you
Honestly, I think we were almost always really under budget, or really over budget. There weren't a lot of times where it costed exactly what we had thought. Either way, it was always a surprise... obviously one was a better surprise than the other ;) But don't sweat it. It'll even out eventually.
9. Does the (literal) dust ever settle??
It does... eventually. If you've done any sanding or demolition at all, be prepared to find a layer of dust throughout your house for a while. Good ventilation will help, but it's not always available.
10. You'll feel immense pride when you're done
Dawwww of course I had to end on a high note. If you DIYed this project, that feeling of accomplishment and pride is amazing. Seeing what're capable of is priceless. Revel in it an enjoy a hard earned break!
Have you done a renovation? What did you learn? What took you by surprise?

DIY Moss Frame
Lately, Tom and I have been feeling a little restless. Now that most of our big projects are done, we're on a hunt for a new one.... or we're trying to decide if we should permanently work remote from an RV for a year while we travel the country (I'm kind of kidding about that one). Regardless of where this restlessness sprouted from, it's caused us to tap a little deeper into that creative part of our brains.
Admittedly, I am not usually one for DIY decor. I've done enough of it to know that about a month later, I'll find exactly what I just made at Target... and it looks better and is cheaper. It's like my personal curse. It happens every time!
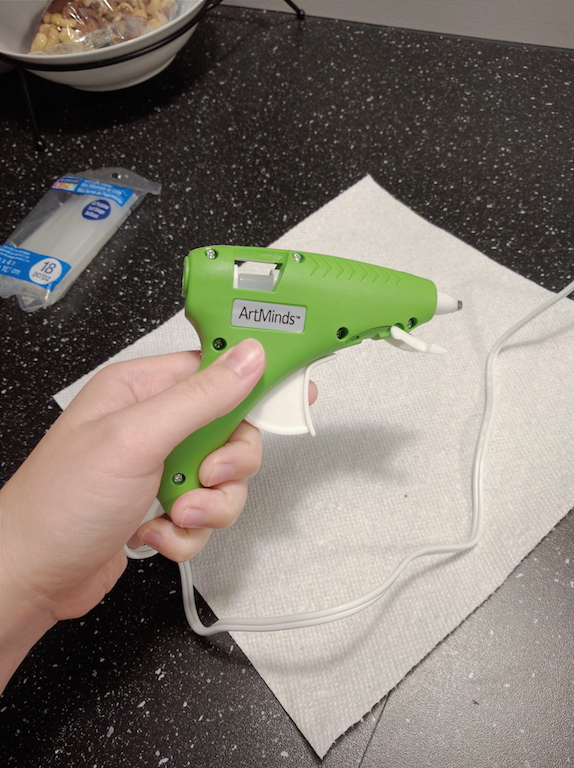
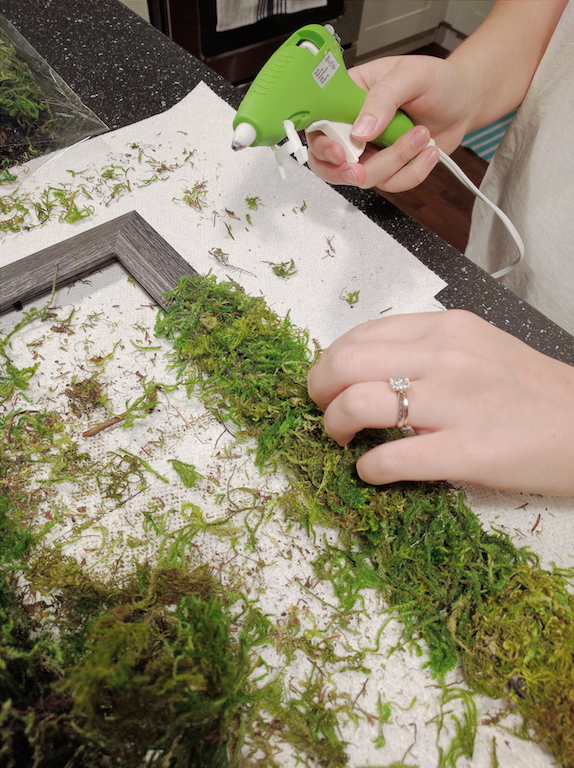
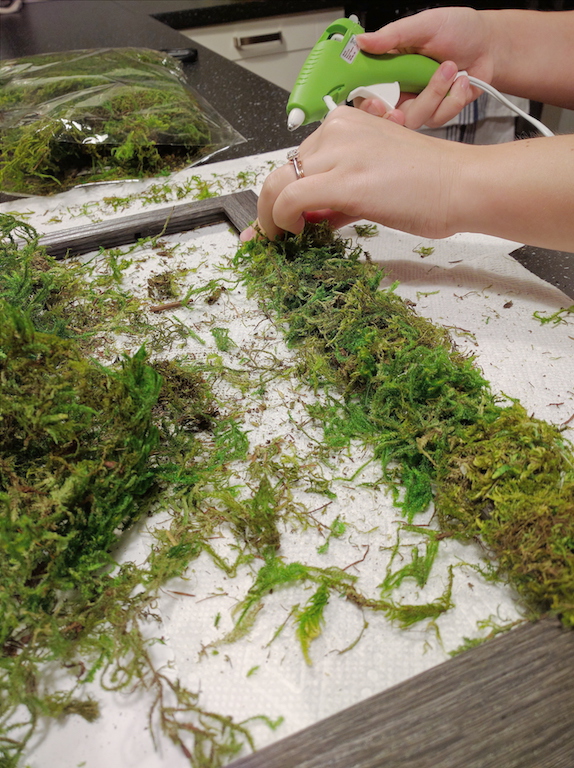
But amidst this funny little season, we've been having some fun. Let's just say, I discovered the way of... THE HOT GLUE GUN. Best four bucks I ever spent. Lemme show you what's up:
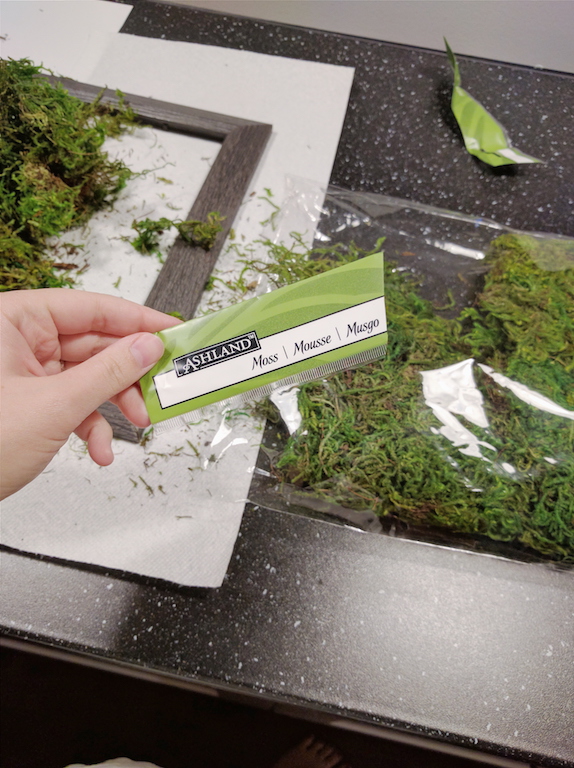
On a recent excursion to Michael's with Tom, I started to meander through the fake flowers while he found a good frame to mount a recently acquired print from Goodwill. 'Twas in this time that a small lightbulb grew atop my head... and the moss-covered-frame was born.
Materials
- Frame (I used this one) $6
- Hot glue gun and glue sticks $8
- Bag of moss $10
Total: $24 (though there is plenty more moss and glue for another project)
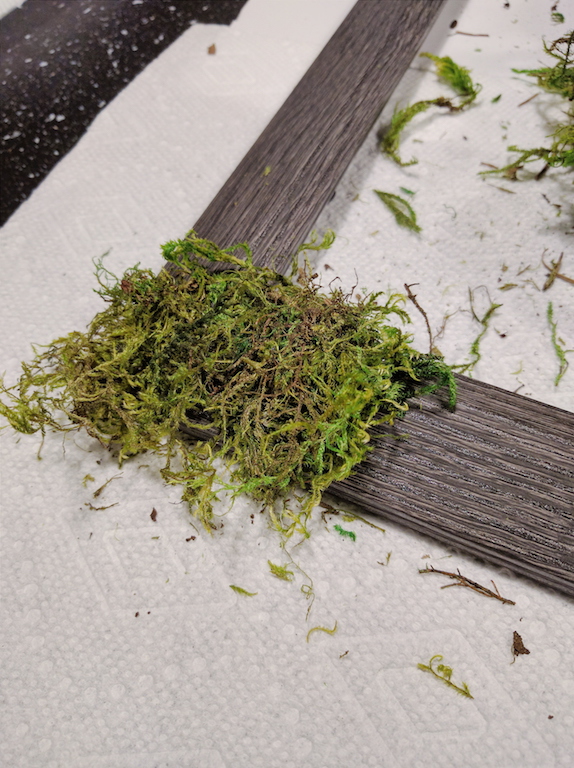
Directions
See the photos below.
Basically, just glue chunks of moss around the frame and you're done! It was actually really fun, and I'm very happy with the results. I may hang it as-is, or add a very minimal print. We're hoping to create a bit of a gallery on either side of the TV and so far we've gathered a nice start. I snagged that lovely Monet print at Goodwill for $6 as well - thrifting is the way to go, my friends!
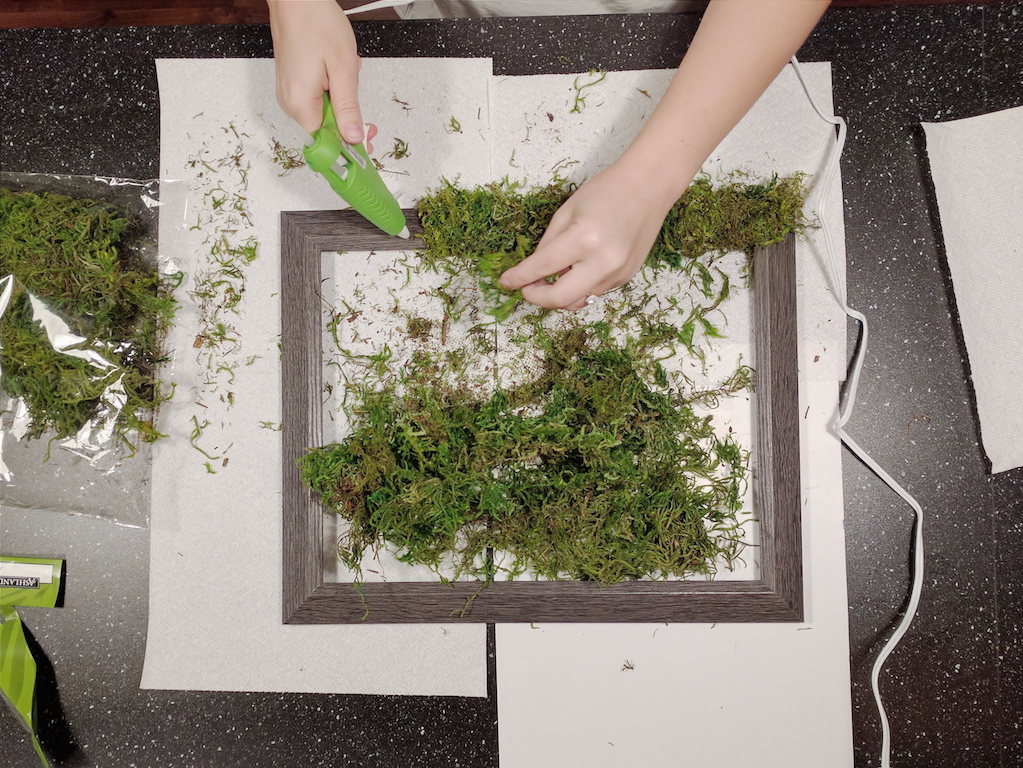

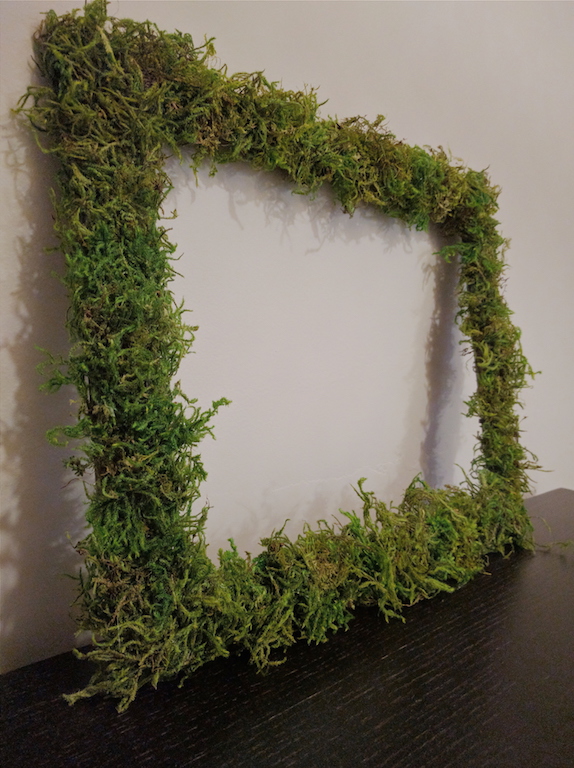
What do you think? For about twenty minutes and minimal effort, I'm not disappointed in the least! Time to moss up everything I own... get it "moss up" ...like, "mess up"..?

Living Room Moodboard
As our final projects come to a close, I can finally begin to dive into decorating our spaces. Most of our rooms are very minimal in decor because 1) we actually do strive to live a minimalist lifestyle, so we don't gather much stuff anyway and 2) because any and all money has been going to bigger ticket items up until now.
We basically did our house in phases. This isn't that unusual, as probably a lot of people unknowingly do this, but here is a brief breakdown of our phases.
Phase 1: Basic aesthetic changes (smooth ceilings, paint walls and trim, update light fixtures, paint existing vanities)
Phase 2: Demolition and renovation
Phase 3: Decorate, fix errors in previous phases, final touches
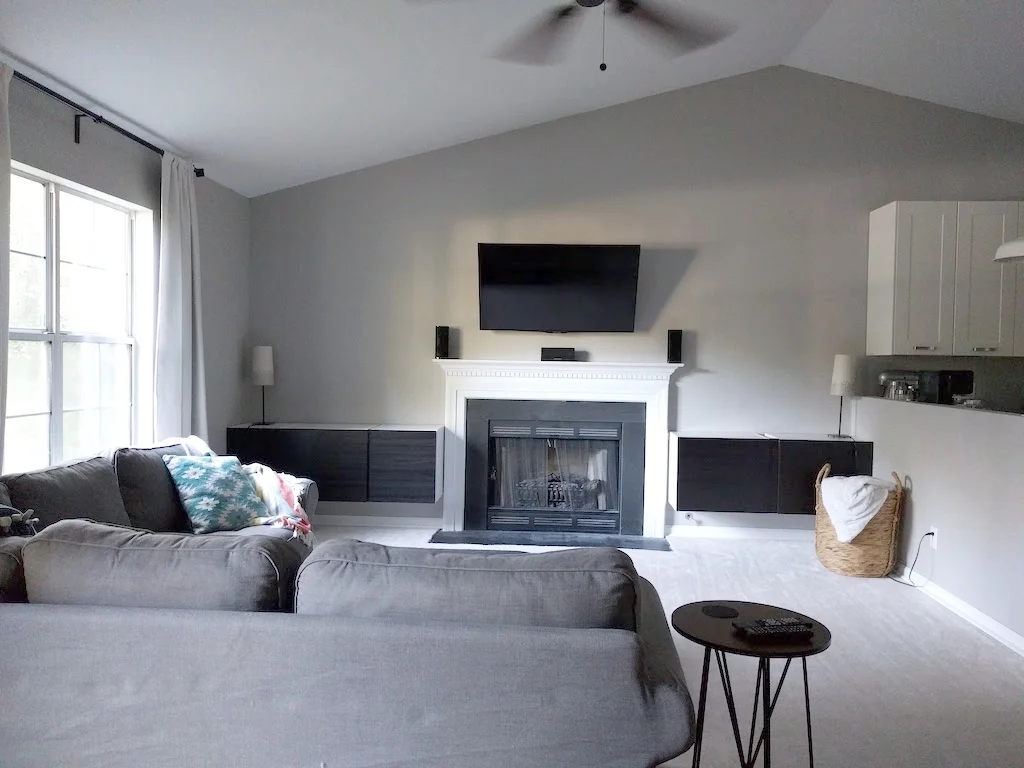
Here is the current state of our living room:
(and can we just swoon for one minute over the hidden cords?!)
Here are some ideas of how to brighten up our space and make it "ours":
Facing the other direction:
If you follow me on Instagram, you may have noticed our DIY coffee table - so that portion is already taken care of.
We are now on the hunt for the right lamps, chair, art, and throws. The colors I'm using bring such life and dimension to our otherwise boring space. It will still look very minimal, but put-together and welcoming. The mixture of textures - wood and ratan, metal legs, plant life, woven pouf, soft pillows, and warm lighting - create a good balance.
Part of me actually wants to create a huge gallery wall up and around the TV. What do you think of that idea?
Anyways, just a short and sweet update on our work-in-progress. Check out my Living Room Pinterest board for more ideas and inspiration (below). Have a happy week, friends!

DIY Geometric Pendant Light
My desk/vanity area in our bedroom is now at completion. I'll probably add a plant to the right of it and maybe hang a couple more items... but for the sake of usability and functionality, it's done-zo! The finishing touch was my light. I was (annoyingly) picky about what I wanted, but I found all the pieces (with the help of Tom of course) and got it done once we could take the time to swing by our IKEA. I saw a Pinterest photo that was close to what I wanted, but I didn't even pin it because I figured out how to accomplish the right look just by looking at it. I found the actual post (here) and Natalie's blog is actually really awesome, so I'm glad I did. She used this $23 cage light from Target and the EKBY VALTER bracket from IKEA (I used this smaller one).
Here's some glamour shots of this DIY in its finished glory:


Here's what we used to pull it off:
Gold geometric candle holder: Target $15
Edison bulb: West Elm $7 (on sale)
Fabric-twisted cord, plug, and socket: Vintage Wire and Supply $18
Wood bracket: IKEA Ekby Valter $2
TOTAL: $42
Honestly, now that I added this up, I'm really surprised! Ahhh whatever. It was worth it for the exact custom look I wanted. The bulb was honestly the hardest part to find. The actual work just took a few holes to be screwed (for the light socket and one for the cord). I also need to give a huge shoutout to Vintage Wire and Supply - they had great customer service, gave us more cord than necessary, and wrote "just in case you need the extra length" on a little card. They have a ton of really awesome products. I'm not being paid to say this, I was honestly just really impressed!
What do you guys think? I'm sure you could make it for far cheaper, but I'm kind of in love with all the unique elements we used.

Our $30 Fire Pit
Georgia is in prime fire pit weather right now. It's still pretty warm during the day, but chilly at night and since we are finally in the position to have a firepit (ie. we own a home and have some land), we decided to make it one of the first upgrades to our outdoor living. When we lived in apartments, we used to look up public places that allowed fires, but we never found anything. Finally, we can burn freely! Yet again, I'm coming to you with some thrifty, amazing finds.
You know those big, metal barrels that are stereotypically used by homeless people in movies to keep warm? Well, this guy was selling those cut in half, with holes (for ventilation) for $20 on Craigslist. Of course we went out right away and got one. Like many other typical house things, we also didn't have a shovel to dig it into the ground. I've said it before, and I'll say it again... ReStore!!! They had what looked like a truckload of brand new shovels for $10 each.
With these items in hand, we made our way home. Thomas dug a hole, and made sure to get airflow to the bottom of the barrel (where there is a hole with a grate over it). Next, we gathered up some paving/landscaping stones that were around little patches of landscaping in the backyard. We're going to re-do the landscaping in the backyard anyway, so it was a good way to repurpose the stones for right now.
Until we want to spend the money on nicer, matching blocks, this one will work great as a more rustic version. Seriously guys, a kit that comes with blocks and a metal ring at Home Depot will run you $200. For $30, I have no complaints and am ecstatic that we have a secluded little place for a fire, drinks, and s'mores.
So there you have it!
Metal half-barrel : $20
Shovel: $10
Paving stones: FREE
TOTAL: $30

Wood Feature Wall
Welcome to "the office"... better known as "the room that happens to have an unused desk in it and so it's laying bare until it one day becomes a nursery." We have a three bedroom house in a split level home - all of the bedrooms fan off from the upstairs landing. This little room currently has no use. However, it will eventually have use, so we puttered with ideas of how we can make it unique while still following suite with our vision to have a brightly lit home. Currently, the entire house tends to follow a brown or dark tan color scheme and we want to go as light, bright, and airy as possible (wait till you see our master). While browsing through Pinterest and Houzz, we came across rooms that had wood accent walls. Wanting to stick to a lower budget, we decided we would ONLY pursue that idea if we could find some wood floor or pallets for cheap.
Only days after making this agreement, I happened upon a ReStore by Habitat for Humanity. Lo and behold, they had unopened boxes of wood flooring for $15 per box (so cheap!!). I called Tom and told him what I found and he raced over on his lunch break to see for himself. There wasn't enough of one color to fill the whole wall, so we settled on two (dark brown and tigerstripe). They are actually real bamboo and much harder than typical wood... and this turned out to be a bit of an issue.
We had no idea how difficult this would prove to be...
First we had to measure and cut all of the boards into smaller pieces. Next, we decided on a "random pattern." Then we put "liquid nails" glue on the back, placed them on the wall, and used a nail gun (with a separate compressor) to attach them to the studs in the wall.
The thing is... we had to go through about four different nail guns before we found one that could handle the hard bamboo. Even the heavy duty gun that needed a mallet to shoot didn't work! Basically, it took over a week to finish this wall because of trial and error. Nevertheless, it is finally done, and we are very happy with the results... but we're more happy that it's just DONE.
What do you think? We painted the walls white, and when colorful decor eventually plays a part in here, it'll stand out so beautifully between the wood and the white. Also, can we just take a moment and appreciate those smooth ceilings? This room is so bright now. We are constantly remarking how dark it seemed and what a bright, fresh coat of paint can do.
Today we're trying a link-up for the first time, so go check out all the great links here.

How To Paint A Ceiling Fan
Ceiling fans are weird. Honestly, it is so hard to go into a home improvement store and actually say the phrase, "Ohhhh that ceiling fan is gorgeous!"
They're fans, and they aren't super attractive.
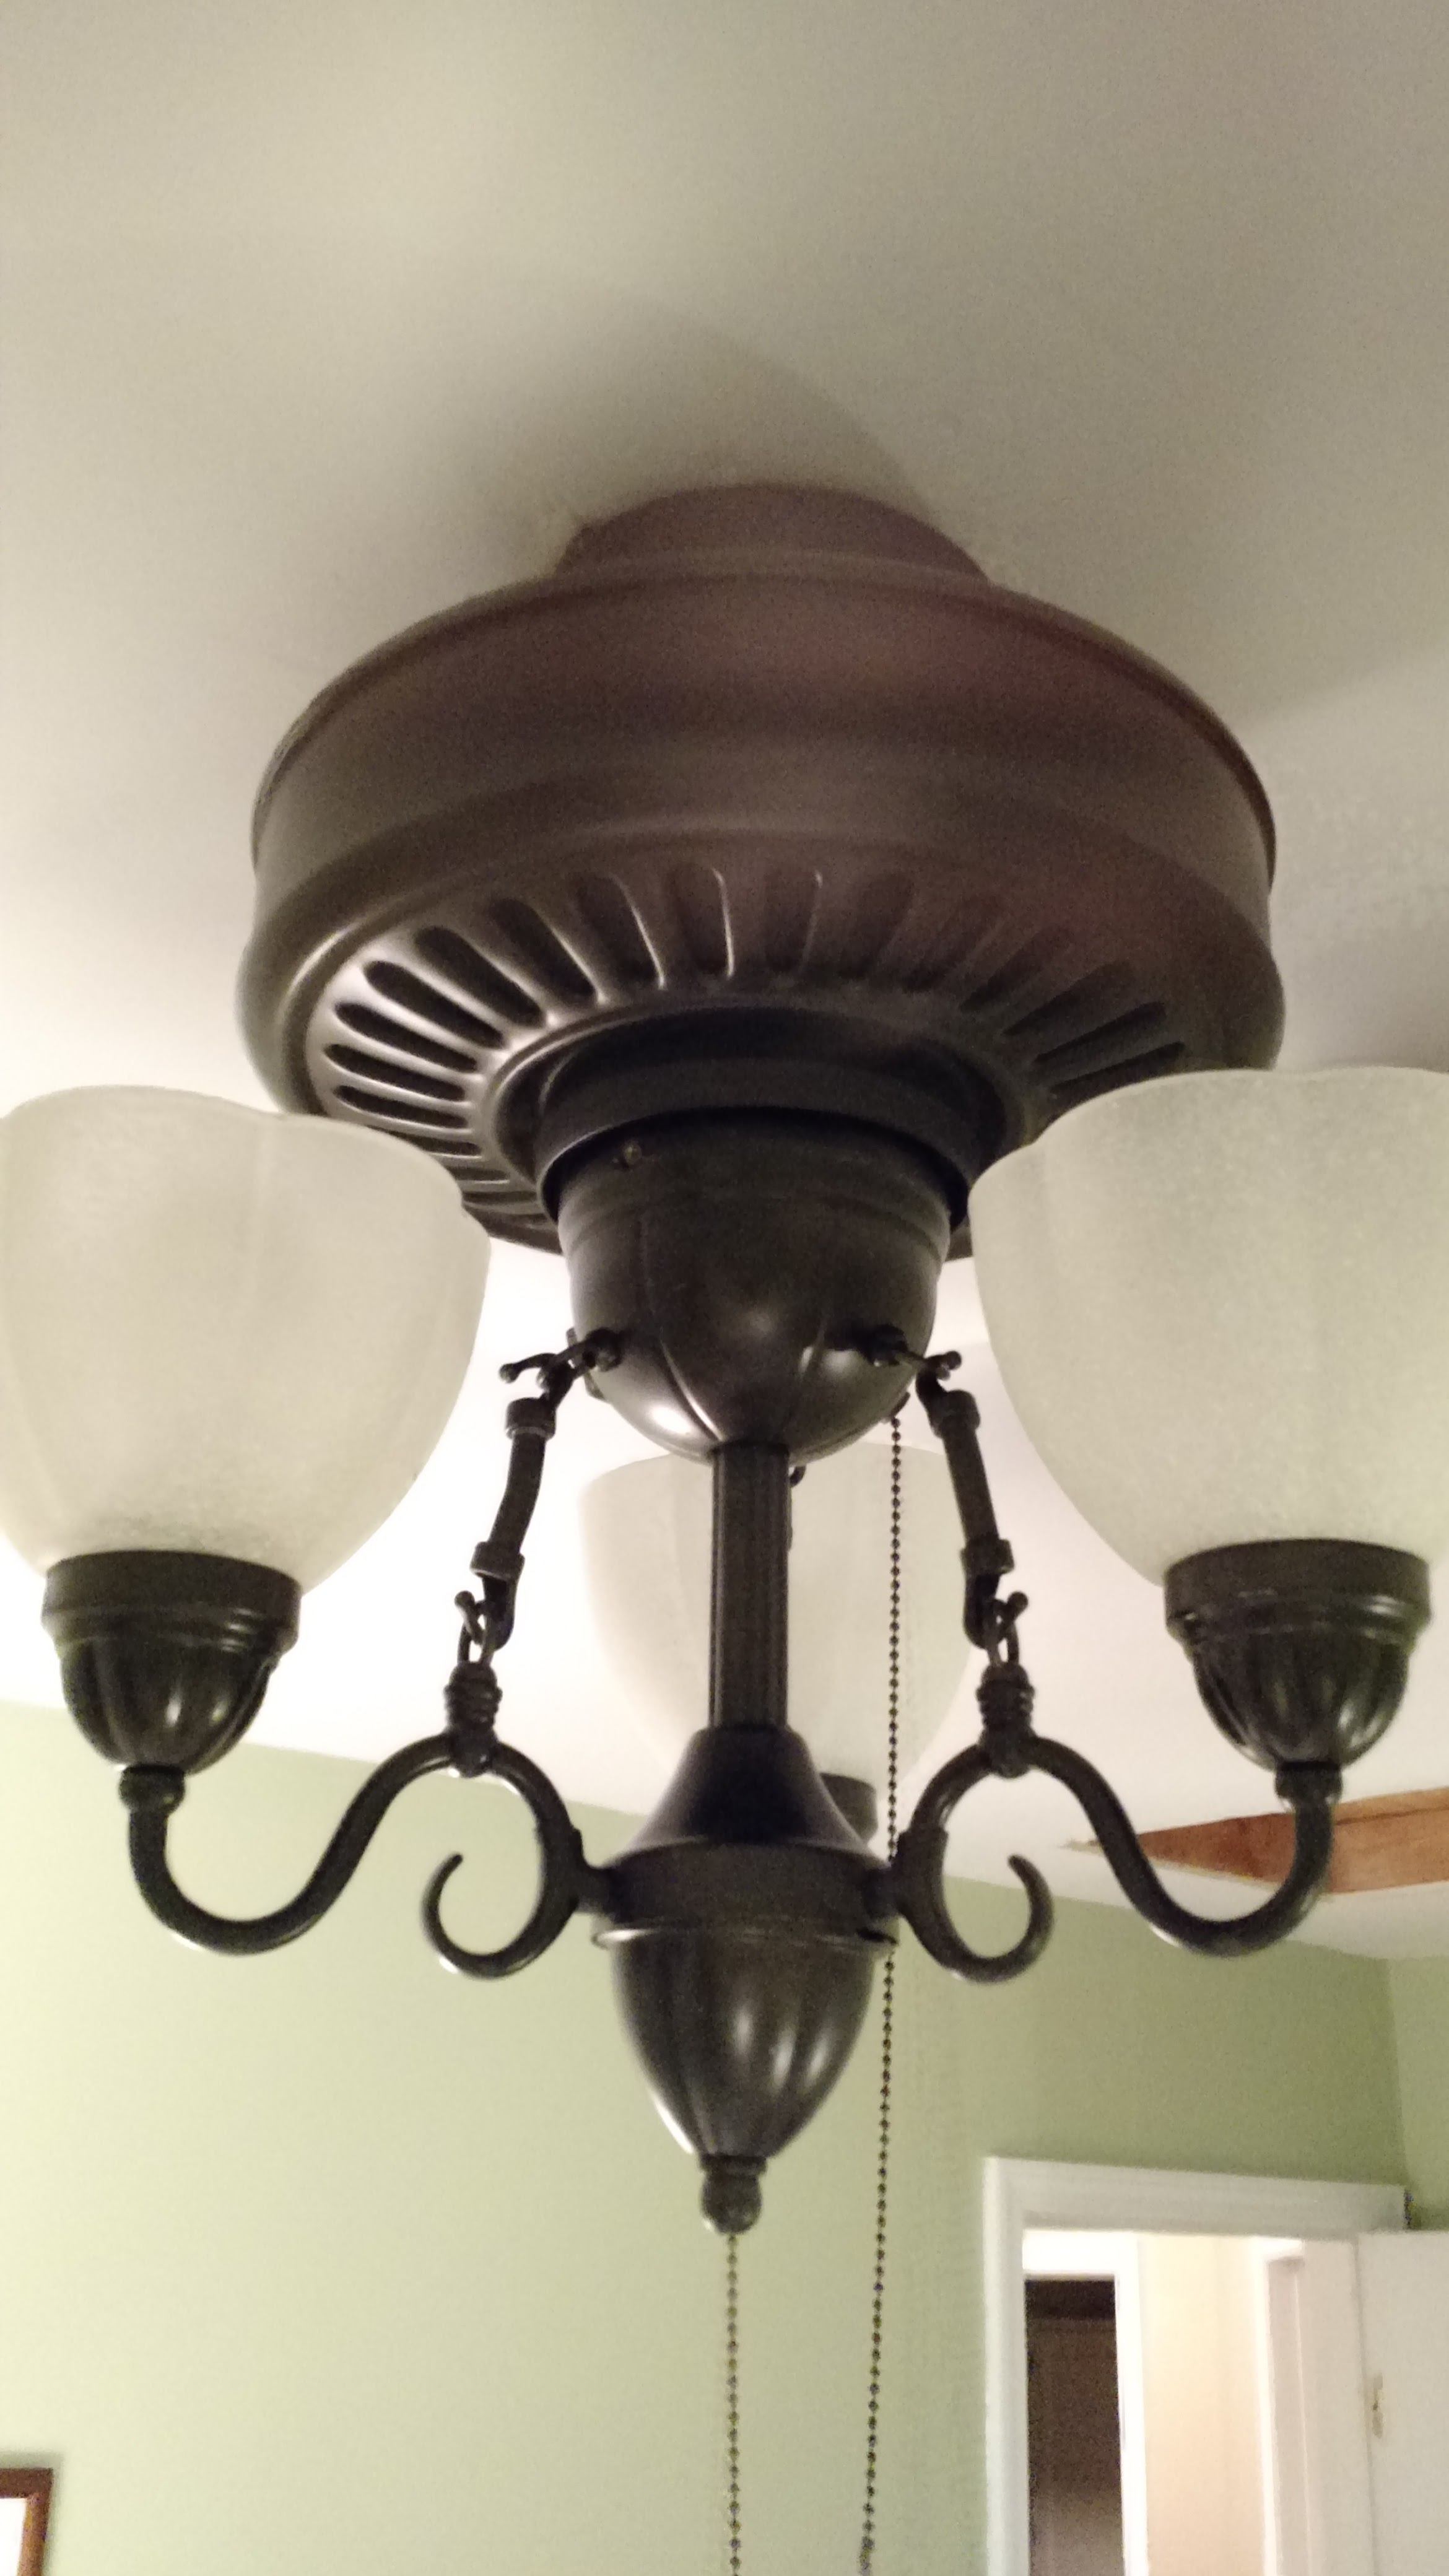
That being said, we had been really on the fence about keeping the fans throughout our home (they're everywhere). In the guest room, the temperature tends to get a little warm because it's the only room in the house that gets a lot of light, so we are for sure going to keep one in there. Below is said fan:
Personally, I found the dingy, brushed silver to be pretty ugly... and in general, this fan has such weird curves to it. Of all the ugly fans in our house, this one was the ugliest (Tom disagreed). When redoing the guest room, after much discussion, we decided that instead of spending money on new fans, we'd just try to "update" them a little. Though ugly, the quality of them are actually pretty good. So until we could throw down a lot of cash on better looking, high quality ones, we're fixing up these babies.
I have to admit though, I really didn't think about the fact that you actually need to take the entire fan apart in order to spray paint it (oops!). Tom was all duh... did you just want to tape it up, spray paint it, and let it goop up all the gears?? And I was like uhhh... oh right, can you just like take it apart though? thankkksssss..
This guy puts up with me and I'm super blessed. Taking apart a fan and putting it back together is actually a real pain in the tush (not that I would know.. but Tom said it stunk).
Anyways, I found this color of Rustoleum on Young House Love when they sprayed some hardware on their door handles and such. It looked really great on their post and since I don't know the first thing about spray paint, I went with it. Here's a few photos for your general enjoyment:
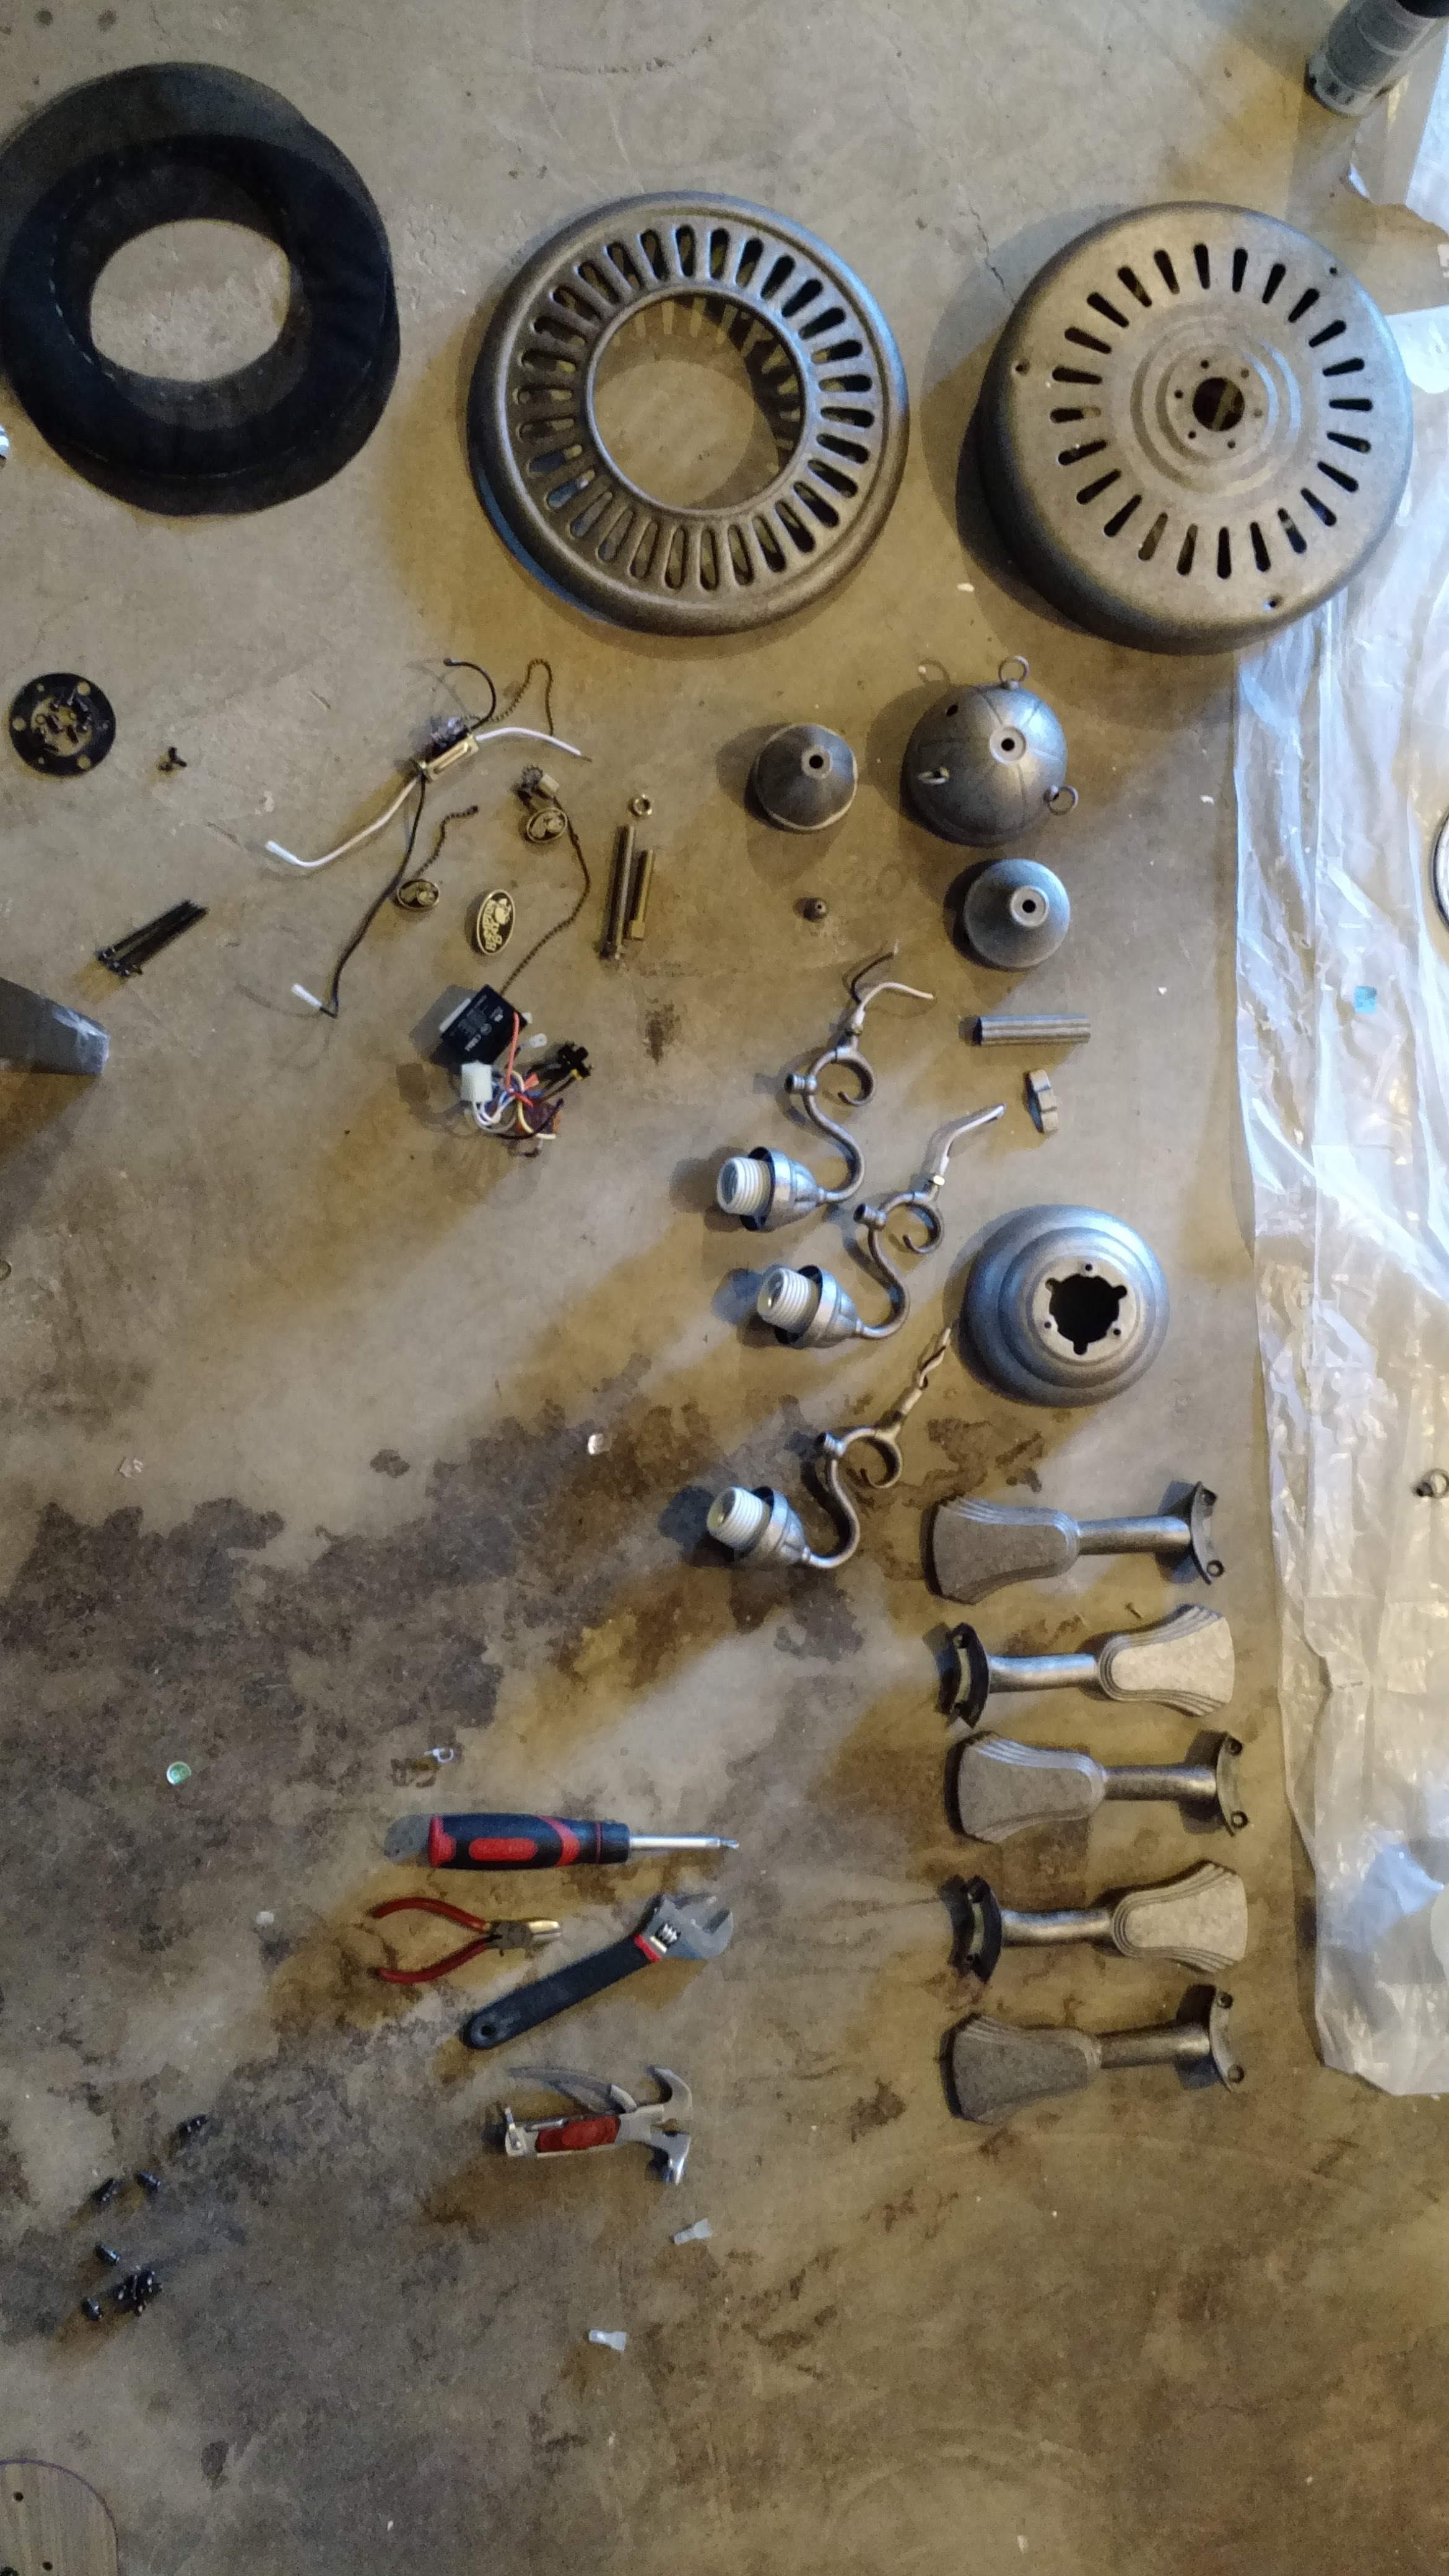


After a good 24+ hours to let them dry, Thomas got to work putting it back together.
The thing we loved about this color is that it isn't completely matte (which I thought I wanted). It gives off just the smallest hint of bronze metallic... we both really love the final product.
What do you think? Big improvement, or not so much?