

IKEA Kitchen Features We Love
I am not receiving any commission for this post. These are truly my honest opinions, and I want to clarify that before I speak super highly of IKEA's kitchen system :)
Remember when I told you how much our kitchen/downstairs reno ended up costing us? It was less than $8,000 for a total gut job (here's the breakdown post). I'm sure some people would read that and think, "Well, that's because you're totally sacrificing quality!" but I want to take today to bust that myth and share with you our favorite features of IKEA kitchens. To be completely honest, we would 100% go with the IKEA kitchen systems again. The pros FAR outweighed the cons and we have been thoroughly impressed. I'm not just saying that now, when we have a great kitchen to get all *heart eyes* over, but the entire process from beginning to end was just smart, efficient, and great for those of us who are control freaks. Let me just jump right in:
Modular System + Online Design Tool
Not only are IKEA systems completely modular - meaning, they have enough dimensional diversity to be mixed and matched to fit any requirements - the online design tool allows you to create your kitchen entirely from scratch (or from a template). I have tried the design tools for other large home improvement stores, and I can tell you that none of them can beat IKEA in terms of ease of use and functionality. Sure, sometimes it's slow and freezes up, but it's not nearly as rip-your-hair-out annoying as the other places. Plus, based on your room measurements, you'll see notifications when one cabinet is too close to another and may cause doors to hit something or not open properly. You can also change door fronts, countertops, handles, etc... in one fell swoop and see your itemized list and total cost whenever you like. The modular system came in very handy when we made a measurement mistake and one of our cabinets wouldn't fit. We simply took back the one that wouldn't fit, and bought a different size - voila! - crisis averted.
(I should also mention, they even have a design tool for bathroom and office renovations)
Cost
Obviously. We did our renovation - cabinets, countertops, lighting, everything - for under 8K. When we had a similar, smaller layout quoted at Home Depot, it clocked in at 12K.... just for the cabinets... which were lesser in quality to the ones we got from IKEA. Yeesh. Which brings me to my next point...
Quality
The quality of IKEA cabinets is not the highest on the market, of course, but they are really sturdy. We're not at all worried about the wear and tear. And even then, if one of the fronts gets wobbly or a drawer track breaks, you can easily buy replacements or let it fall under IKEA's 25 year limited warranty. But again, they don't at all feel "cheap" and we love the quality.
Ordering, Set-up, and Rail System

When you make your order in-store, the workers are knowledgable and will go through each and every piece to make sure you will have everything you need. It takes a couple hours to go through it with them, but considering it costs nothing extra to have an experienced worker make sure your design is okay, the time spent is fine by me. They tell you about shipping options or pick-up FYI's and it's very smooth sailing.
It's also super nice to have your entire kitchen before you even start your demo work, just waiting to be put together. Which by the way, though time consuming, is SUPER easy and helps save you moolah.
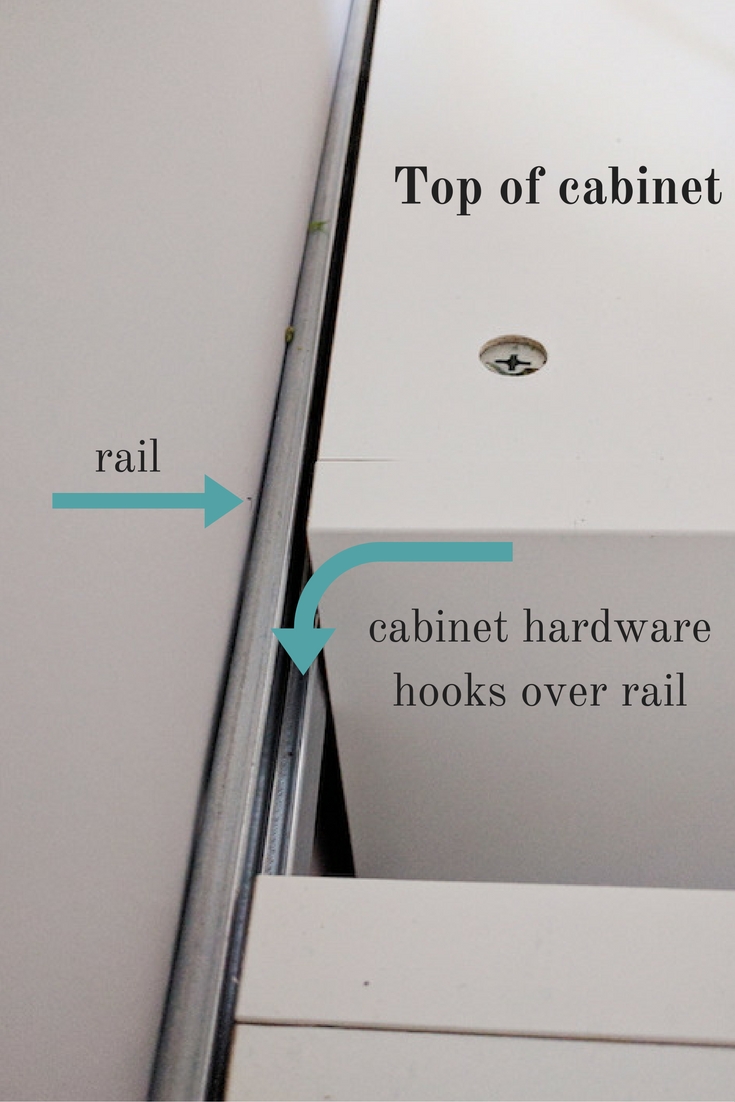
The rail system is amazing. Ever thought about that fact that wall cabinets are actually hung on a wall one at a time? Getting them all to line up and not start sloping down or up can be really hard. IKEA comes with these long rails that you simply screw into some studs, make sure it's level, and then slide your cabinets on. It makes it so easy and less stressful. Of course it still takes some measuring to be sure your cabinets are the right height from the counters, but it's much nicer than their competitors. Oh, and the base cabinets are rail-hung too!
Door Hinges
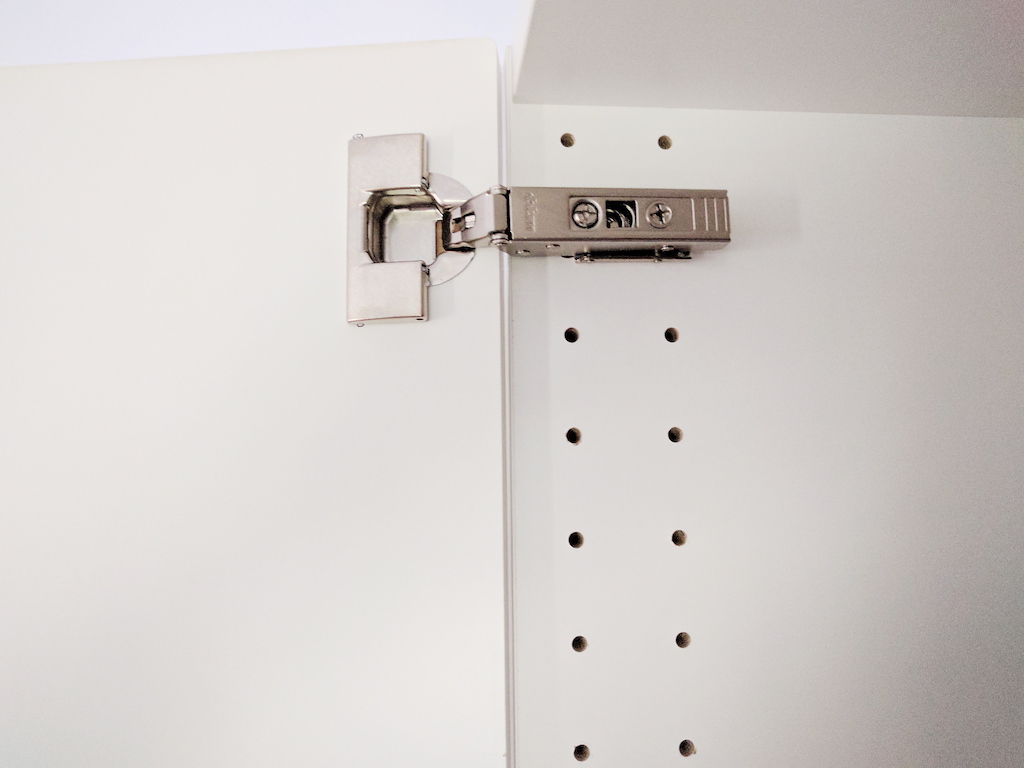
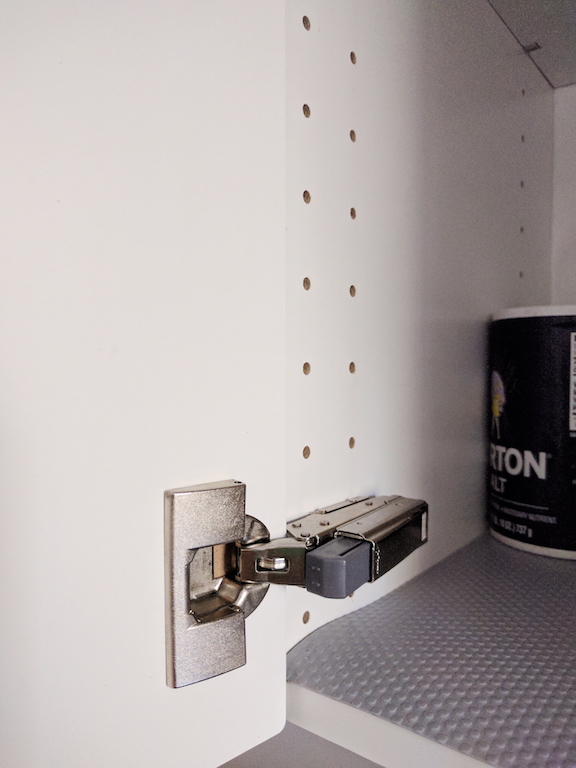
I'm not all that great with power tools, but IKEA's hinges are so ingenious. The holes on the frame of the cabinet are already there which makes screwing in the hinge a piece of cake. On the door front, you just push a metal piece in place (no tools required) and it tightens itself. The piece on the front, snaps easily into the piece on the frame, and you're done. Once it's on, you can use a small screw driver via two holes on each hinge to adjust the door front so it's exactly centered on the frame or lined up with the other cabinet doors. Then, you can add a small "soft close" clip to one of the hinges to finish it off. We probably put all our door fronts on in less than twenty minutes. If you're curious about what I mean, this guy's 2 minute video shows you how easy it is. Honestly, it's almost therapeutic to put on these hinges because it's so painless.
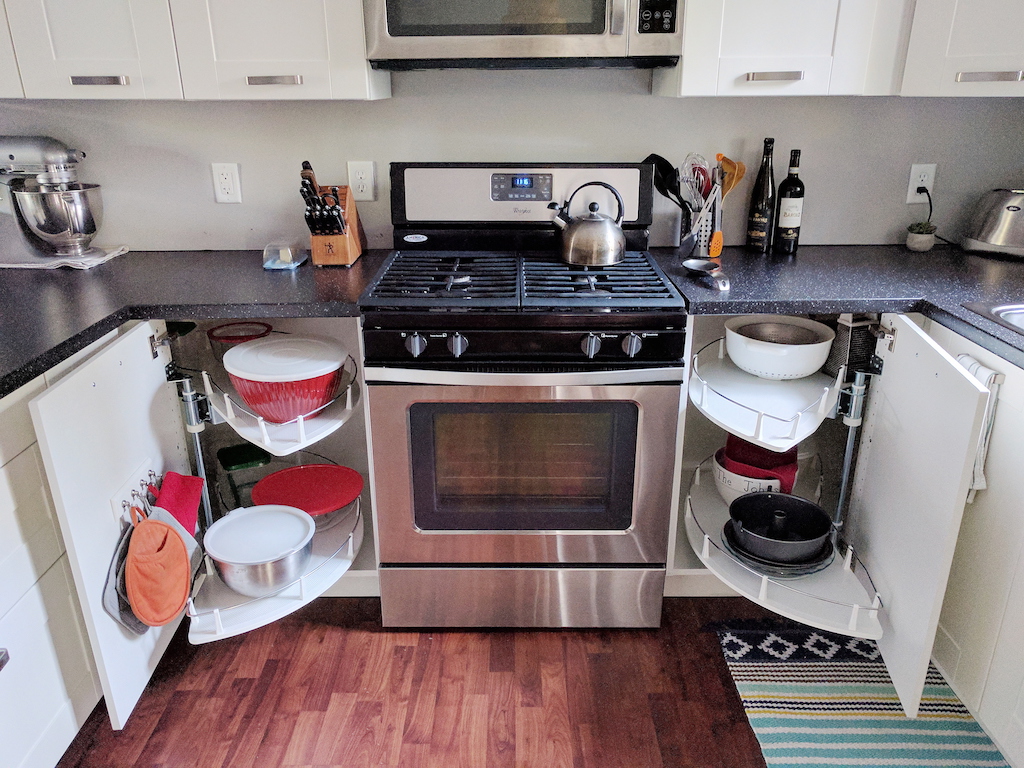
No Gaps, Lips, or Separators
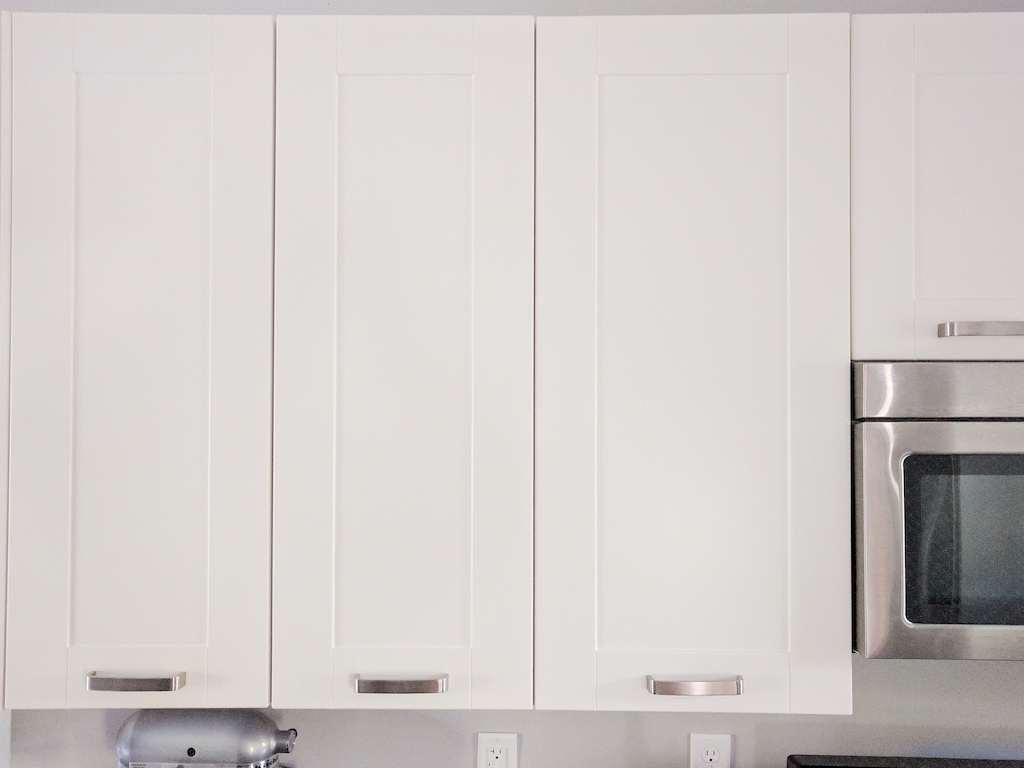
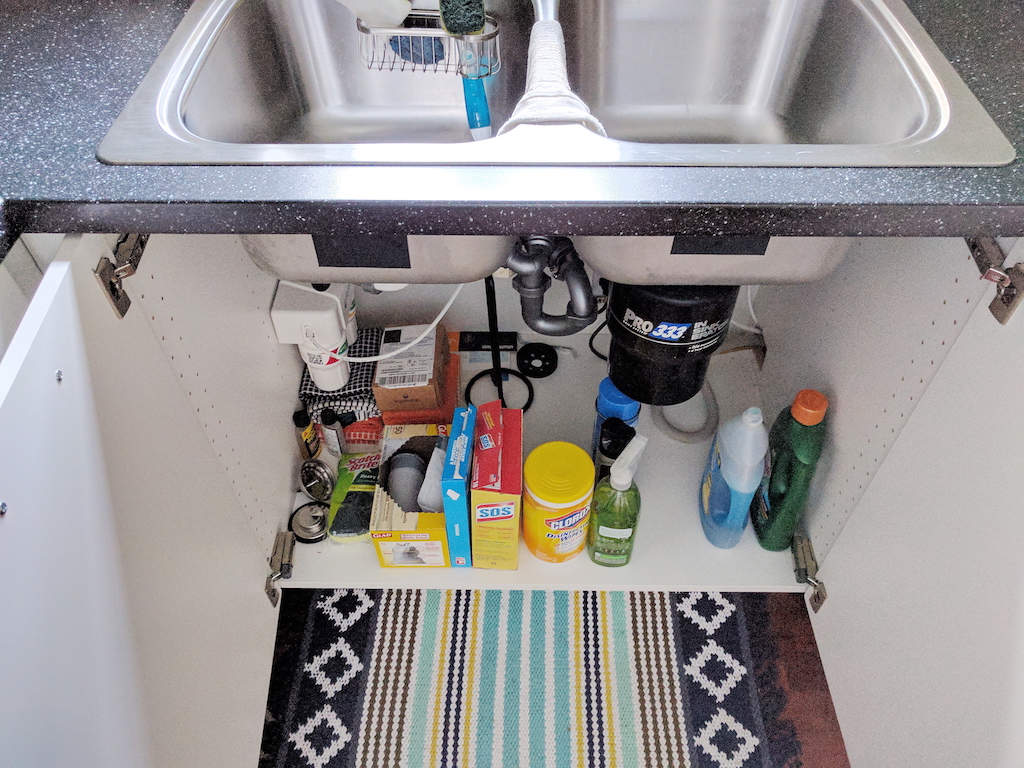
No gaps, meaning all your doors are flush with one another. There are no wood gaps that show between the door fronts.
Along with that, there are also no lips on the insides of the cabinets. So when you pull a glass off a shelf, it will slide right out instead of hitting a lip on the bottom of the shelf or on the side of the cabinet.
Have a two-door cabinet? There won't be a piece of wood running down the center. I love this feature especially under our sink as it makes organization super clean and simple. Tom loves it because if he needs to work on plumbing under the sink, he doesn't have to squeeze into one side. He can open both doors and have free range to lay underneath!
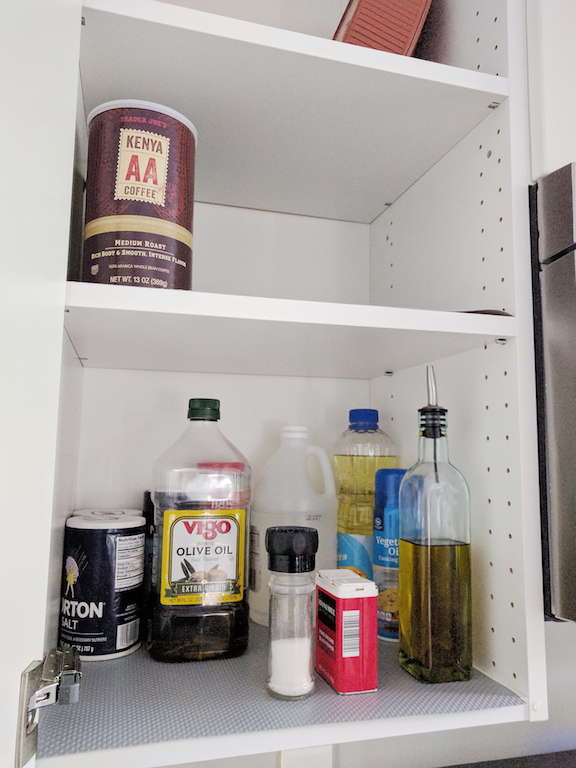
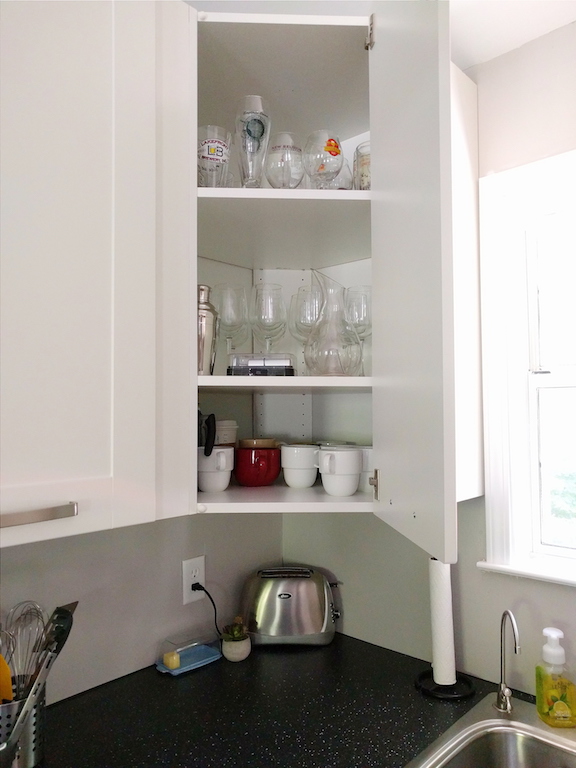
Wall Cabinet Depth of 15"
The standard depth of most wall cabinets is 12-13" (I believe) but IKEA's are 15". Meaning, I can fit one stack of plates in the back of a cabinet, and still fit another stack in front of them. If we didn't have a pantry, the depth of those cabinets would be such a life-saver in terms of storage. I absolutely LOVE the added depth.
Drawers, Drawers, and More Drawers
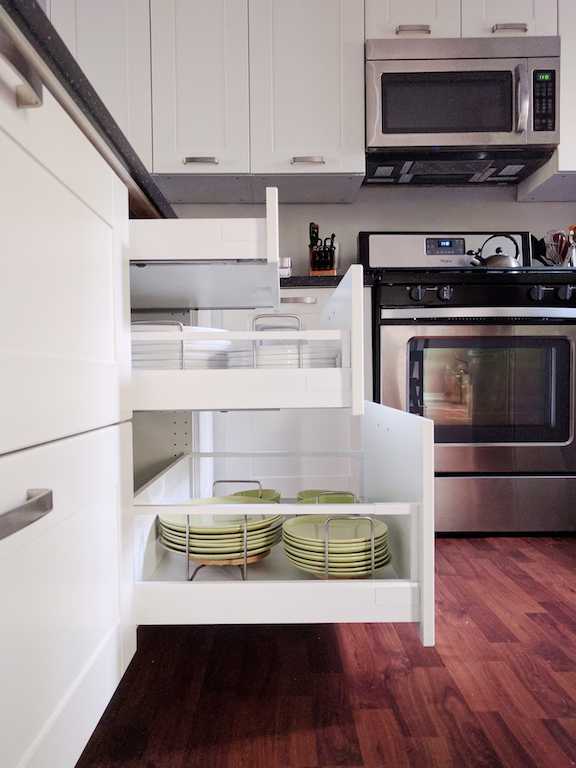
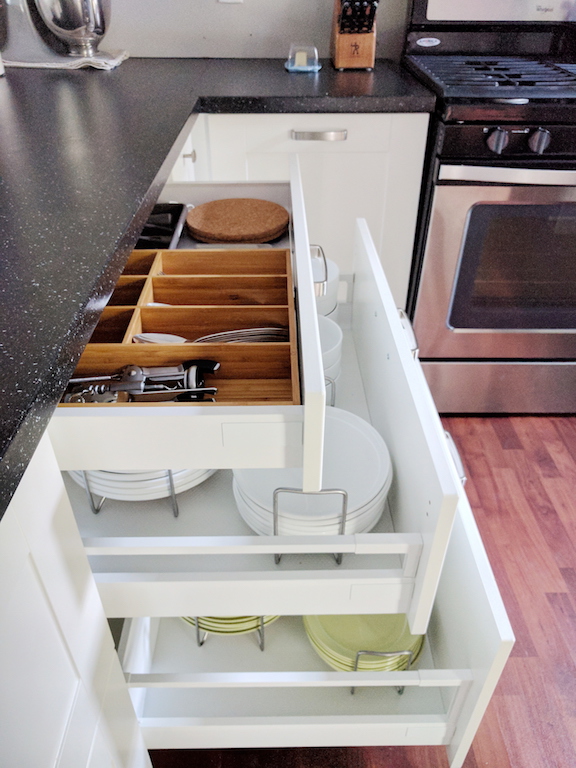
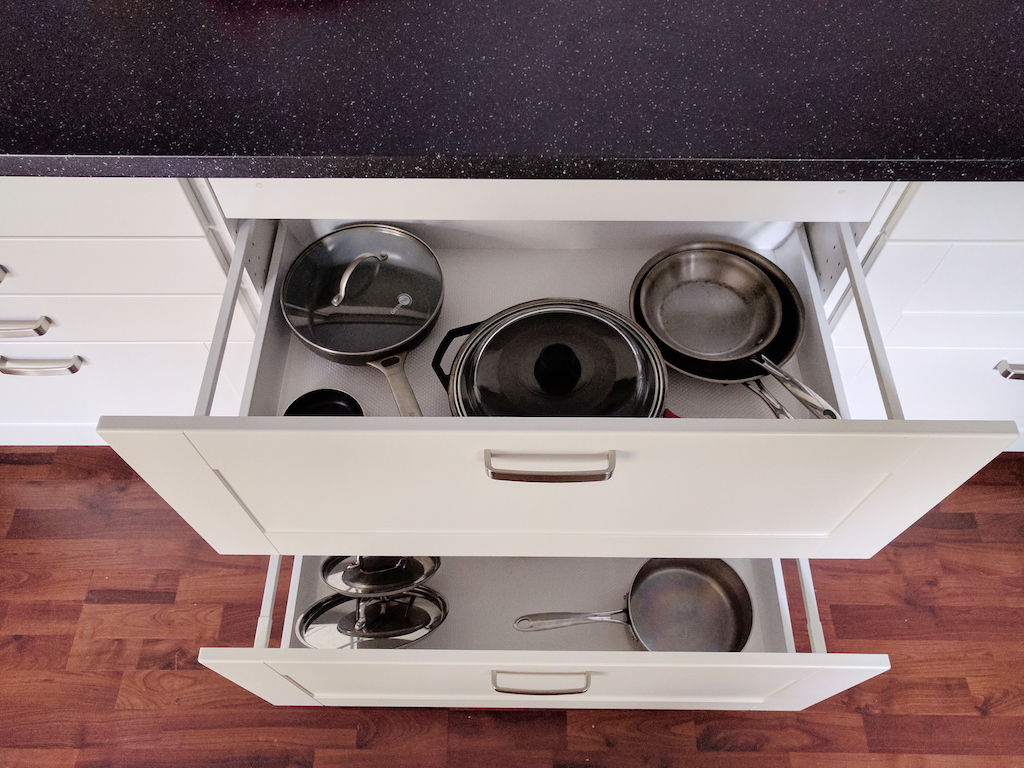
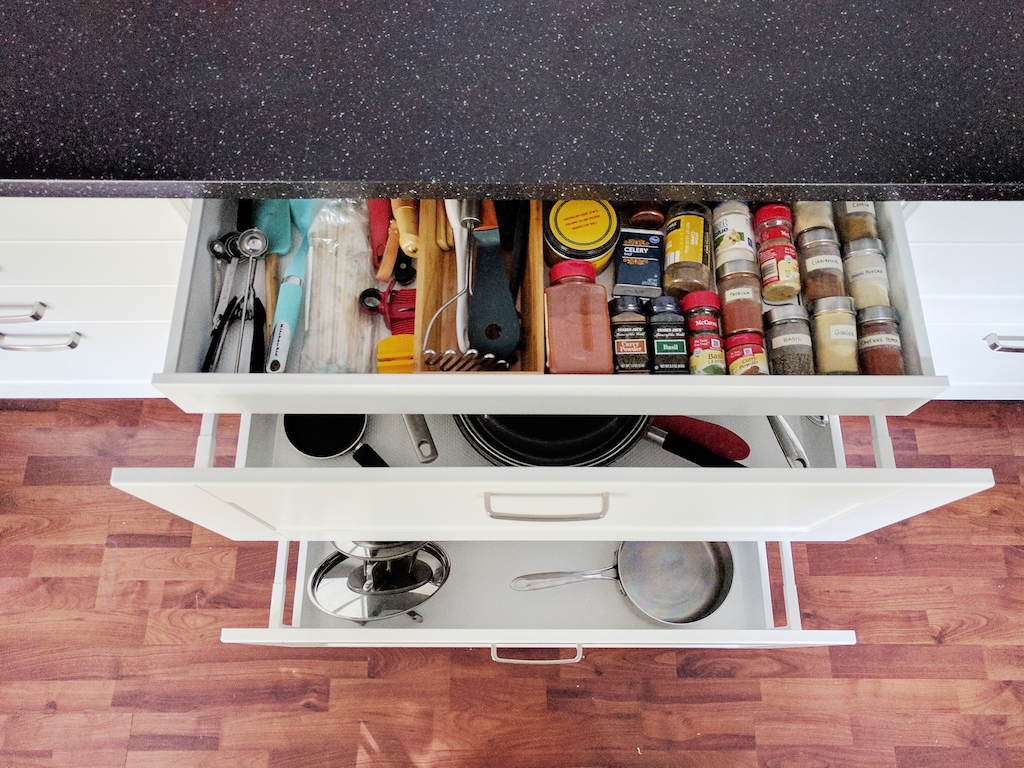
Our base cabinet drawers. I am in love. Nothing like not having to dig to the back of a cabinet on your hands and knees to reach that big stock pot. Guys, they come all the way out. It doesn't stop with 2 inches left to go, they go all the way. Drawer organizers, corner pull-out lazy susan, etc. The organization of the base cabinets is the greatest. They are also soft close and can come with hidden internal drawers too. Endless options and combinations. Which again, on that subject...
Easy To Change
Don't like the door style or colors? Just get some new fronts instead of scrapping the whole thing. Not crazy about the drawer configurations? We could swap the drawers of our two 30" wide base cabinets anytime, or just go buy entirely new drawer combos in that width whenever we'd like. No problem! Anything can be undone with such ease and adjusted after the fact with no repercussions.
Countertops
We paid only $250 for probably 45 linear feet of counterspace... which is amazing. Most of IKEA's countertops would require you either cut and install their laminate options yourself, or hire someone to do it for you. We honestly love the quality of their laminate. We cut and installed ourselves, and it doesn't look cheapy to us at all. I think if you live in a great big home with top tier features, a stone or solid surface would make sense, but not in our little starter home :) We also don't give two hoots about the hoopla behind granite, so we'll gladly stick with a nicely done laminate. Plus, if it gets ruined, or we tire from the look, it's only $250 to replace or update!
However, IKEA does offer quartz and acrylic options that they do through area third parties who will measure, cut, and install for you.
I'm sure once I hit publish I'll think of even more reasons we love our IKEA kitchen, but this is what I've got for now. We are so happy and grateful to have this wonderful kitchen at our fingertips each day. We feel like home chefs and somehow even just pouring a bowl of cereal feels fancier now! As I read this post over to Tom a few moments ago, he said he would add that even if IKEA were more expensive than their competition (Home Depot, Lowes, etc) he would still get IKEA again. The quality is better and the overall features and how it's put together are just smart.
Looking to do a kitchen renovation with IKEA and have some questions? Leave me a comment!

Cost Breakdown : The Kitchen
So renovations are supposed to be this crazy financial burden, right?
Well, yes and no.
No doubt, this renovation was the most costly update to our home, but it was a fraction of what it easily could have been. In fact, when we had Home Depot and Lowes give us a design and estimate, it was well over 12K for the cabinets alone (and they were using smaller room measurements than we ended up with).
We still have a few small bits and pieces to add, of course, because curating your home from a blank slate takes time. We are still learning our style, but we definitely lean towards a mid-century modern minimalist look. It's important to me that the items I put on display are meaningful or serve a purpose. I'm just not one who cares for excess :) There is nothing left to do in this home that is necessary for living our daily lives, though, so it is nice to relax and enjoy finding those final little pieces as they come.
However, now that this project is behind us, I have gone through and sorted out all the costs and will be breaking it down for you. I have not been shy about telling our real life friends how much this thing was, mostly because I think people really should know that a kitchen renovation does not have to cost an arm and a leg. Granted, we saved boatloads by doing it ourselves, but even then, we really hunted around for the best quality for the best price, and I'm thrilled with how it all turned out. I'm super satisfied with IKEA... not only their products, but their customer service. The process for this project (especially since it was DIY) meant we had to have a lot of involvement. IKEA is well aware of the fact that their customers may be doing this themselves, so they are happy to answer any 'dumb' questions concerning installation or what each item listed is used for. That being said, living 40 minutes away from a store was pretty essential to our success with them. For more photos, see the reveal post.
Okay, okay. Enough yammering on... here is the cost breakdown:
Demolition
Blades: $12
Brown paper & tape: $15
Trash bins: $20
Shop Vac & filters: $65
Total: $112
Ceilings
Scaffolding: $0 (We owned a ladder and a bunch of weird wooden island things that came in super handy)
Mud: $35
Industrial sander (rented): $50
Primer: $30
Paint: $40
Total: $155
Walls
Materials for half-wall: $60
Drywall: $70
Mud and tape: (used what was left from ceilings)
Primer: (used what was left from ceilings)
Paint: $80
Trim paint: (already owned from previous projects)
Outlets: $100 (switches, covers, GFCI, boxes)
Electrical: $200
Trim brush: $6
Paint rollers: $10
Total: $526
Plumbing
Piping, valves, p-trap: $160
Total: $160
Appliances
Stove: $499
Fridge: $979
Microwave: $250
Garbage disposal: $50
Sink: $180
Already owned faucets and dishwasher.
Total: $1,958
Other
Cabinets (including handles): $3,900
Countertops: $256
Lighting: $140
Ceiling fan: $35
Misc decor (towels, placemat, planter, drawer liners, utensil trays, plate holders, spice holder and bottles, cutting boards, coffee container, candles, etc..): $300
Total: $4,631
GRAND TOTAL: $7,542
The pictures really don't do this place justice. Our cabinets are huge and very sturdy, our appliances are wonderful (yay for an ice machine!), and the counter space has made such a monumental difference in how we prep and cook.
So for less than 8K we completely re-did our kitchen and part of our living room (it still needs some built-ins on either side of the fireplace). Again, thousands were saved by the fact that we did not hire out for any of the work, but regardless, we did such in-depth research on how to pull this off without breaking the bank and I am pretty proud of how it turned out.
Do you guys have other questions about this project? I would be more than happy to cover any specific topics that you are wondering about!

Kitchen Reveal
It's been quite the journey to get to the kitchen renovation finish line, but we have made it... and in pretty good time, if I do say so myself! We have been up and running for a couple of weeks now, but just recently scored some awesome deals on new appliances that we had been waiting for. These deals showed up earlier than expected, and what's better, if the prices go down at Best Buy or a competitor in the next 45 days, they'll match it.
I'm not being paid to say this, but I gotta give a little plug to Best Buy. They were incredibly easy to work with and their price match guarantee was super easy. They didn't even raise an eyebrow when we showed them a price almost $200 under what they were charging. Then, at no extra charge, they had our new appliances loaded into our house about 48 hours later. It was amazing!! I just think it's important to acknowledge great customer service that goes beyond what's expected and they certainly proved that to me.
Back to the reveal and the photos... because let's be real, I'm lucky if you're actually reading what I'm typing right now. You're here for the pictures, I know, I know.
If you need a refresher on the progress photos try Progress 1 and Progress 2.
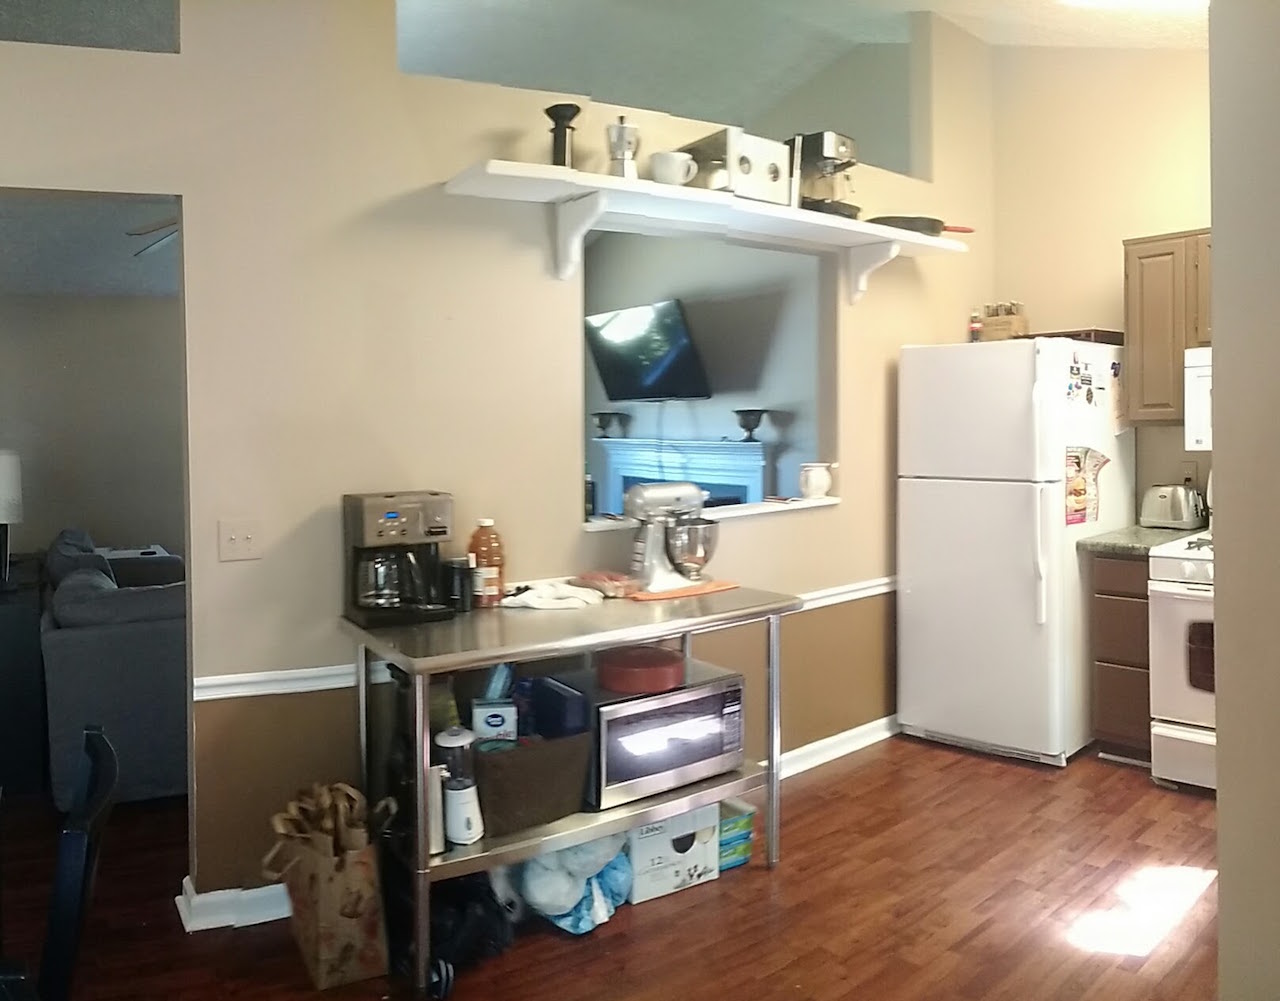
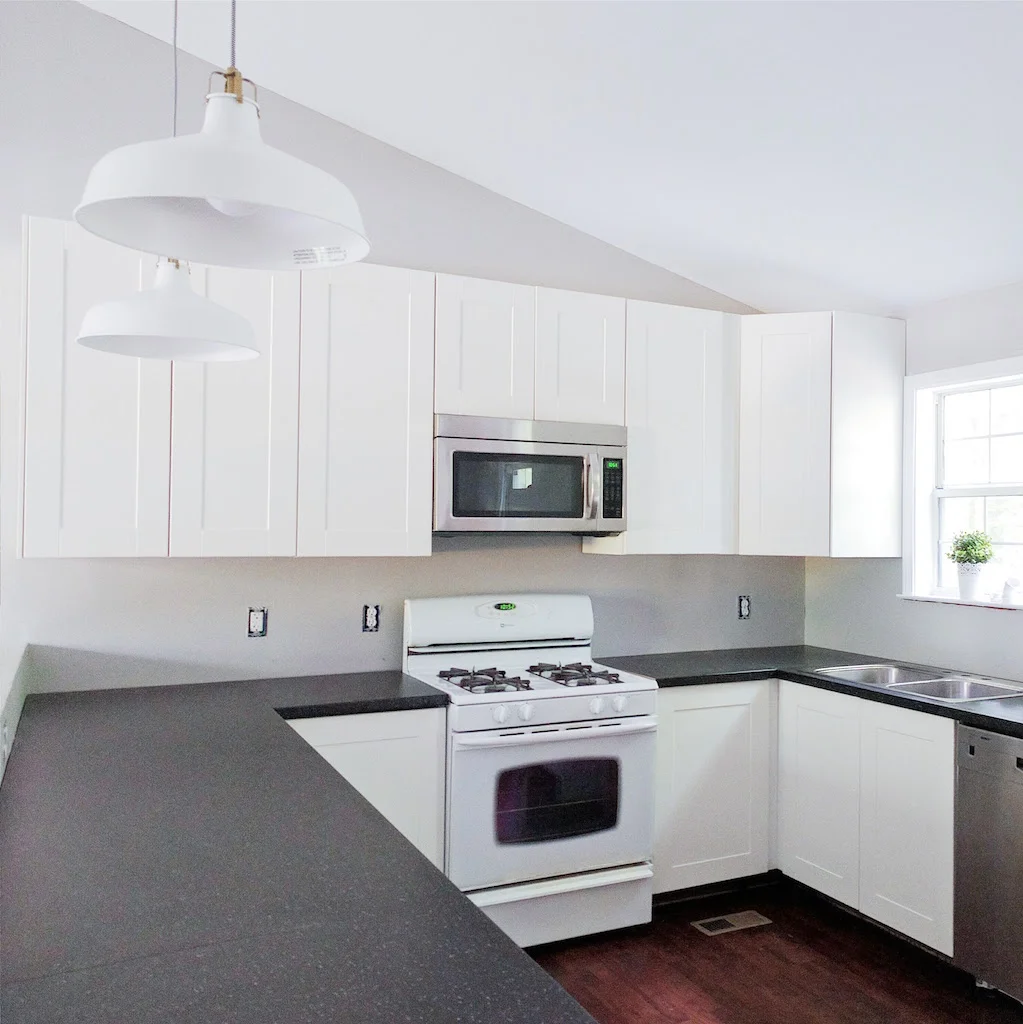
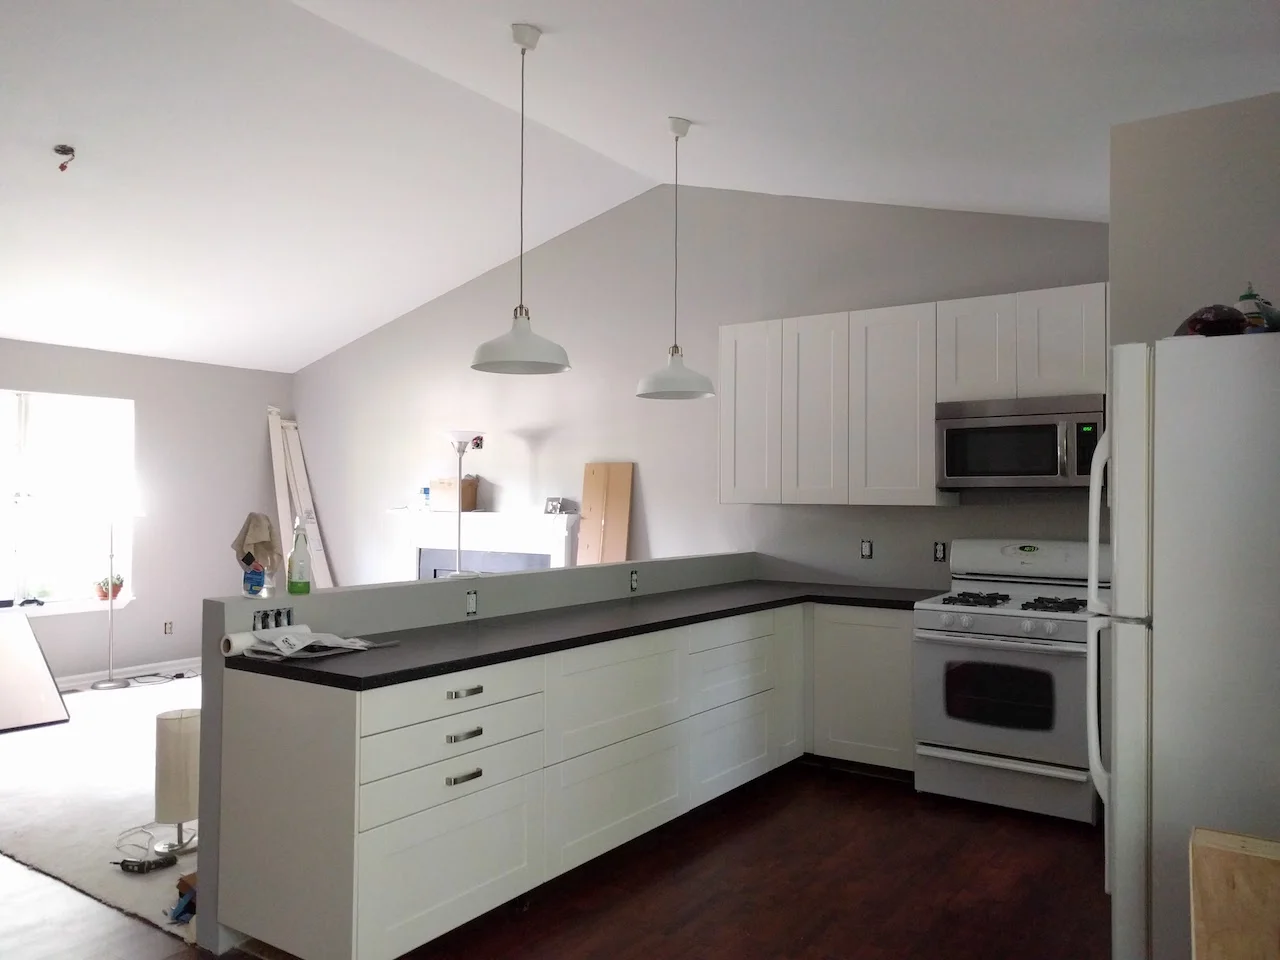
Keep in mind, we still have some pieces to add in terms of decor and a backsplash and so on, but now that we're able to use the space, those things can come along later - bit by bit. And if you're wondering at all where something is from I'm just gonna go ahead and simplify the answer for you: IKEA. The lights, the counters, the handles, the table, the couch... There are some exceptions, but I actually chuckle a little when I look around and am surrounded by IKEA! I am soooo happy we chose them and I'll get more in depth on that in another post.
Okay, okay, now I mean it... PICTURES (click to enlarge):


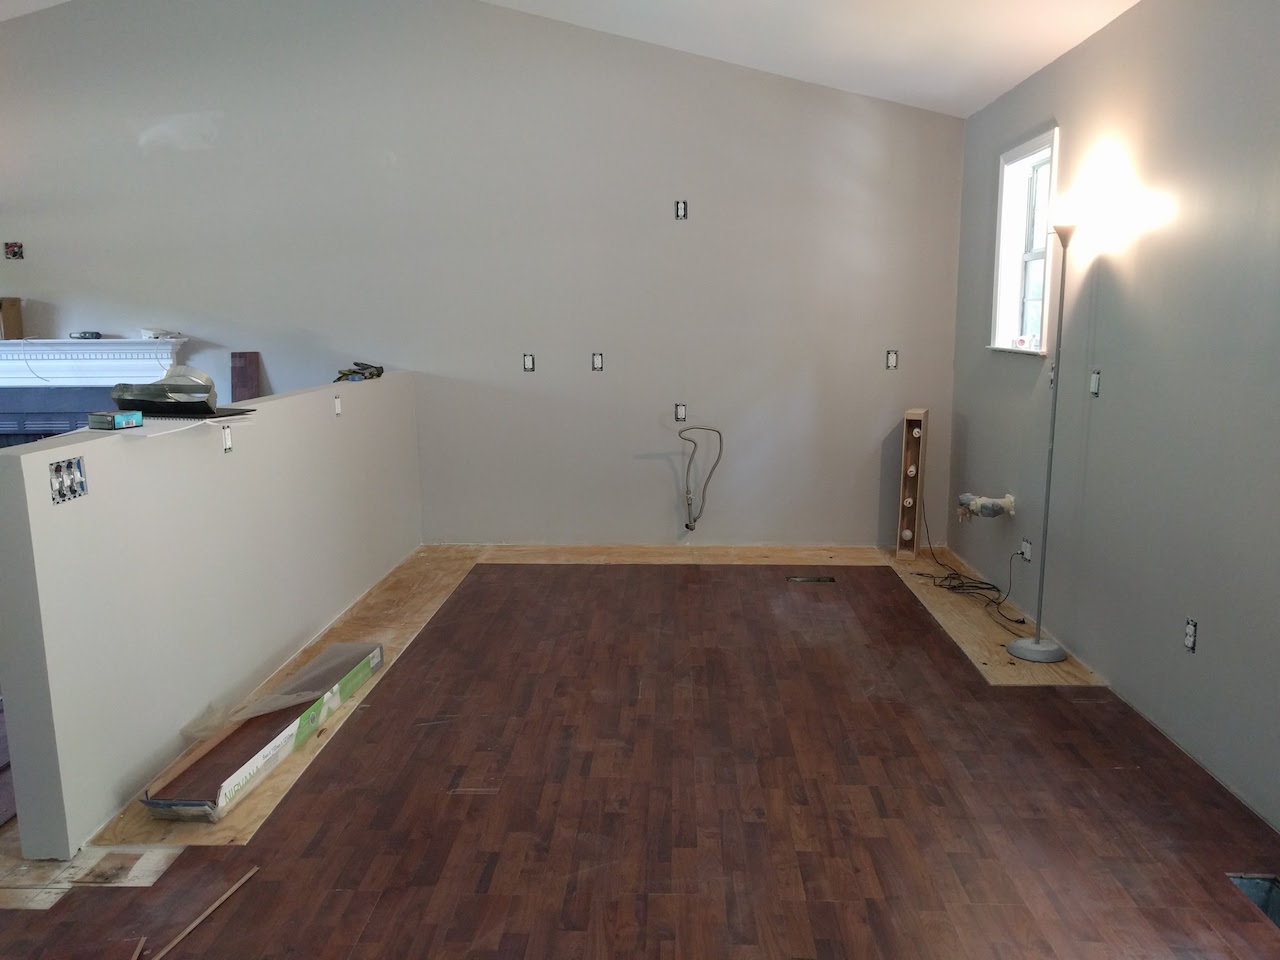
Kitchen Progress 2
I'm not sure how exciting and/or interesting this whole renovation may be to some of you, but considering it has been the complete and utter bane of Tom and my existence for the last two months, it's getting covered here quite a bit. I hope you enjoy it, but if not, you can rest easy on the fact that we are nearly done! Trust me, that comes as more of a relief to me than it does to you - hahaha! We have learned so much from this process and there are plenty of snippets of wisdom regarding a DIY renovation that I'll be sharing with you all soon. Seriously. We've learned some really weird things about renovating that no one ever warns you about. So stay tuned for some words of wisdom!
Today though, I thought I'd give you an update on our progress. This will be the last update (most likely) until the final reveal... but that won't come until July because we're waiting to hit the 4th of July sales for our new appliances. We got tempted by the Memorial Day sales, but we know the July round will be better. Not to mention, we've gotten pretty dang good about being patient. Two months without a kitchen sink or oven will do that to you. See? Wisdom.
In my last update, we had successfully managed the demolition, electrical, and were patching up the drywall. You could make out the faint outline of a kitchen, but since then, we have made leaps and bounds. If I'm being honest, where I left off in my last update is about when we started to feel the burn of renovation life. We were tired of it, and it seemed like we hadn't gotten anywhere. But. About a week later, we finally started to feel the down hill speed picking up and have been trucking along ever since.
I tried to group the photos in "fours" of the same angle taken over the last month. Basically what you're seeing in terms of stages are: patched, sanded, painted, and current status. It's truly amazing how important the seemingly little things are in a functioning kitchen. We still have toe-kicks, faucets, outlet and switch covers, more lighting, a backsplash, new appliances, door/drawer handles, finishing touches on the counters, a pantry and fridge cabinet to assemble and install, shelves to place in cabinets, and more. So as close as it might seem, there is still plenty to be done. But heck, I'm just thankful I could actually bake a frozen pizza in a REAL oven last night. Praise Jesus.
Anyways, enjoy the progress photos and see below for links to a few products (lights, paint colors, etc..).


What do you think? We are soooo ready to have a couch in our home again and a TV on the wall. And maybe a few bottles of wine.... each. But hey, it's been totally worth it, who am I kidding?
Paint color: Silver City by Behr
Trim paint: Maui Mist by Behr
Pendants: RANARP by IKEA
Handles: VARDE by IKEA
Countertop: SALJAN by IKEA
Cabinet/Drawer fronts: GRIMSLOV by IKEA
Sink: KOHLER from Home Depot
Microhood: BETRODD by IKEA (fun fact: all IKEA appliances are actually Whirlpool)
Any questions? Drop me a comment or contact me!

IKEA Kitchen Planning
If you've ever done a kitchen renovation, you know about the researching, measuring, remeasuring, re-researching, and choices, choices, choices. It's stressful and time consuming, and there are about a million paths you can take based on style, function, and price. If you haven't been through this process, then you've come to a great place.
After looking at the options at Home Depot, Lowes, and IKEA, we've narrowed it down to IKEA. Partially because one of their famous kitchen sales will be starting March 4 - April 17 of this year. The deal is, you have to spend at least $4,000 in order to receive their generous 15% return in the form of a giftcard. That's at least $600 you'll get back for purchasing through them which is about the cost of some appliances.
Regardless of their sale, IKEA also has a 25 year warranty on their kitchens as well as a surprising reputation for quality. Like many people, you may think of IKEA's products as the ones that fall apart after a year of use... but not so with their kitchens. My parents built a house in 2007 and installed a stunning IKEA kitchen that looks practically new to this day. While they were visiting us last week, we asked for their advice on the IKEA front and they whole-heartedly gave their support for it. Especially in a house of our size and price range - it just makes sense.
By using their kitchen planner tool, you can add in all the dimensions of your space, floors, paint colors, correct placement of doors and windows, and even add weird additional structures that your particular space may have. It's a little slow and frustrating sometimes, but you learn how to navigate it well over time.
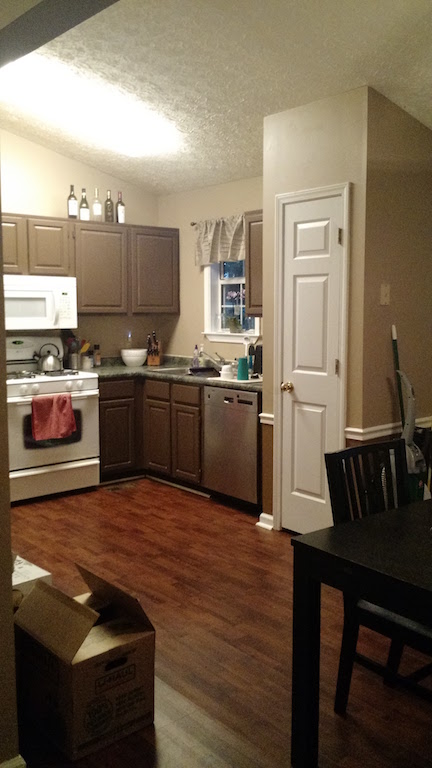
Our current kitchen has a very awkward layout. The kind of layout you look at and go, "What were these builders thinking? Look at all the wasted space and lack of storage..."
Tom and I love open concept homes (said every HGTV guest ever) and our downstairs has the potential to embody that so well. It just means we need to remove a wall and a pantry and move a fridge. Oh, and add about 3x more storage and about 35 more linear feet of countertops.
Here's the current state of things:


Yeah. It's a cluster. And it's a pain in the butt to function in... just ask the goose egg that's on my head from when I nailed my head on an open cabinet and then wept like a baby on my mother's shoulder.
But here's our plan:
- Remove the wall between the living room and kitchen. So as to scoot the kitchen into the living room just a smidge and open the space.
- Remove the current pantry and put the fridge in its place.
- Smooth the ceilings throughout.
- Paint the walls.
By doing all those things, we can have a space that looks like this:


LOOK AT ALL THE COUNTER SPACE.
I actually made a mock-up of the entire downstairs because we actually own that sectional, table, chairs, and bench... so you guys are seeing the big picture! We wouldn't probably install those built-ins next to the fireplace just yet, but it'll stay in the plans for the future - we just aren't totally sold on them yet.
We love this layout because we aren't sacrificing our pantry, and will instead replace it with one that has drawers (praise Jesus).
Also, you'll notice the half-wall between the rooms. This will serve as a minor separation and something to install outlets on for the kitchen.
We decided to leave the stove where it is so that we don't have to move the gas line, but it'll scoot about five inches to the left of its current position.
Small adjustments will still be made, like adding pendant lights over the long counter and possibly some open shelving above the dishwasher, or a slight change in the drawer combinations of the base cabinets. But overall, the size and dimensions are pretty much set in stone!
We're ecstatic to be moving forward in this process and we'll be sure to keep you all updated as we go along. In the meantime, what do you think?