

Towering Torte | Showstopper Bake by Cameron
This is the second and final bake (at least until we eventually start up the challenge again with the next season) from our Star Baker, Cameron! I never know what she has baked up for us until about the day before her post goes live, and let me tell you... when I opened her email my jaw about hit the ground (and so did my husband's!). This is a showstopper to be sure! Be sure and read through Cameron's process of this bake - she is a gifted writer as well as baker, and you feel as if you're watching her as a Great British Bake Off contestant!
If you missed her last bake, find it here: Mini Lemon Cakes
And be sure to find her on Instagram for more mouth watering photos: Cameron's Instagram
Sit Down for This One… A Towering Torte to Tempt Your Sweet Tooth
I have watched and baked along with The Great British Bake Off for years. When Joy sent me the schedule of the episodes that I could select from for my bakes, I thought….now is the time for a challenge. When it came to this post I had narrowed it down between multi-tiered pies and tarts or the decadent dobos torte.
Obviously, the legendary Hungarian delicacy would be uncharted territory, so I opted for the challenge rather than the tried and true.
I must be honest, once I started ladling layer upon layer of fluffy batter and flattening it with a pallet knife, a little part of me wished I had gone with something more familiar. Now don’t get me wrong, this towering rich cake was delicious and seems more overwhelming than it is!
First things first, this is based on Mary Berry’s dobos torte recipe. Never having attempted this bake, I looked to the “Queen” and master for guidance. Notice that I have taken liberties with Mary Berry’s recipe and added my own personal twist to this traditionally chocolate/caramel massively layered torte….a bit “cheeky” I know….but my taste testers validated my deviation from the traditional with resounding “oohs and ahhs”. I hope you find the modifications a delight to your palate as well should you also venture into the dobos torte baking adventure.
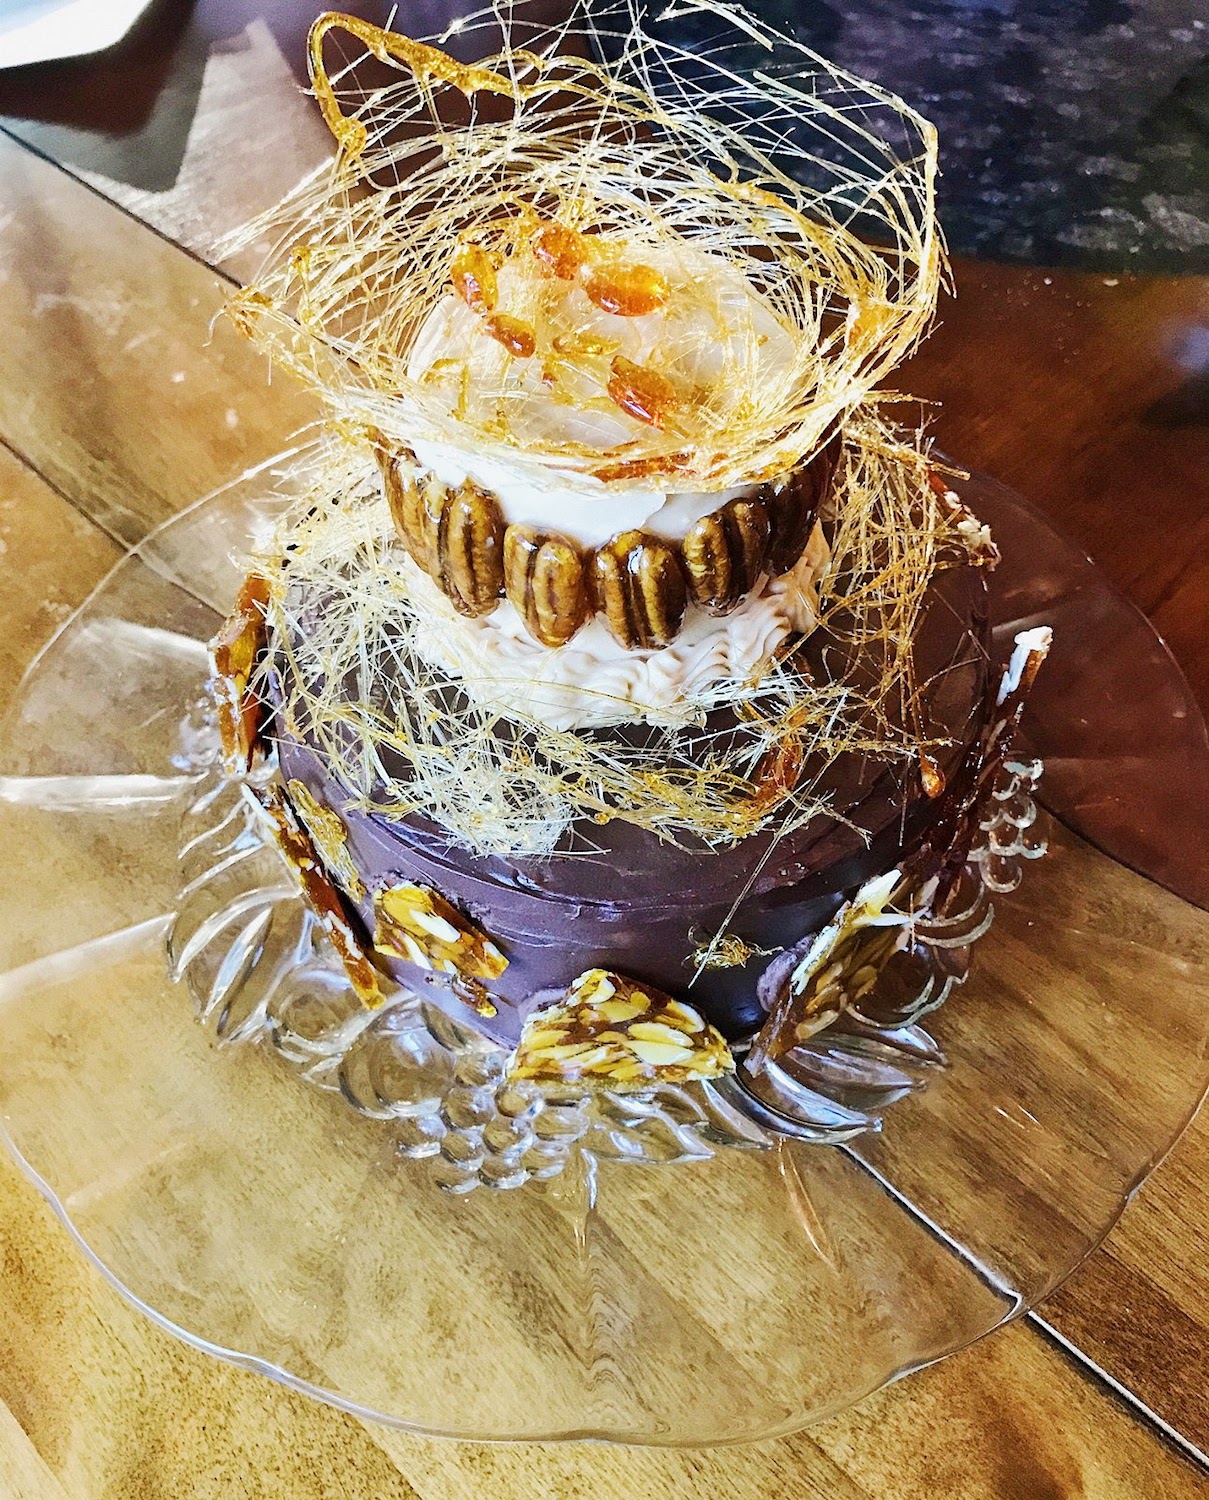
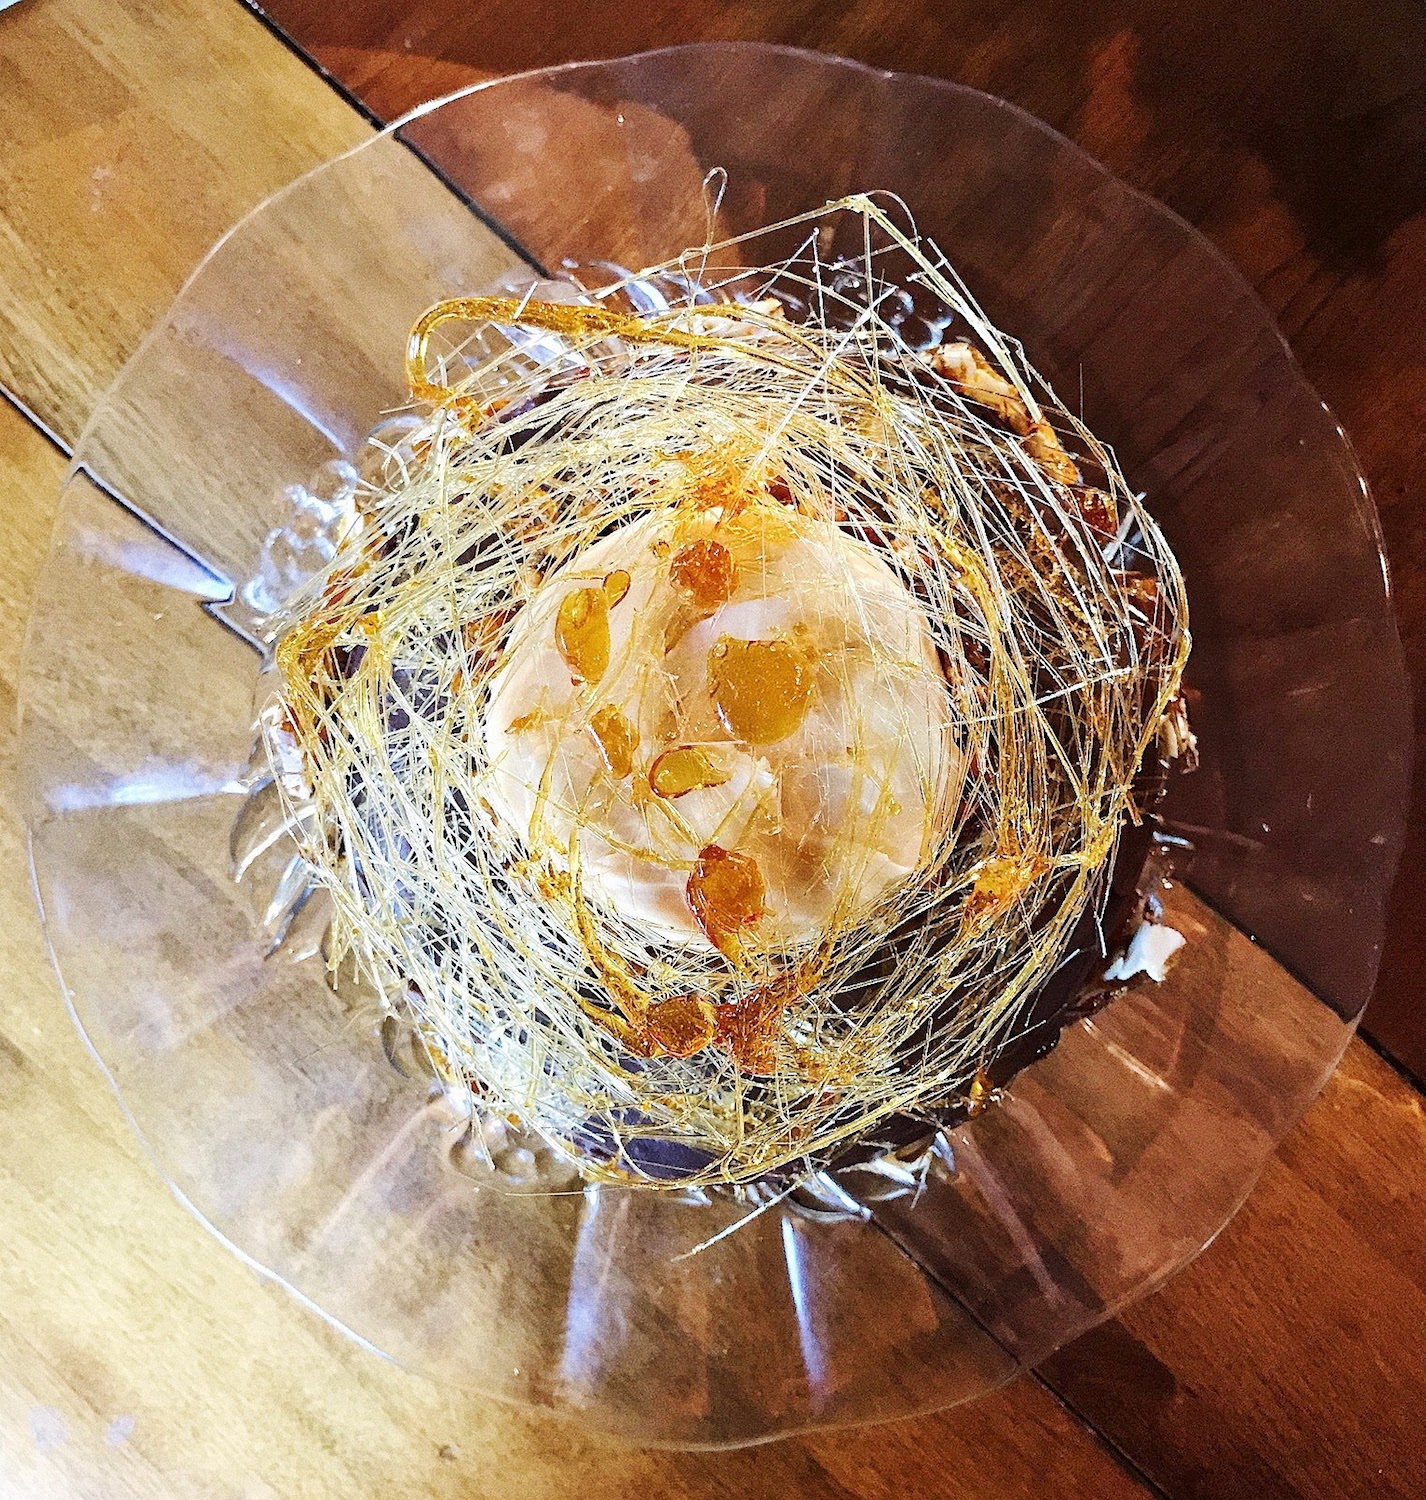
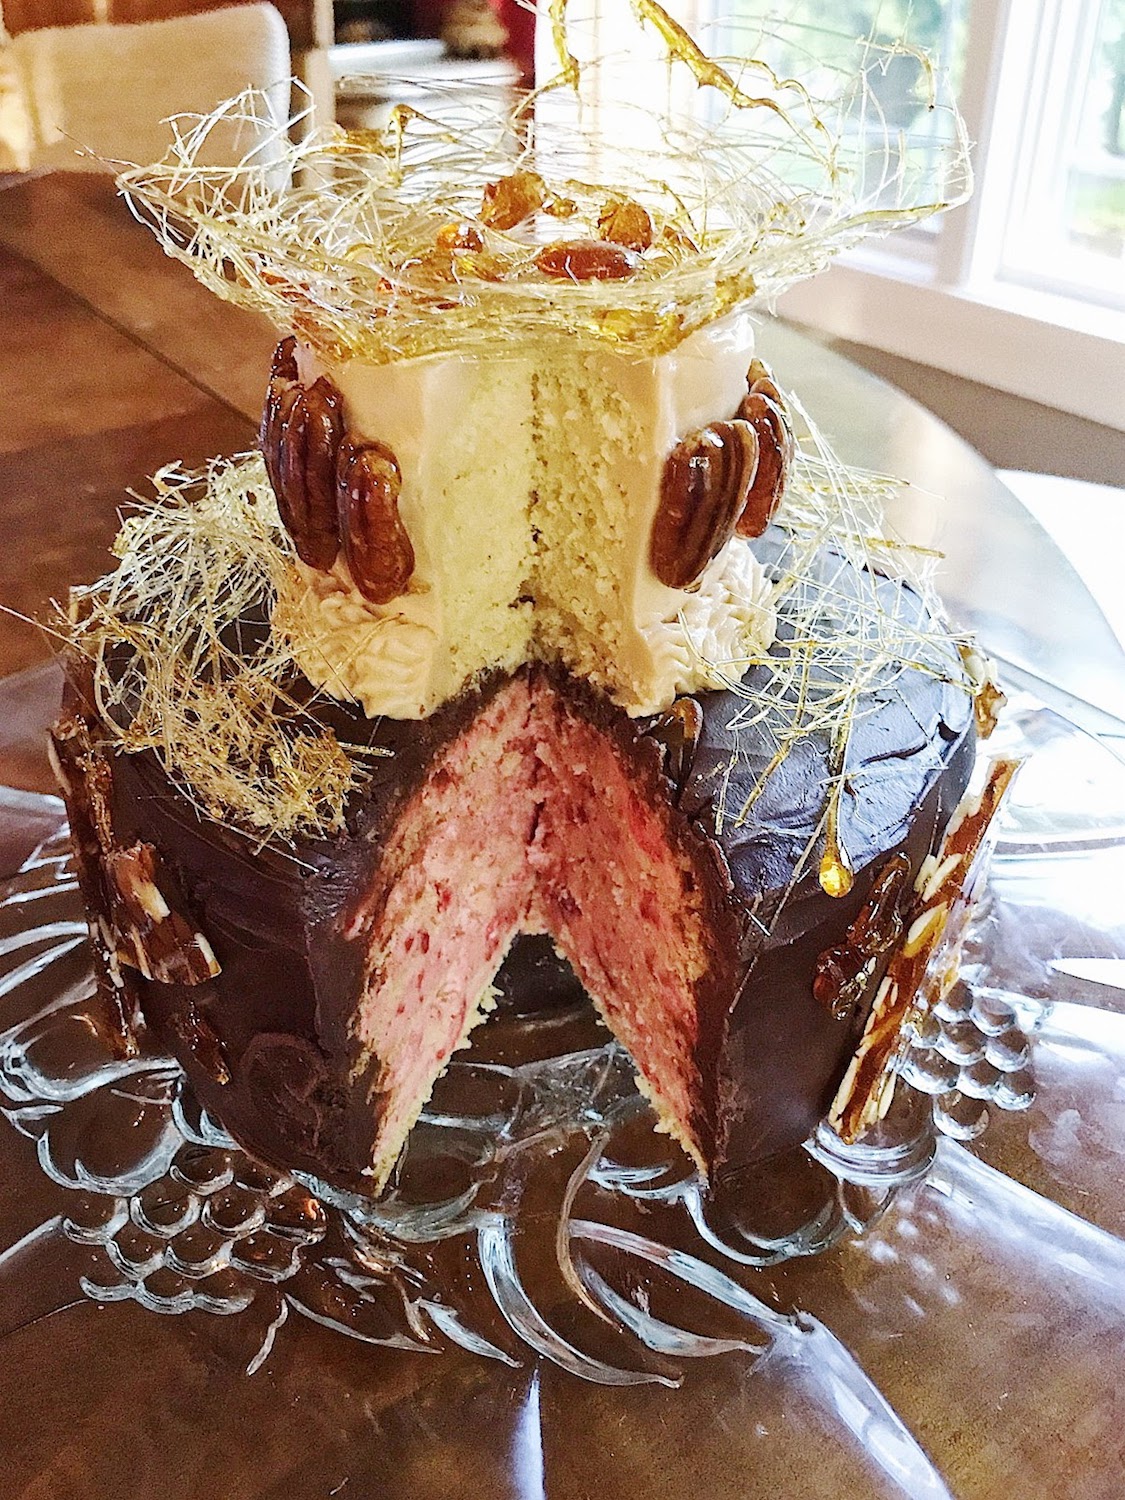
My heartbeat quickened when I saw self-rising flour as a primary ingredient. I’m not sure what it is, but I have never had much luck with self-rising flour or any recipe that calls for it. Often self-rising flour is a component gently folded into light airy egg laden sponge cakes. Nine times out of ten I either over mix the batter and it doesn’t rise or I under mix and have nasty little pockets of flour. This time the stars aligned and everything went according to the plan! I patiently took my time incorporating the flour which resulted in the intended light airy batter. The cake itself is sweet and heavenly, but the real flavor show stopper...an assortment of rich strawberry, caramel, and chocolate buttercream encased in rich silky chocolate ganache. Eye candy…. spun caramel golden threads, shards of caramel almond brittle, and caramel dipped pecans.
Initially, I wanted something a bit tarter as a juxtaposition to the sweetness of the caramel. My original flavor profile of choice was raspberry. After careful consideration, I had concerns about incorporating a juicy fruit into a buttercream. The multi-layered effect of the dobos is visually appealing but there is a structural weight issue to account for ...a tilted towering bake is not the look I hoped to achieve. This rationale leads me to freeze dried fruit. Unfortunately, I was unable to find freeze dried raspberries and opted for freeze dried strawberries…. a superior substitute! The buttercream legitimately tasted like strawberry ice cream if it were a buttercream!
The final personal hurdle of this cake was the caramel. There are few things in this world that I love more than salted caramel. One problem though…. I have the worst luck with caramel! I always burn myself and the caramel turns out crystalized or burnt.
It’s an affliction in this life to not be able to make that which one loves to eat!
This time however, like the self-rising flour, the stars aligned and everything went beautifully! I did manage to burn myself right at the very end with the caramelized pecans, but it wasn’t anything too traumatic. On this bake, I did allow myself to live on the edge and added a splash of bourbon in the caramel for a little bit of fun…. I would recommend it. It doesn’t blow you away but it does make you feel cozy.
Overall this was a bake of personal challenges, and I have to say I’m darn proud of myself and how it turned out. It was decadent and delicious. My “Ottoson Empire” dobos torte was carefully transported to share with co-workers (aka the culinary “test team). By the end of the day...it was fait accompli…. not a crumb nor a dollop of buttercream remained. I don’t think I’ve ever made something that looked so much like a showstopper. Hopefully Mary Berry would be favorably impressed. I’m very pleased with the outcome and would like to challenge everyone else to push themselves outside their comfort zone.
Happy Baking!
Towering Torte
Ingredients
Cake Sponge:
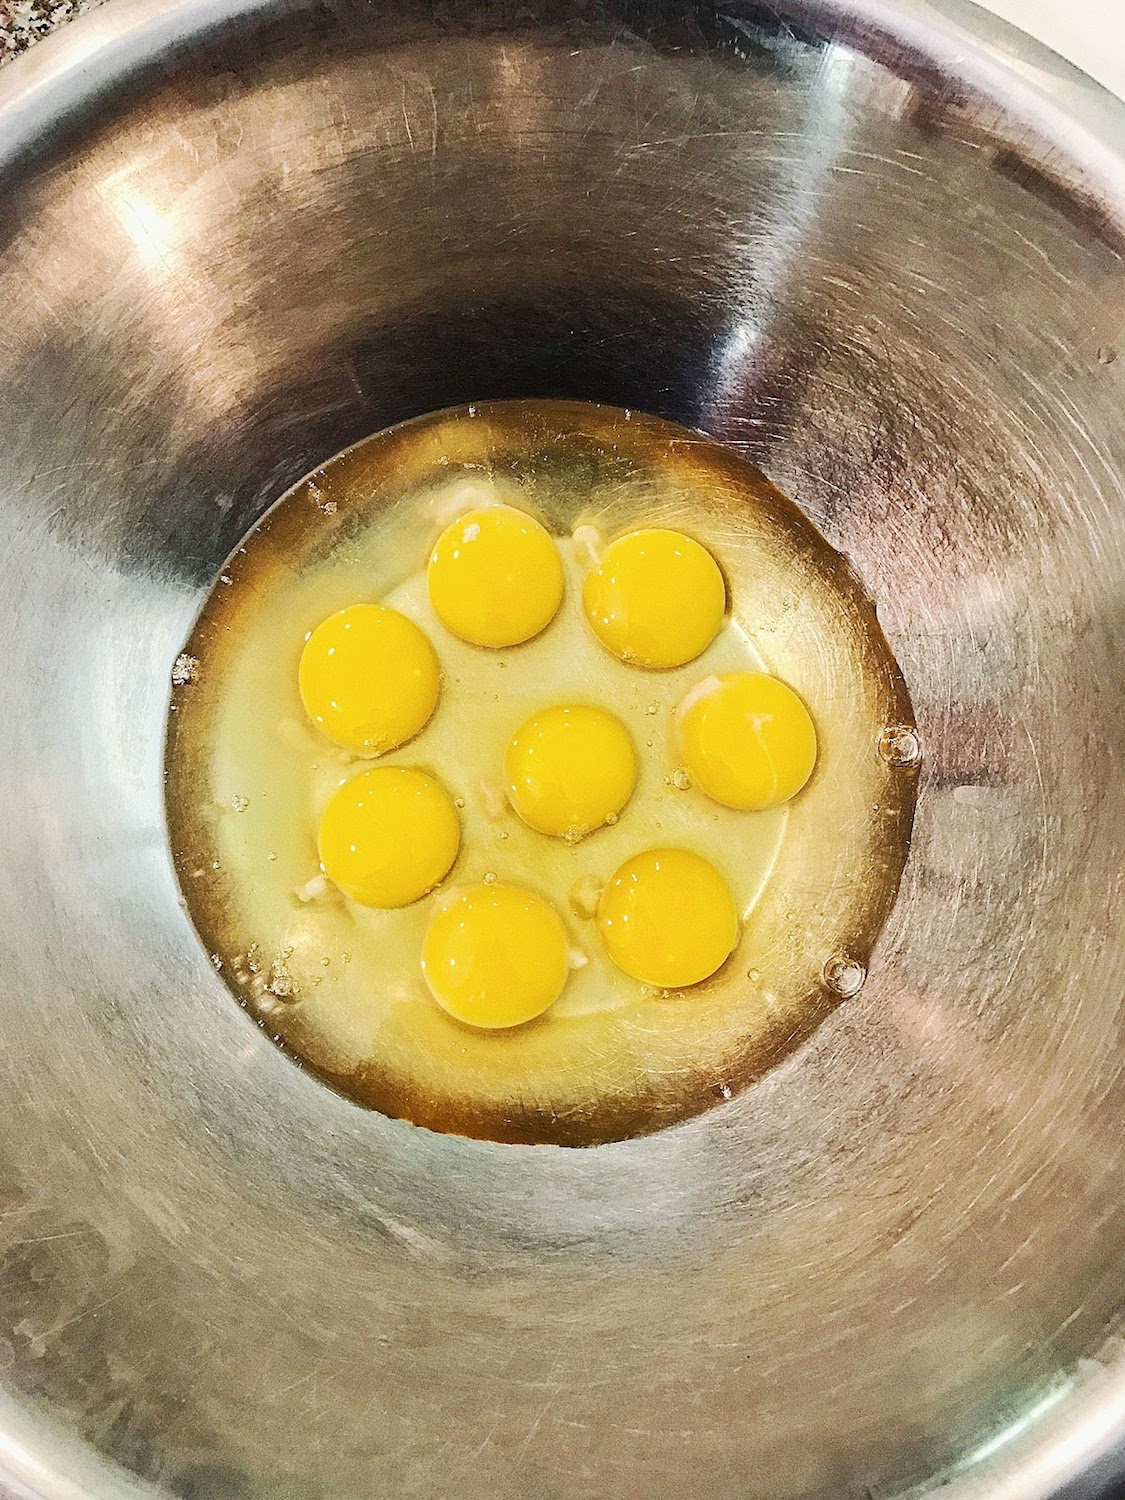
- 8 large eggs (room temperature)
- 350g sugar
- 300g self-rising flour
Caramel Buttercream:
- 800g sugar
- 400ml heavy whipping cream
- 450g softened butter
- powder sugar as needed
*A splash of bourbon optional should you feel adventuresome.
Strawberry Buttercream:
- 1- 34g/1.2 oz. bag of freeze dried strawberries
- 226g softened butter
- 448g powdered sugar
- 1tsp vanilla extract
- 1 tsp milk
- 1/8 tsp of salt
- powder sugar as needed
Chocolate Buttercream:
- 226g softened butter
- 448g powdered sugar
- 64g cocoa powder
- ½ tsp salt
- 2 tsp vanilla extract
- 4 tbsp. milk or heavy cream
Chocolate Ganache:
- 907g semi-sweet chocolate
- 350mL heavy cream
Caramel Work:
- 400g sugar
- 100g almonds
- 12 pecans
Method:
Chocolate Ganache
In a heavy bottomed pan heat heavy cream until it is at the point of boiling. Keep a close eye on it as you don’t want to scald the cream. Pour the warm cream over the chocolate. It is easier if the chocolate is in a wide shallow bowl so it will melt more easily. Once completely combined and there are no lumps, place in a bowl and allow it to cool and set a bit.
Caramel Buttercream
In a large heavy bottomed pan combine sugar and 100mL of water. On a low heat stir constantly and dissolve the sugar in the water. Once dissolved increase the heat and allow the mixture to turn a light golden-brown color (at this point you do not want to stir anymore). Once the mixture has reached the ideal color, the darker the color the stronger caramel flavor, remove from the heat and add the 400 mL of heavy cream. Be careful, as the mixture can often spit since you are adding a cool temperature liquid into something very hot. Combine entirely and leave to cool and set.
Once the caramel is cold and set you can start to beat the butter with a paddle attachment and slowly add the caramel. I found my buttercream needed a little extra help in reaching the best texture for frosting by the addition of powdered sugar ¼ cup at a time. Fill a piping bag with buttercream and set aside until ready to use.
Strawberry Buttercream
Beat your softened butter with a paddle attachment, then on a low speed add powdered sugar. Once it starts to combine, add vanilla extract, milk, and salt. Once the buttercream comes together add ¾ of the bag of freeze dried strawberries and allow them to break up a bit. Take remaining freeze-dried strawberries and crush them into a powder, then add that powder to the buttercream. This ground up version of the strawberries allows you to intensify the flavor without ruining the texture of the buttercream. Fill a piping bag with buttercream and set aside until ready to use.
Chocolate Buttercream
Beat your softened butter with a paddle attachment, then on a low speed add powdered sugar and cocoa powder. Once it starts to combine add the vanilla extract, milk, and salt. Fill a piping bag with buttercream and set aside until ready to use.
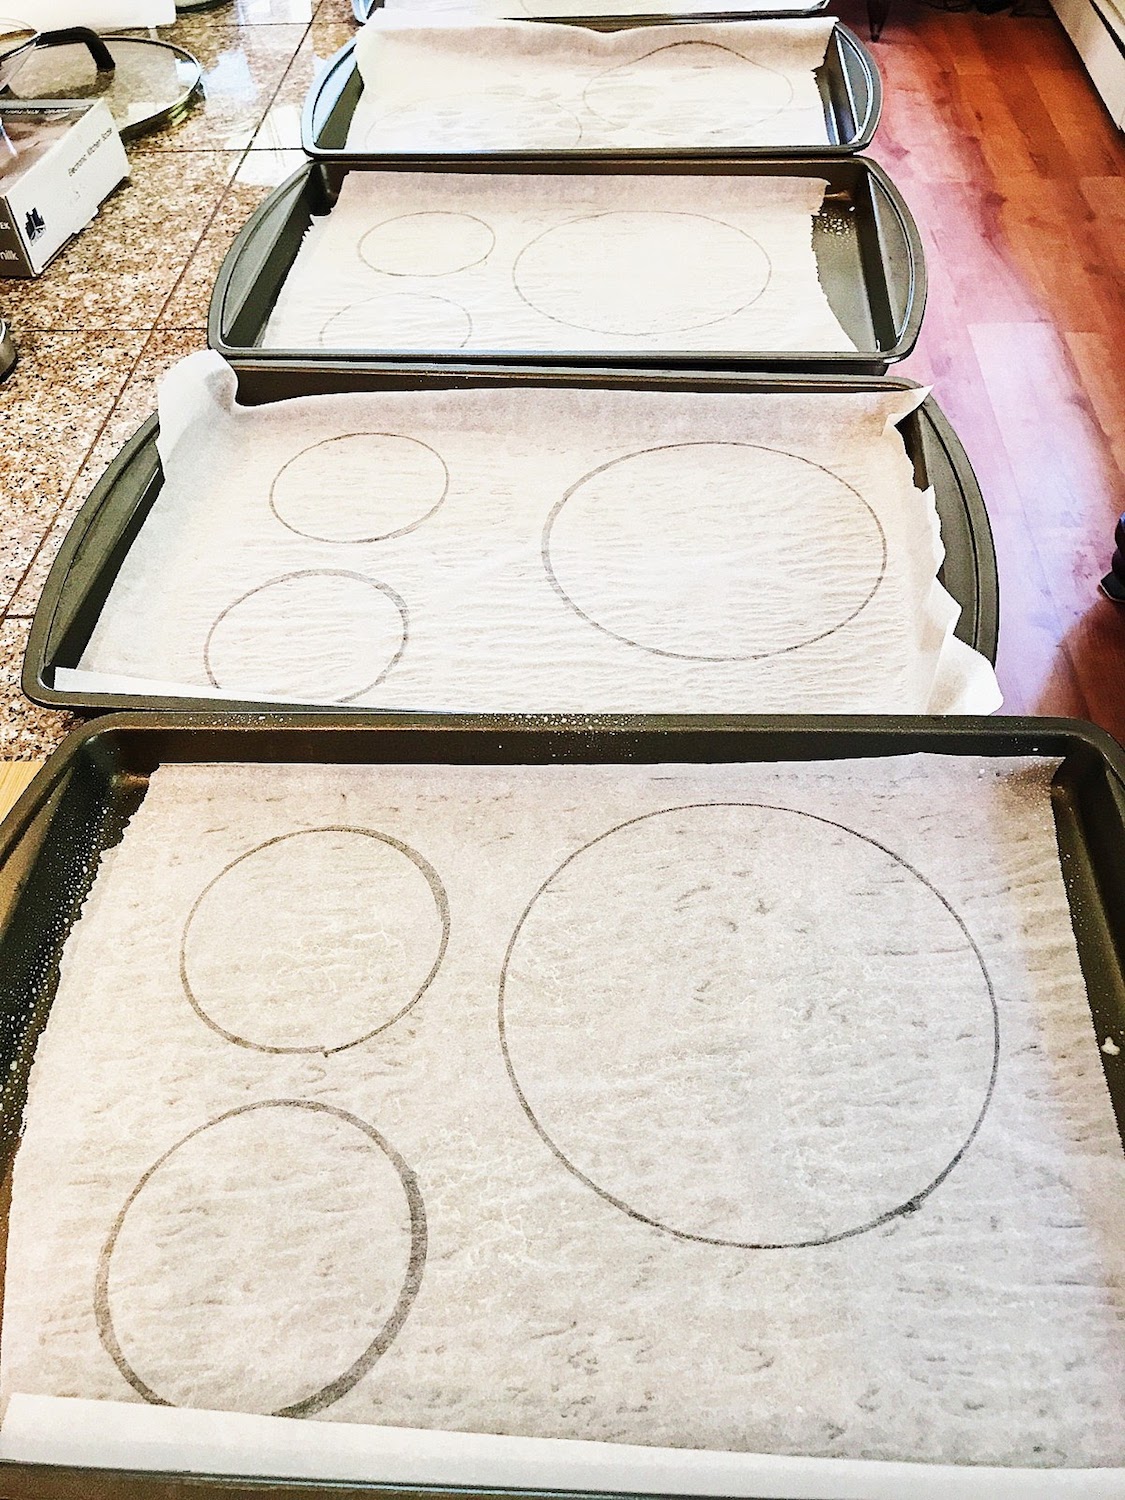
Cake Sponge
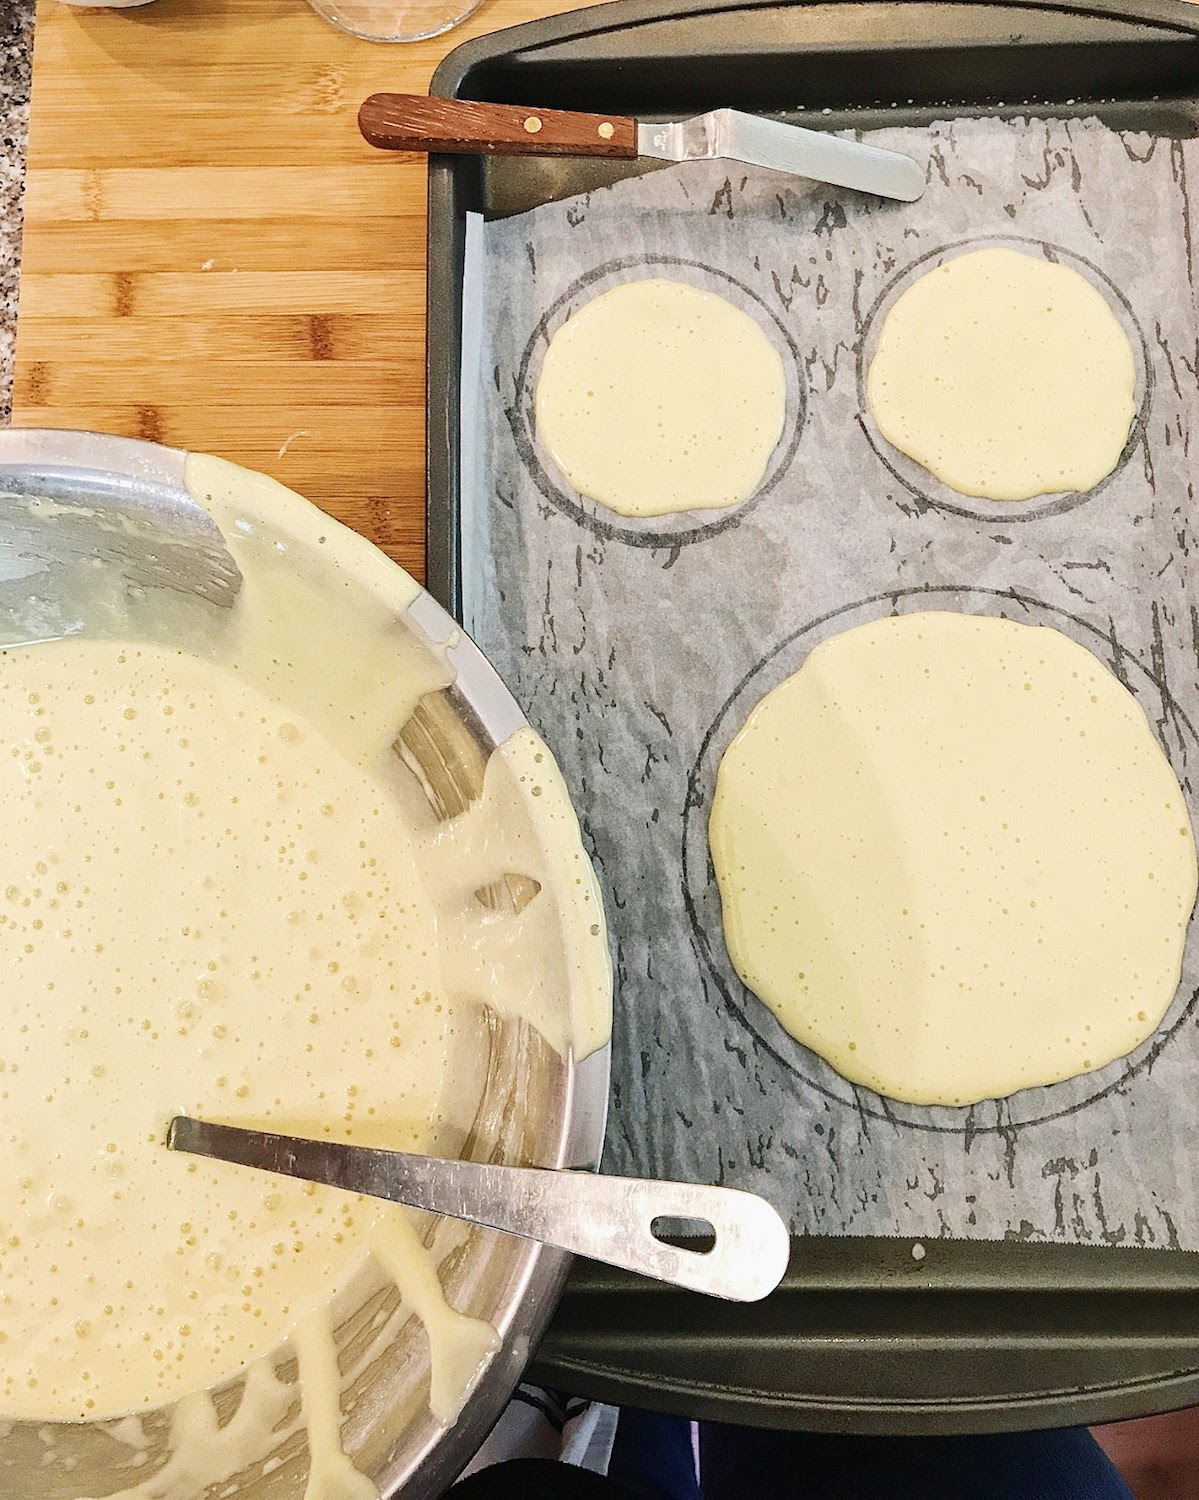
Preheat oven to 395 F and line 4 baking sheets with parchment paper. On each parchment paper trace one 8” circle and one 4” circle. You can start off with this and continue to reuse parchment paper or create more circles until you have used all the mixture or have reached your desired number of layers. Sift self-rising flour into a bowl. In a separate bowl, combine the eggs and sugar. Beat until it turns into a pale and fluffy mixture. Once eggs and sugar are combined, sift the self-rising flour in, ½ cup at a time. Be careful combining the flour into the egg mixture, this will prevent losing all the air you just created by beating the egg. Gently move a rubber spatula around the outside of the bowl and then move it thru the middle of the mixture. When the flour is fully combined the mixture will resemble a loose pancake mixture. Using a ladle, spoon mixture into your traced circles and smooth out with a pallet knife. You want the mixture to reach the edges you have traced out so the layers will be easy to trim. Place the baking sheets in the oven and watch carefully as then can overcook quickly, for my gas oven about 9 minutes was all that was needed. Repeat the process until you’ve reached the desired number of layers.
Assembly
Allow the layers to cool, this is pretty quick given the layers are so thin. Take individual 8” layers and lay them on parchment and place an 8” springform base on top and use that as a template to trim any excess off around the edges. Take one layer and place it on a cake stand, using your piping bag with strawberry buttercream (be sure not to use a tip, the strawberry bits will definitely get stuck) pipe buttercream on top of the layer and smooth with a pallet knife. Use the buttercream layers to help straighten any sloping edges. Once everything looks level, place another layer on top and repeat until you’ve reached your ideal height. You want to make sure that the final top layer does not have buttercream on top of it, otherwise it will compromise the smaller layer and be difficult to cover with the ganache.
Once the bottom tier is assembled you will want to crumb coat it. This is where the chocolate buttercream comes into play. Crumb coating prevents any loose cake bits disrupting the overall look of your frosting. Cover the entire outside of your bottom tier multi layered 8” inch tier in chocolate buttercream. You can now cover the outside with chocolate ganache and place in the fridge to set.
While the 8” base of the torte sets in the fridge, begin assembling the smaller second tier of the torte. You’ll repeat the same frosting concept as the bottom tier only now using the caramel buttercream. This tier does not have a separate frosting as a crumb coat, I just frosted the outside of the cake with buttercream. But if you wanted a more universal look you could also coat it with the ganache topping.
Decoration
On a baking sheet scatter your flaked almonds and using toothpicks, skewer pecans. In a heavy bottom pan combine 400g of sugar and 8 tbsp of water, and on a low heat dissolve the sugar. Once the sugar has dissolved stop stirring and allow it to caramelize, again the darker the color the more flavorful but it can burn very quickly. Once you’ve reached the ideal color, pour 2/3 of your mixture over the almonds and allow to set. The remaining caramel can be used to dip the pecans. Insert a toothpick into the pecan and run through the caramel. Once you have dipped them you can turn them over and insert the pick into an orange or grapefruit which will serve as a sturdy stand and allow them to cool and harden. Allow the caramel to cool completely before handling it to decorate otherwise it will melt the buttercream. To achieve the spun caramel effect, take a metal pick and dip it in the caramel, then quickly move it around an upside-down bowl. This will take some practice to get the temperature of the caramel right so it will start to stick. Keep making circular motions around the bowl until you’ve achieved the look you want.
I hope you all are as impressed and inspired as I am over Cameron's torte! For every relatively failed bake I've been having with my mom throughout this challenge, Cameron has made up for it with her incredible prowess and creativity in these showstopper bakes. Don't forget to follow Cameron on Instagram for more mouth-watering bake photos!
We're going to do the last three bakes a little differently. On the show, these bakes were done all together as part of the finale show. Because of some travel and general life circumstances, we're going to have these bakes presented together on Wednesday, July 19th... so, you'll really have to hang tight for our little Great Blogger Bake Along Finale!
Wednesday, July 19th
Victoria Sandwiches, Tartes au citron, and Scones

Mini Lemon Cakes | Showstopper Bake by Cameron
The day has finally arrived! I get to share my friend Cameron with the blogging world! I've known Cameron for almost a decade through my college friends, but we've probably only spent a handful of times together in person. We've bonded over weird Facebook posts and memes, and more recently, over our shared love of The Great British Bake Off. Just looking through Cameron's Instagram will show you that she challenges herself to master not only taste, but technique and creativity. She is a true Star Baker and I'm so happy to have her here today. Also, keep an eye out - I think Cameron may be catching the blogging bug and she's going to hopefully have a blog up in the future for you to follow! :) Okay, and read everything below because I swear Cameron is like a super interesting person. AND she got noticed by one of the bakers on the show on Instagram and I'm SO jealous!
I was always the kid in school who had cucumber sandwiches for lunch instead of peanut butter and jelly. I had fairy cakes at my birthday parties instead of store bought ice cream cake. I left shortbread for Santa instead of iced sugar cookies. None of these statements are complaints by any means, I was always lucky to be in a household that embraced food from all over the world. My mom is Canadian, by way of California, and the daughter of a Scottish Australian mother and a Canadian father. These influences have always left me with a strong attachment to my British heritage and its culture. This obsession with all things British has been a strong undertone in all my cooking. I began taking baking seriously about five years ago. It started off with mastering the family shortbread and then moved along to pavlovas and then down the rabbit hole of pastry and a stack of cookbooks and baking textbooks as tall as I am.
I first discovered The Great British Bake Off in a deep dive of English TV shows. I grew up watching Keeping Up Appearances, Monty Python, Absolutely Fabulous, and Fawlty Towers. As I got older I started finding all sorts of new shows I loved, both scripted and reality, on BBC and Channel 4. I found an extension to run on my laptop that allowed me to access to the BBC iPlayer, that was it.... I was obsessed with Bake Off. I thought about it all day, I couldn't wait until the next Wednesday when a new episode would air. Besides the interesting recipes and challenges, what I loved most was how genuinely kind the contestants were to one another all while remaining fiercely competitive. I have my own opinion on the Diana vs. Ian bin-gate drama. Many of my bakes are inspired by the contestants. I once recreated Chetna’s white chocolate and pistachio cake. She liked it and commented on it on Instagram.....you better believe I screenshot it!
When Joy approached me about contributing showstoppers for her blog I was instantly on board. I loved her idea of including her mom's feedback as well and challenging herself to creatively bake outside her comfort zone. I wracked my brain deciding what to feature for this first showstopper bake. I bounced back and forth between mini British bakes and bread. In the end it became clear….an homage to my British heritage... a classic lemon drizzle cake with my own twist... homemade lemon curd (a family favorite) and a honey goat cheese mascarpone filling.
"My friends poke fun at me for being pretentious... “honey goat cheese mascarpone filling”....I can see the eye rolls! I promise it's totally worth it."
Now let the baking begin! For this recipe start by making the lemon curd. Give the filling enough time to cool and set before filling the cakes. Once it comes together put it in the fridge until you’re ready to assemble the cakes. There are several different methods for making lemon curd. I prefer using a bain-marie, placing a sauce pan on the stove top with water on low heat. I then float a bowl in the water filled pan and begin adding the ingredients. Sugar, eggs, zest, and lemon juice are added to the floating bowl and whisked until the mixture begins to thicken. Ideally, the objective is to reach a temperature of 165F without boiling the mixture. Once it has reached the desired temperature, begin adding the butter in small amounts at a time. If you are not getting the thickness you need, you can add more butter. Once it has come together you can sieve the curd to get eliminate the zest, however I like to leave it in.
Now the “pretentious” as well as rich and delicious goat cheese mascarpone filling. Best to prepare this before the cake batter so that the rich flavors have more time to fully set. Begin with heavy whipping cream in a tall narrow glass bowl and a hand mixer. I've always found that the cream whips better if it has less space to escape the beaters. Once I get a nice amount of volume I add in the sugar and continue beating until the cream is smooth and the sugar granules are no longer detected. Once the cream looks set I add the mascarpone by gently folding it in to keep as much air in the cream as possible. Finally add the honey goat cheese. I recommend allowing the goat cheese to reach room temperature. Once it's all combined allow it to set in the fridge.
Now we get down to the star of the show. This cake utilizes the creaming method. This means that you start by creaming your butter and sugar together first, doing this produces a fine crumb with a dense and rich texture perfect for slicing. By fitting your mixer with a paddle attachment and continually scraping down the sides will produce an evenly creamed mix. You are looking for a smooth texture, and then begin slowly adding your eggs. Allow your eggs to come up to almost room temperature. You will notice that if the batter or eggs are too cold the mix will begin to look like it’s curdled. Don't panic... just keep mixing until the batter becomes smooth again and add another egg. Once that is done fold in your dry ingredients as well as the zest. I used an ice cream scoop to measure out my batter into the square molds, but traditions round cupcake tins or other shaped tins work as well.
Once the cakes are done in the oven, you are looking for the cake to spring back when you touch it and the sides of the cake have come away from the tin. Let them cool a bit in the tin and then place them on a cooling rack. Once they are cool, slice the cakes in half and using a wooden skewer poke holes on the inside of both sides. This will allow the syrup to be absorbed into the cakes. Make sure the cake is cool before doing this step. Once the syrup has set you can start to assemble. Using a piping bag, pipe five dollops to lemon curd on the bottom half. Then follow up with four dollops of the goat cheese mascarpone mix.
Typically, a lemon drizzle cake has a sugary crispy top, however mine did not achieve the desired level of crispiness. Shifting into problem solving mode, I diverted from the traditional and created a mixture of leftover lemon syrup and lemon curd and brushed in on the top and finished it with Swedish pearl sugar for a sweet, delicious, and eye pleasing finishing touch.
Overall these little cakes are begging to be center stage of any tea party. In my opinion they are the perfect marriage of sweet with a juxtaposition of savory tartness from the goat cheese and lemon. The end result is balanced perfection. These little bakes make me yearn for a cup of tea, some sunshine in an English garden, and good friends to share with!
Mini Lemon Cakes
Ingredients:
Lemon Curd
- 285g sugar
- 4 range-free eggs
- 2 large lemons, zest and juice
- 140g of butter
Honey Goat Cheese and Mascarpone Whipped Cream
- 237mL heavy whipping cream
- 2 tbsp granulated sugar
- 8 oz mascarpone cheese
- 4 oz honey goat cheese
Cake
- 175g butter (room temperature)
- 175g sugar
- 3 range-free eggs
- 175g all purpose flour
- ⅛ tsp salt
- 1 1/2 tsp baking powder
- 1 lemon zested
Lemon Syrup
- 100g sugar
- 1 1/2 lemon, zest and juice
Method:
Preheat oven to 350 degrees
Cook for
Lemon Curd
- Make lemon curd by whisking together sugar, eggs, lemon juice, and zest in a bowl over boiling water. Allow the mixture to thicken, ideally reaching 165F; do not allow it to boil. Then add butter in small pieces until the mixture is thick enough.
Honey Goat Cheese and Mascarpone Whipped Cream
- Whip cream in a bowl until cream begins to form.
- Add sugar, 1 tbsp at a time, and beat until sugar is fully incorporated and you are unable to feel granules of sugar in the cream.
- Add the mascarpone cheese by folding it into the cream, being sure not to over mix and loose the air in the cream. Once incorporated add the room temperature goat cheese in the same manner.
Cake
- Set your oven for 350F, use convection mode if available on your oven.
- Using a paddle attachment combine room temperature butter and sugar. Blend together until the sugar is incorporated completely and the mixture is pale in color and fluffy in texture. Again, you should not feel any granules of sugar left.
- Gradually add room temperature eggs.
- Once the eggs are incorporated, sift in the dry ingredients of flour, salt, and baking powder. Then fold in lemon zest.
- Coat baking tin with butter or cooking spray and fill according to how you would like to enjoy your cakes. In this case I used an ice cream scoop per square muffin cup.
- Bake for 15-20 mins, remember your looking for the cake to begin coming away from the sides of the tin and a spring back texture.
Lemon Syrup
- Combine sugar, lemon juice, and zest in a saucepan on medium heat until the sugar dissolves and a syrup forms.
Don't forget to follow Cameron on Instagram for more mouth-watering bake photos!