

Eating During a Kitchen Renovation | 6 Step Survival Guide
If you currently have a working kitchen, picture yourself without it for the next week.
How does that look?
Maybe a little inconvenient, but doable.
Now try 8+ weeks. No sink, dishwasher, stove, oven, garbage disposal, maybe even no fridge...
Let me speak for you.
It stinks. REAL bad. Not literally, but it really blows.
However, here we are, safely on the other side of our DIY renovation and we didn't starve. In fact, we kind of rocked it and I'm going to tell you how! It had its moments, but for the most part, we got creative and had some pretty easy systems going that made it bearable. Lemme just dive in.
1. Designate a space for a makeshift kitchen.
This took a bit of trial and error, but it was probably the most important part. Here's our first failed attempt at containing our makeshift kitchen:
I crack up every time I look at that photo. What were we thinking?! So sketchy. That table in there wobbled at the slightest touch and an electrocution was just waiting to happen. Good gracious.
So we cleared out another room that was full of our boxed cabinets and countertops and used this second bathroom for washing dishes exclusively and it turned out like this (week one vs. week bazillion):


I'll be honest, it still wasn't amazing, but it was definitely doable. We made it work! Give yourself some room to prep, room to store items, and even room to sit down and eat (we used my desk that's in our bedroom). I highly recommend the stainless steel table you see there. Before our renovation, our kitchen needed it for extra counterspace and at only $125-$150 it beats out any other little "island" you find in stores in terms of price and size. Trust me, I hunted around for the best deal on freestanding islands for weeks.
2. Give yourself several ways to "cook."
Since you won't have a stove, you'll probably use a microwave to replace it most of the time. But believe me when I say that gets old... fast. Have a couple other methods like a grill or a crockpot. We bought this grill for cheap and it's been a total champ. You may end up eating a lot of hot dogs, and grilling them helps you feel more settled than you really are. Plus, raw meat doesn't exactly microwave, so throwing a roast in a crockpot with some veggies is a great home-cooked alternative to frozen meals.
3. Get a wholesale membership.
My in-laws are amazing and gave us a Sam's Club membership as an anniversary gift, which happened to be right around the time we started our reno. This came is so handy in terms of stocking up on bags of microwavable veggies, meat, snack packs of chips or fruit, water bottles!!, and hot dogs/buns. It saved us a ton of money and kept us fed for ages.
4. Go disposable.
I know this isn't very "green" of us, but doing dishes in a little bathroom sink or bent over a tub just sucks. Paper plates and plastic utensils saved us soooo much time (and back-aches) and also saved us from breaking our good glass dishes. Of course, we had a few larger glass bowls for heating soupy items and serving veggies and such. To be honest, you eventually stop eating off of anything at all and you and your spouse pretty much eat straight out of serving bowls and paper towels. So maybe we were "greener" than we thought? Do your best to find disposable items that are biodegradable.
5. Find your favorites and rotate.
You'll probably find something really easy to make and begin to fixate on it. For us, it was hot dogs. But instead of eating them over and over and getting sick of them quickly, we had them every other day... and I'm actually - to this day - not tired of them. Other meals included:
- Grilled chicken, instant rice with cream of mushroom soup, and steamed veggies.
- Frozen chicken tikka masala and naan heated on the grill.
- Hot dogs, baked beans, chips.
- Marinated grilled chicken, potatoes, and steamed veggies.
- Toasted bagels and cream cheese, side of fruit.
- Sandwiches and chips.
- Canned soup.
- Microwavable asian meals.
- Frozen hot pockets, meat pie pockets, or burritos.
- Take out: Chinese, Vietnamese, pizza, Indian, etc..
If you can get creative and prep your food days in advance, you'll find it's not too hard to eat decent meals at home, and some frozen meals are really pretty tasty these days!
As wise people say, "it's not going to be easy, but it'll be worth it." True that. With the right tools, organization, and determination, you can survive a kitchen renovation and not starve.
Now, with a finished kitchen and lots of decorating to do, we are eating delicious meals with the help of a stove and oven. Baking is such a passion of mine and I am thrilled to finally be back at it! Worth it, indeed.
Have you lived in a house during a kitchen renovation? Any other kitchen reno questions for me? Leave a comment or contact me!
Kitchen Progress 2
I'm not sure how exciting and/or interesting this whole renovation may be to some of you, but considering it has been the complete and utter bane of Tom and my existence for the last two months, it's getting covered here quite a bit. I hope you enjoy it, but if not, you can rest easy on the fact that we are nearly done! Trust me, that comes as more of a relief to me than it does to you - hahaha! We have learned so much from this process and there are plenty of snippets of wisdom regarding a DIY renovation that I'll be sharing with you all soon. Seriously. We've learned some really weird things about renovating that no one ever warns you about. So stay tuned for some words of wisdom!
Today though, I thought I'd give you an update on our progress. This will be the last update (most likely) until the final reveal... but that won't come until July because we're waiting to hit the 4th of July sales for our new appliances. We got tempted by the Memorial Day sales, but we know the July round will be better. Not to mention, we've gotten pretty dang good about being patient. Two months without a kitchen sink or oven will do that to you. See? Wisdom.
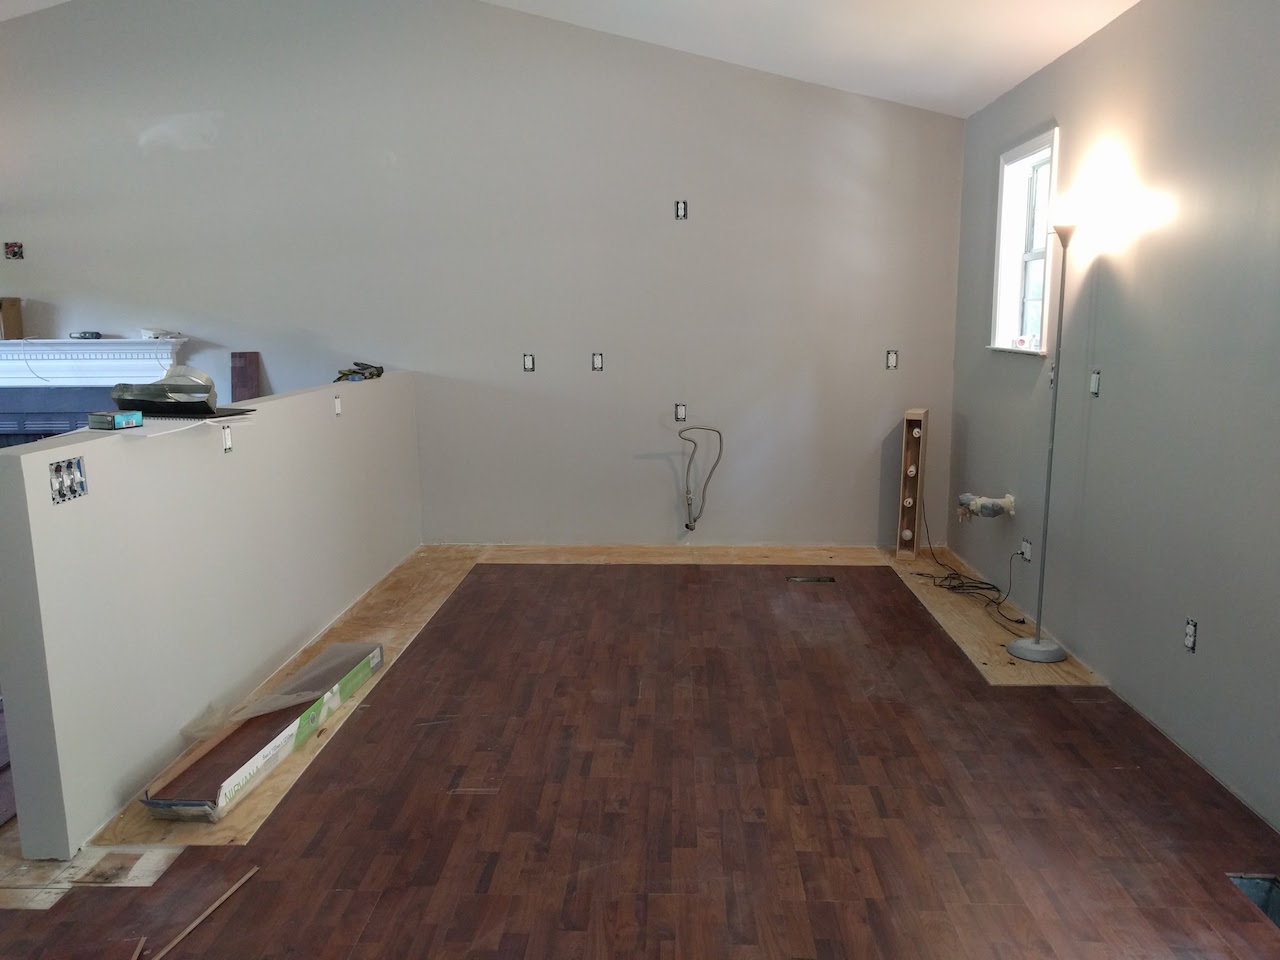
In my last update, we had successfully managed the demolition, electrical, and were patching up the drywall. You could make out the faint outline of a kitchen, but since then, we have made leaps and bounds. If I'm being honest, where I left off in my last update is about when we started to feel the burn of renovation life. We were tired of it, and it seemed like we hadn't gotten anywhere. But. About a week later, we finally started to feel the down hill speed picking up and have been trucking along ever since.
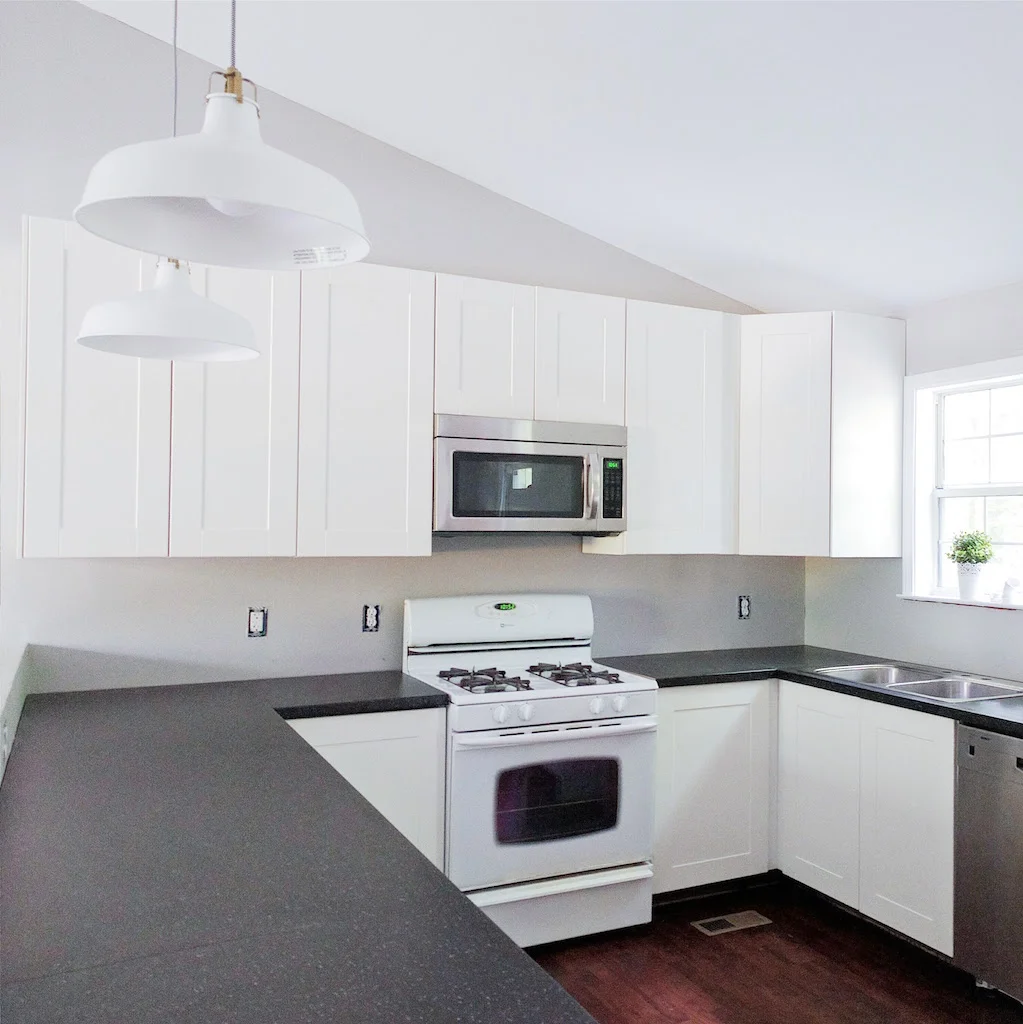
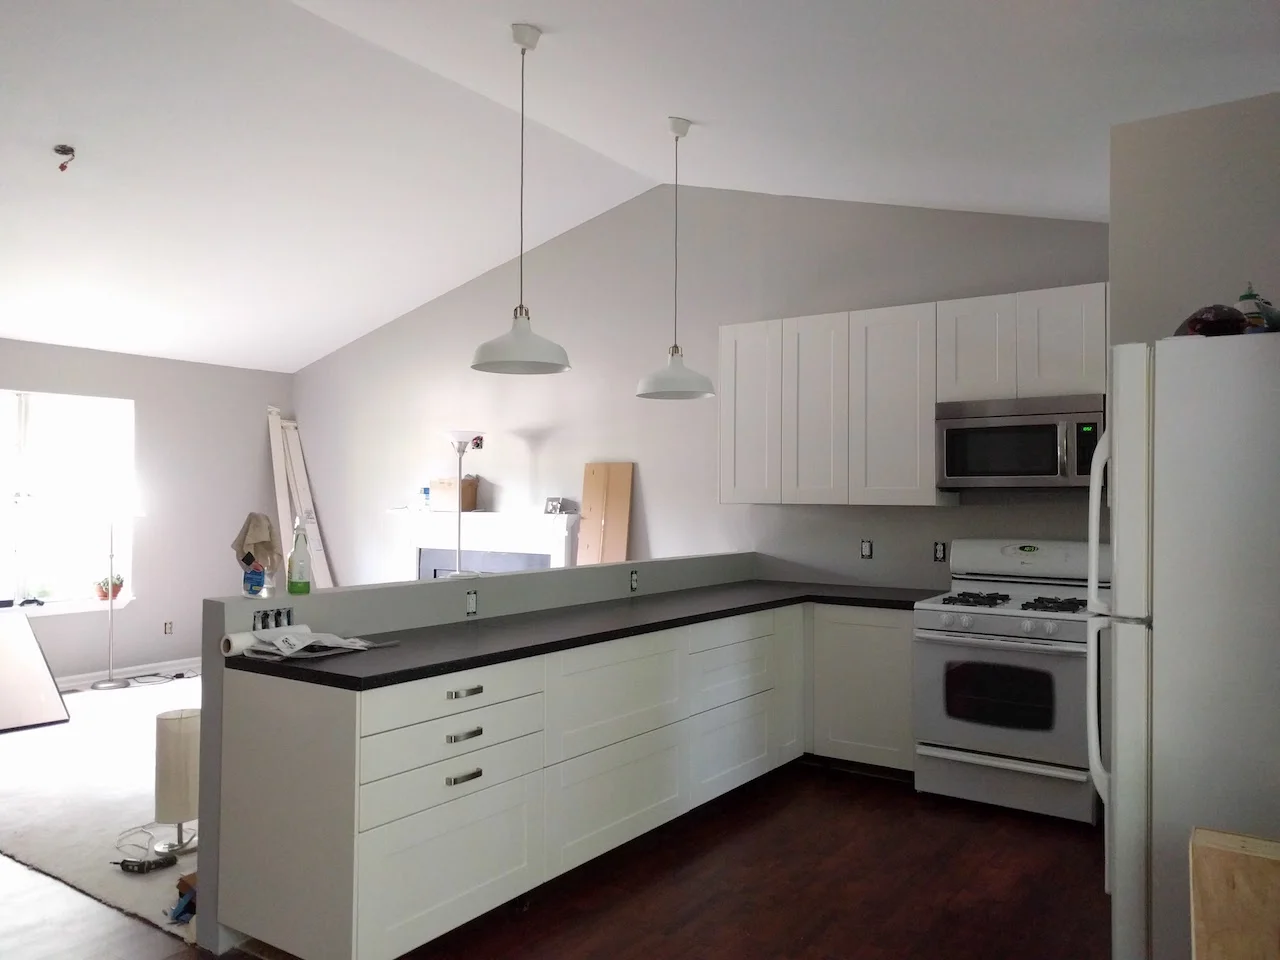
I tried to group the photos in "fours" of the same angle taken over the last month. Basically what you're seeing in terms of stages are: patched, sanded, painted, and current status. It's truly amazing how important the seemingly little things are in a functioning kitchen. We still have toe-kicks, faucets, outlet and switch covers, more lighting, a backsplash, new appliances, door/drawer handles, finishing touches on the counters, a pantry and fridge cabinet to assemble and install, shelves to place in cabinets, and more. So as close as it might seem, there is still plenty to be done. But heck, I'm just thankful I could actually bake a frozen pizza in a REAL oven last night. Praise Jesus.
Anyways, enjoy the progress photos and see below for links to a few products (lights, paint colors, etc..).


What do you think? We are soooo ready to have a couch in our home again and a TV on the wall. And maybe a few bottles of wine.... each. But hey, it's been totally worth it, who am I kidding?
Paint color: Silver City by Behr
Trim paint: Maui Mist by Behr
Pendants: RANARP by IKEA
Handles: VARDE by IKEA
Countertop: SALJAN by IKEA
Cabinet/Drawer fronts: GRIMSLOV by IKEA
Sink: KOHLER from Home Depot
Microhood: BETRODD by IKEA (fun fact: all IKEA appliances are actually Whirlpool)
Any questions? Drop me a comment or contact me!

Kitchen Progress 1 | Plus An IKEA Event Recap
Hey, all you good looking people!
Since we've been living the renovation life for about a month now, I thought you might like the DL on what's been happening around here and see how things have changed in our downstairs area. We've reached the halfway point in our kitchen renovation, finally! See below for the progress in photos (click to enlarge them).
Below that, I'll list real quick for you what we've accomplished thus far, and THEN I have a few photos of a recent event I attended at IKEA Atlanta with a short explanation of what I learned!
Before


Process


Over the last four weeks, we have:
- Packed up, moved, and stored our kitchen, dining, and living room.
- Created a 'kitchenette' in a third bedroom. We eat meals off paper plates and cook via microwave, crockpot, or grill. Dishes are done in a bathroom sink and we have mastered the art of surviving without a kitchen.
- Demolished our old cabinets and moved appliances and light fixtures out of the way.
- Scraped a layer off the textured ceilings.
- Removed some flooring to make the workspace easier to navigate.
- Ripped out a wall and pantry.
- Built and wired a new half-wall further over from where the original wall had been.
- Wired electrical for our TV/stereo system, kitchen, and lighting.
- Replaced the drywall we had to remove.
- Bought and returned countless items to our local home improvement store.
- ...and found a huge snake on our back porch.
We have worked at this project every night and every weekend since we started and we still have to finish replacing the drywall, taping, mudding, sanding, priming, painting, building cabinets, plumbing, installing cabinets, and more.
But has it been worth it?
YEP.
Stay tuned for my next installment on this project and don't forget to follow me on Instagram to catch some more peeks.
Now, for the news on IKEA.
If you've ever been to one of these big blue and yellows, you're probably familiar with their "cafeteria." The thing is, what has always been lovingly referred to as a cafeteria has always officially been called their restaurant. But let's be real, it never felt like one. So they made some changes!
They invited me to come to the re-opening of their restaurant last Friday, and I am honestly very impressed with what they've done to make the dining experience more convenient for the needs of every one of their shoppers. Not only that, but as one of the largest showroom spaces their stores contain, they weren't really showcasing much of their products there.
The restaurant now boasts several different seating areas for all types of visitors. A family area where parents can be near to the condiments, drinks, and even a bottle warmer while still being able to keep an eye on their wiggly little kiddos. There are bar height tables for the visitors who maybe need to just grab a drink or gather their heads around what they're purchasing, longer tables for groups or people who are looking to grasp some inspiration from the decor around them, and couches for those who need to take a rest and use the wireless chargers located on the lamps! The decor of the restaurant has been vastly improved, and will change twice a year to stay relevant with what's popular or inspiring for their guests. When you visit, take note of the "family room feeling" they're trying to give of.
Of course, so many of us are familiar with their menu (meatballs anyone?)... but they've changed that too! They now offer family meals at unsurprisingly low prices, and more options for sustainable eating. Organic pastas, vegetarian options, clean-eater friendly choices, and more. They've done a great job on their restaurant overhaul. If I'm being totally honest with you, I had never been one to frequent their restaurant because of the cold environment and unsatisfactory menu options... but (and I mean this completely unbiased) I'll actually be visiting it more often now! I am not being paid to say any of this, by the way, it was just honestly worth being noted in a post because it's a big change from the IKEA we have all known. Big kudos to them!
For the rest of my time there, our group was given a brief synopsis of their new kitchen system Sektion (which we will be installing in our own home in a few weeks), a little info on their marketplace that you usually see in front of you after you checkout, and a lively lecture on their Cooking Shop (aka: dining, cooking, and serving department). Did you guys know they have a 15 year warranty on their Sensuell series?? Their knives have warranties too. I was really surprised by how much they actually care about backing up their products. Sometimes, I assume that since they're so large and so cost effective, they wouldn't care if their customers are happy, but they really do! They genuinely want their products to be attractive, functional, and of good quality. In fact, Epicurious gave them a pretty great review on their $10 bundt pan - check it out.
Overall, I was really honored to attend their event and their new store manager, Jill, was such a joy to meet! She has an awesome team, and they all showed such care and passion for what IKEA stands for and hopes to stand for in the future. It was a pleasure to spend a few hours with them and hopefully I'll have more IKEA news to share with you all in the future! Here are some fun photos from the event :)


What do you all think? Do you like the changes to their restaurant?

Why We DIY
To catch you all up to speed, my husband (Tom) and I are in the midst of a kitchen renovation.
Actually, it affects our entire downstairs area. I wrote a post on our renovation plans here and you can see what we hope the finished product resembles.
We've been without a kitchen for two weeks now. We wash dishes in the bathroom sink, dust from demo work has begun to settle throughout the entire home, and we have no where to "sit" besides a bed and a desk. We have to shower nearly every night to get the grime out of our hair, and all our spare moments are usually filled with planning for the "next step." This will go on for another several weeks.
If you're reading this and thinking to yourself "Whyyyy?? Why do you do that to yourself, when you could have someone else do it FOR you?" then you're in the right place. Not to mention the fact that we get asked this question pretty frequently, so it seemed like a good time to answer! Let me explain to you why we DIY. Who knows, maybe you'll catch the bug too!
1. It saves money
I bet you saw that one coming.
It's true! It saves an enormous amount of money. If you were to Google "cost of a kitchen remodel" I guarantee you wouldn't see an answer for less than 20K. If you do see it for less than that, it certainly wouldn't include new cabinets, floors, or backsplashes. Let me tell you a secret... our total renovation for our downstairs will cost around 8K. That includes new appliances, countertops, cabinets, a sink, lighting, demolition, paint, and more. It's so cost effective it's not even funny. Okay, maybe a little funny.
2. You learn
Education is priceless, is it not? Well, when our inspector came rolling in the other day to make sure our renovation was a go, I held my own and talked about Romex wire and joked about the lack of GFCI outlets where they should obviously be placed. It felt good to know what the heck I was talking about and not stand there with a glazed over, blank stare. Don't mistake me, we are certainly no replacements for plumbers and electricians, but we do heavy research for even the smallest things and quadruple check that we're doing everything correctly. It's incredibly rewarding. Especially when something breaks, even if just slightly, and we can fix it ourselves right away instead of waiting for help to come and charge us an arm and a leg. Did I mention it also teaches you patience? A good one for the sinfully impatient ones like me.
3. We enjoy it
A work of your own hands is something that you can attach a very personal pride to. We get bumps and bruises, work long, tiring hours, and get dirt on our hands and paint on our cheeks. But we do it together... and as a couple, we've grown. It's taught us how to disagree in a freakishly agreeable way. It's very stressful work, but we've learned to take a grain of salt with every set-back and not get too distraught. It's fun! Not always, of course, but much of the enjoyment comes from the attitudes of those working on it. So we just keep it positive and share the love of the reno-life.
4. We go at our own pace
You know that old saying, "There's no time like the present!"
Well, we get to control when "the present" really is. We tackle one room at a time based on schedule, finances, or whatever else. Sometimes we've gone straight from one project to the next, and other times we've given ourselves a break from the chaos. We get to decide when a project starts and ends and we don't have to wait on people to show up and do the work... because it's always us! We've even been spontaneous and started a project after talking about it only a day prior. We weren't going to even start the kitchen until this fall, but the pieces aligned and we created a schedule and got to work.
5. Customization
Sure, you can ask a contractor to do something an exact certain way, but you can't always guarantee the message will get across just how you mean it. Plus, by doing it yourself, you get the option of finding all the parts for as little or as much money and from wherever you choose. That means I get to find weird quirky pieces to add at the last minute without having to halt anyone's work or try to schedule around someone else's time.
6. It was passed down
Both Tom and I come from families who DIYed. Having grown up with handy fathers and creative moms, we are especially open to the possibilities that doing it yourself brings along. I lived in a house that was undergoing a gut job and I spent my summer playing in boxes from the new cabinets in our backyard. I've helped hold tools while I watched my dad fix things, and I dragged my feet through many a home improvement store. Tom spent a summer or two as a handy man, and his skills have easily transferred into our renovation life. We love being able to call our parents and ask for help and learn from their experiences.
7. We can
We're young and able. We're smart. We can handle (and happily welcome) the challenge and brain power it takes to figure out all the idiosyncrasies of doing it yourself.
For us, the bigger question with DIY has become...
...why not?
What about you? A DIYer, or not so much? Questions for me? Leave a comment!

IKEA Kitchen Planning
If you've ever done a kitchen renovation, you know about the researching, measuring, remeasuring, re-researching, and choices, choices, choices. It's stressful and time consuming, and there are about a million paths you can take based on style, function, and price. If you haven't been through this process, then you've come to a great place.
After looking at the options at Home Depot, Lowes, and IKEA, we've narrowed it down to IKEA. Partially because one of their famous kitchen sales will be starting March 4 - April 17 of this year. The deal is, you have to spend at least $4,000 in order to receive their generous 15% return in the form of a giftcard. That's at least $600 you'll get back for purchasing through them which is about the cost of some appliances.
Regardless of their sale, IKEA also has a 25 year warranty on their kitchens as well as a surprising reputation for quality. Like many people, you may think of IKEA's products as the ones that fall apart after a year of use... but not so with their kitchens. My parents built a house in 2007 and installed a stunning IKEA kitchen that looks practically new to this day. While they were visiting us last week, we asked for their advice on the IKEA front and they whole-heartedly gave their support for it. Especially in a house of our size and price range - it just makes sense.
By using their kitchen planner tool, you can add in all the dimensions of your space, floors, paint colors, correct placement of doors and windows, and even add weird additional structures that your particular space may have. It's a little slow and frustrating sometimes, but you learn how to navigate it well over time.
Our current kitchen has a very awkward layout. The kind of layout you look at and go, "What were these builders thinking? Look at all the wasted space and lack of storage..."
Tom and I love open concept homes (said every HGTV guest ever) and our downstairs has the potential to embody that so well. It just means we need to remove a wall and a pantry and move a fridge. Oh, and add about 3x more storage and about 35 more linear feet of countertops.
Here's the current state of things:


Yeah. It's a cluster. And it's a pain in the butt to function in... just ask the goose egg that's on my head from when I nailed my head on an open cabinet and then wept like a baby on my mother's shoulder.
But here's our plan:
- Remove the wall between the living room and kitchen. So as to scoot the kitchen into the living room just a smidge and open the space.
- Remove the current pantry and put the fridge in its place.
- Smooth the ceilings throughout.
- Paint the walls.
By doing all those things, we can have a space that looks like this:


LOOK AT ALL THE COUNTER SPACE.
I actually made a mock-up of the entire downstairs because we actually own that sectional, table, chairs, and bench... so you guys are seeing the big picture! We wouldn't probably install those built-ins next to the fireplace just yet, but it'll stay in the plans for the future - we just aren't totally sold on them yet.
We love this layout because we aren't sacrificing our pantry, and will instead replace it with one that has drawers (praise Jesus).
Also, you'll notice the half-wall between the rooms. This will serve as a minor separation and something to install outlets on for the kitchen.
We decided to leave the stove where it is so that we don't have to move the gas line, but it'll scoot about five inches to the left of its current position.
Small adjustments will still be made, like adding pendant lights over the long counter and possibly some open shelving above the dishwasher, or a slight change in the drawer combinations of the base cabinets. But overall, the size and dimensions are pretty much set in stone!
We're ecstatic to be moving forward in this process and we'll be sure to keep you all updated as we go along. In the meantime, what do you think?
Considering doing an IKEA kitchen remodel or wondering about something you see in the photos? We'd love to answer any questions you may have :) Feel free to contact us.
Question: What kind of range is best?
I can't resist a little Office humor.
Here's the dealio.
We're hoping to renovate our kitchen sometime this year and it's going to need all new appliances as well. The fridge has already been chosen, but the range (and we are for sure getting a range) has been of recent discussion lately.
I grew up with electric coils and have never had an issue. Since I learned how to cook on them, the issue of "control" has never bothered me that much and I got used to it. After we got married our apartments used electric coils - still used to it, still not a big deal. When we got our house, though, it came with a gas stove - much to Tom's delight. I had heard him speak highly of gas and the ability to control the temp more easily, so I was looking forward to trying it myself and was honestly convinced I'd love it. We love to cook, so having gas was pretty exciting (searing over electric coils isn't the best... things like that). Sadly, I really do hate to admit it: I hate our gas stove!
Years ago, we made an agreement that I would eventually get the final say on a fridge, and Tom would have the final say on a range. We would take each other's thoughts into account, but it would ultimately be up to that person. The reason we made this agreement is because Thomas feels more strongly about stoves than I do, and I feel strongly about certain fridges.
Unfortunately, I now feel pretty darn strongly about ranges! So we're going over the pros and cons of certain types and trying to make an educated decision. Granted, we won't get one for several months, but it's good to be prepared and be able to keep an eye out for sales on appliances you eventually want to buy.
We are still weighing the pros and cons and I thought it might be sort of fun to open the floor for discussion with others. Let me share with you what we have and please share your two-cents as well in the comments.
Gas
CONS
- Entire cooktop gets hot
- Open flame is dangerous (towels, children's fingers, reaching for cabinets above)
- Middle space too hot to use for drippy spoons/utensils
- Difficult to clean
- Takes forever to boil
- Cannot get to food if dropped under flame
- Cannot whisk for long periods without burning hand/utensil handle
- Can heat room temperature
- Oven takes longer to heat
PROS
- Cheaper
- Temperature control
- Can still use in power outage
Electric (Glass Cooktop)
CONS
- Lack of temperature control
- Hot burner
- Uneven cooking
- Takes a while to boil
- Can't use in a power outage
- Glass could crack/break
PROS
- Cheaper
- Easy clean-up
- No flame
- Only single burner gets hot, not entire surface
- Safer for fabric and children
- Attractive look
- Can use as extra counter space when not in use
Induction
CONS
- Expensive
- Needs special pans (though, we do own them)
- Unknown: neither of us have used it before
- Can't use in a power outage
- Unsure of technical issues
- Lack of product choices or variety
PROS
- Temperature control
- Fast boil time
- Easy cleanup
- Safe, cool surface
- No flame
- Attractive look
- Can use as extra counter space when not in use
This is a really difficult decision! What are your opinions? We don't know a ton about induction, but we're very curious.
I mean, when shopping for these things, even the location of the knobs becomes a factor! We're not sure if we trust a completely "touch-screen" based range - what if something in the software busts? What about ovens that have a small upper level and a larger bottom level? Don't you save some energy and time if you can heat up only the smaller oven for baking cookies or cooking a casserole? Can basic be better in saving yourself from tech errors down the road? What's the deal with slide-in ranges - are they worth the extra cost?
We would LOVE to hear your thoughts!

Stairway/Landing Refresh
It's official.
Our upstairs now looks like an entirely different house than our downstairs. Which is annoying, but good -- progress, baby!
This was the quickest refresh we've done so far. All it took was a weekend!
Here's what we did:
- ceiling: smoothed, primed, painted
- painted the walls
- painted the trim (6 doorways..ugh)
- replaced the light fixture
- replaced the switch and cover
As always, here's the glamour shots:


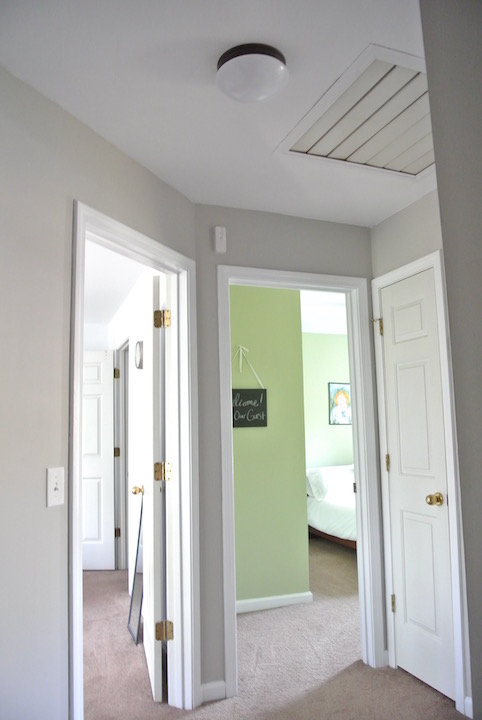


Here's a breakdown of items:
Wall paint: Silver City by Behr Marquee
Trim paint: Maui Mist by Behr (it's also the same white we used in our master and wood room walls)
Light fixture: Oil Rubbed Bronze LED Mushroom Flushmount
What do you guys think? Easy-peasy and soooo much better. That grey is also going to be used throughout the downstairs as well. That way we'll have a very nice flow to our small home and go from browns all over the place, to some cooler neutrals to brighten the space.

Guest Bathroom
I love an easy update!
Here's the shortcut version of what we did...
- removed chair rails and patched area
- scraped ceilings smooth, primed, and painted
- re-caulked tub, toilet, and sink
- painted walls, cabinet, vanity, and trim
- added drawer and cabinet hardware
- created a faux marble countertop using contact paper
- installed a new toilet
All of these projects were simple, relatively cheap, and we were done in four days. Did it have surprises? Ohhh yes. Unwelcome, accidental, surprises. Lemme just show you the best way we know how.
Hahahaha ...don't you love when you buy a house that literally has holes in the walls? Oh well. We'll fix it later. Here's some more process glamour shots.


So what do you all think? For a simple update, we are super pleased.
Things for Phase 2:
- champagne bronze towel holder (also one for large towels), light fixture, and faucet
- new tub/shower
- new vanity and countertop
- fix the hole in the wall and come up with a better storage solution (instead of the cabinet)
- different flooring
- fix the air vent to actually go outside instead of to the attic (ugh)
- general decor (framed art, etc..)