Entryway
Wow - it's been a while since I had a new project reveal for you guys! This is just a little one, but it's made a world of difference.
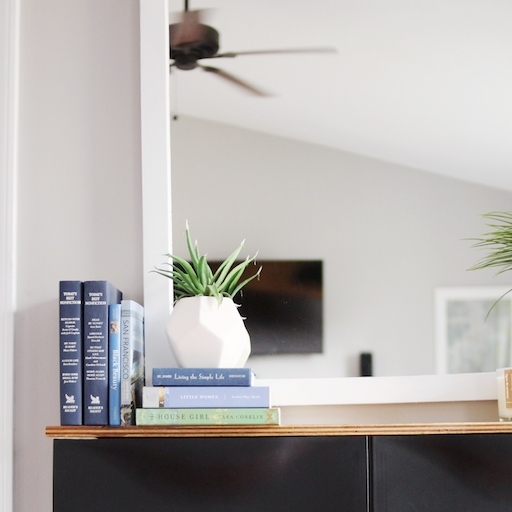
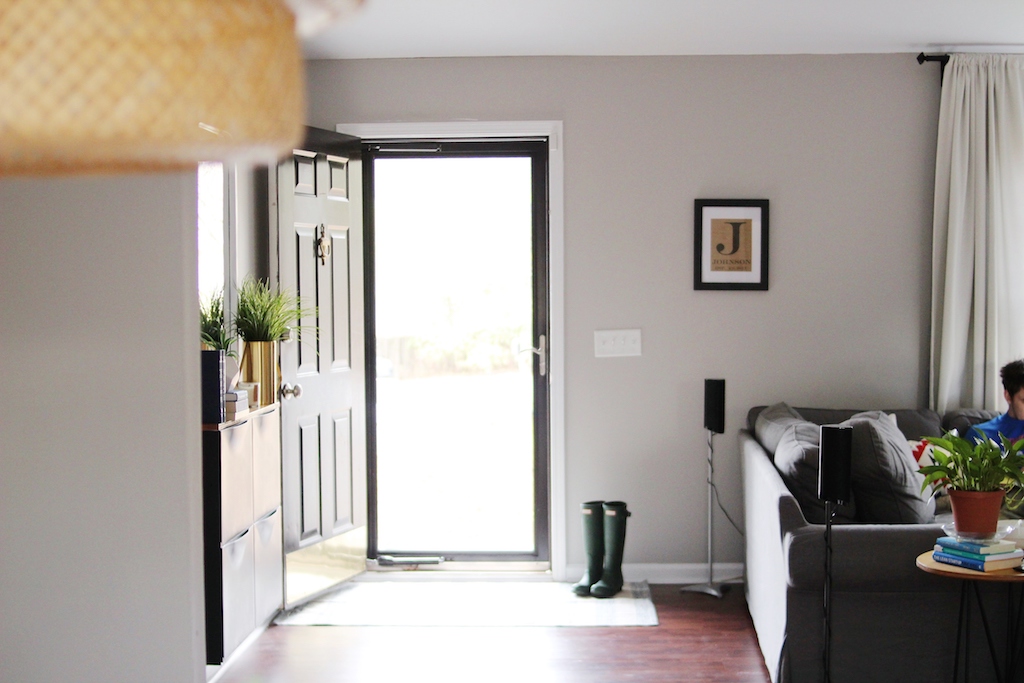
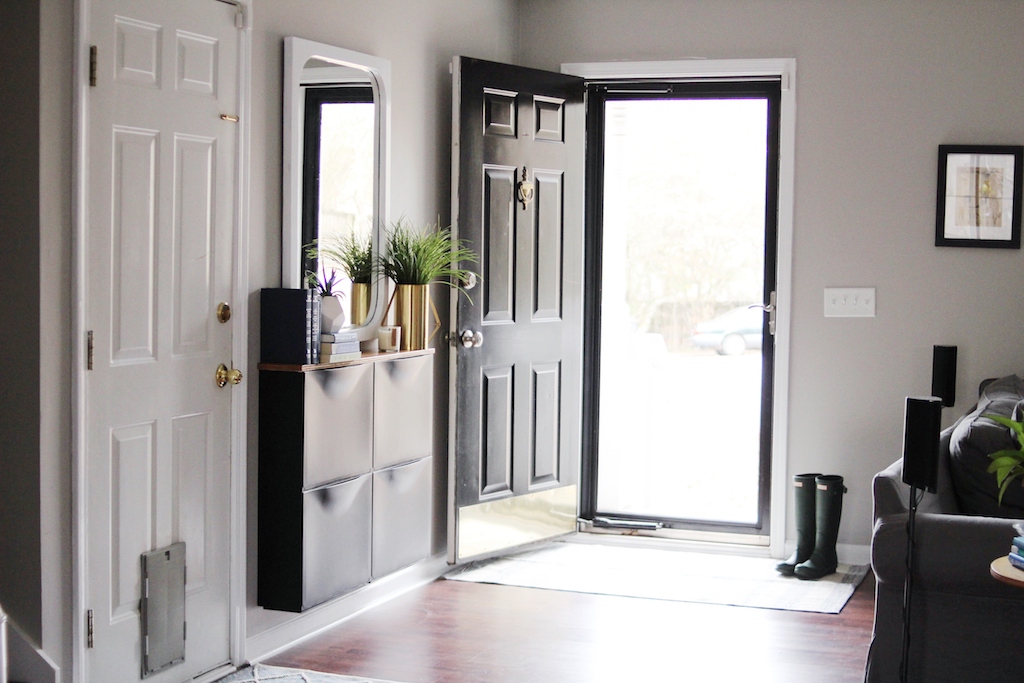
We have a small entryway. Our living room and foyer sort of morph together and things get even more crowded with a garage entry and front door entry in only slightly different spots. In the following pictures, you'll see the garage entry (complete with a tiny dog door - which our new puppy will never fit through) to the left of the shelf and storage we just added. We still need to update the paint on the doors - maybe even a light pop of color? - and add a lamp, but so far we are loving the minimalist look and functionality.
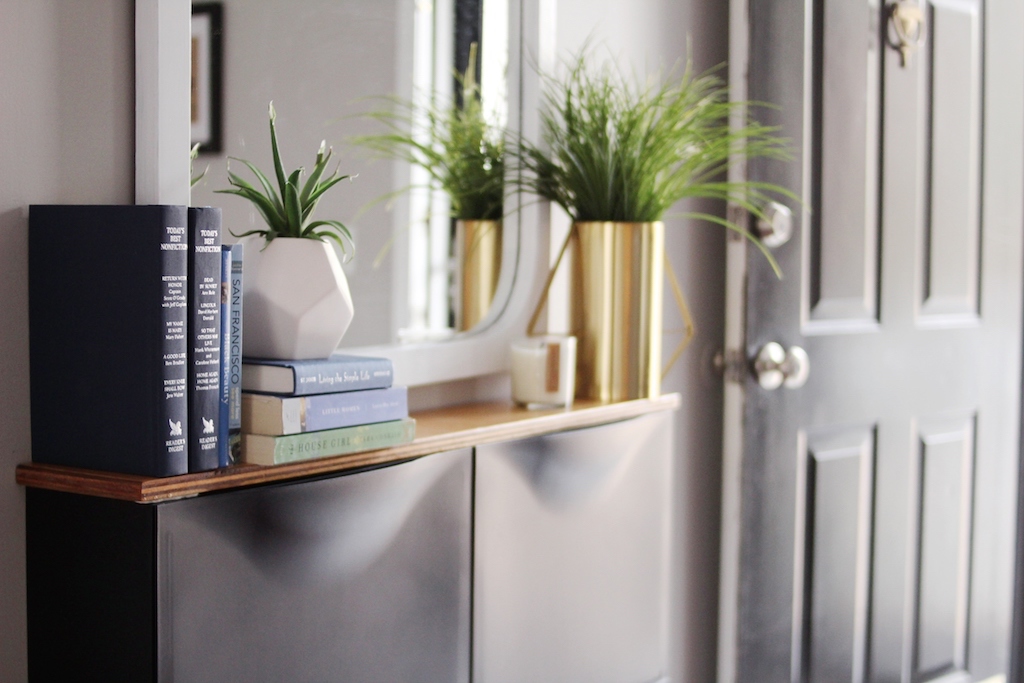
The top two cubbies give each of us a place to put floater items. If I see Tom's keys or wallet or glasses floating around, they go into his compartment. It's sort of like our own little "internal mail" system - haha! Mine stores my purse and sunglasses and whatever else I may need to grab on my way out the door. The bottom two compartments hold a few pairs of shoes. Just the pairs we can slide on to check the mail or run to the store in. Since our actual coat and shoe closet is in our upstairs landing, a storage spot like this was pretty needed for our little entryway.
Of course, I'mma give you the breakdown:
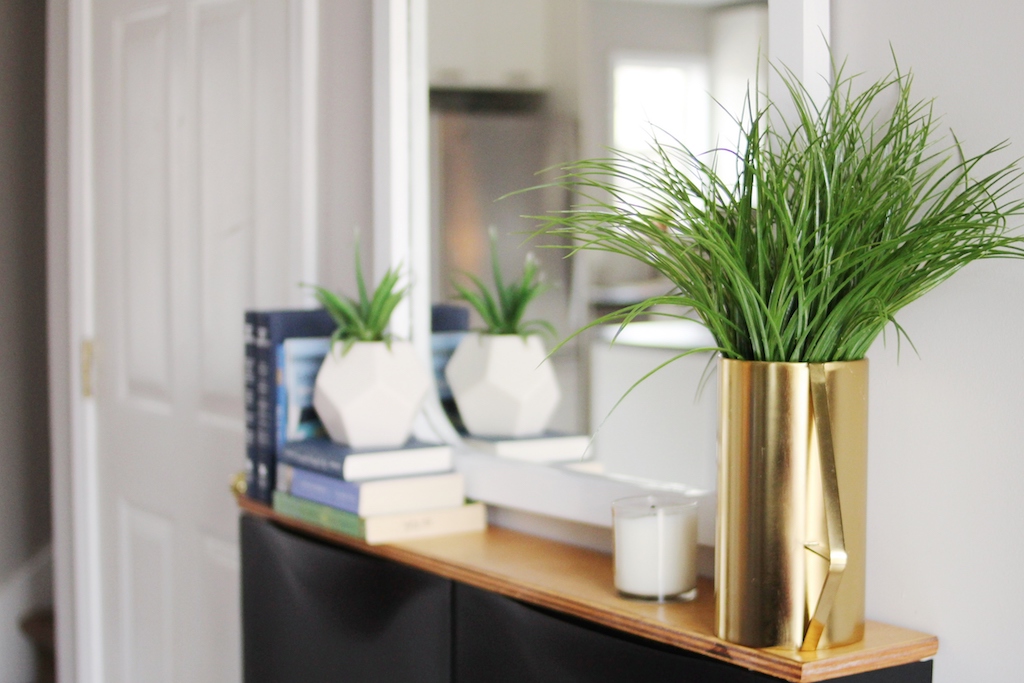
Trones: $80
Mirror: $16 (thrifted and painted)
Vases: $15 total (Home Goods, Target)
Books: $15 Goodwill
Candle: Gift (Pottery Barn)
Shelf: leftover from previous projects
TOTAL: $136

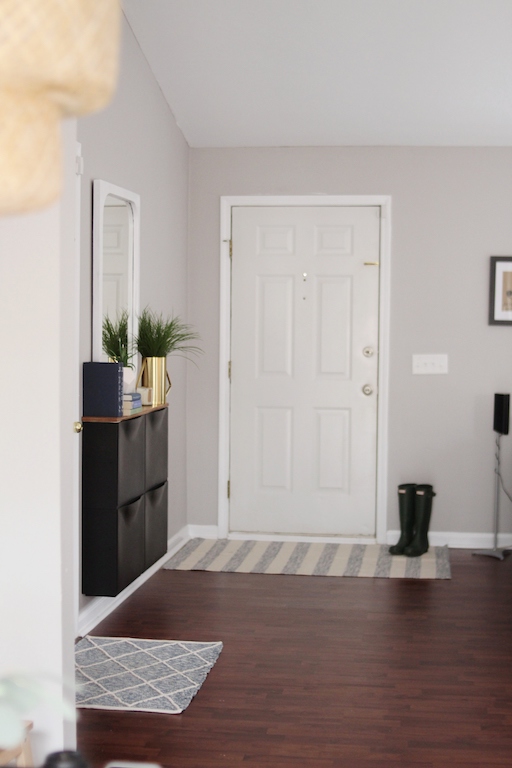
It's been the perfect place to check my makeup before heading out, and dumping the mail until I have a chance to look it over. Our kitchen counter had become the gathering place for all those random items before this, so I love the storage and minimal aesthetic. These are a great example of something I mentioned in my last post on being a clean freak - functionality. Though this looks clean, that top right cubby is full of old receipts and some plastic shopping bags (Tom's cubby, of course) but unless I told you, you'd just assume this area is spotless, huh?
So, what do you think? Would this sort of thing help in your home?

IKEA Kitchen Features We Love
I am not receiving any commission for this post. These are truly my honest opinions, and I want to clarify that before I speak super highly of IKEA's kitchen system :)
Remember when I told you how much our kitchen/downstairs reno ended up costing us? It was less than $8,000 for a total gut job (here's the breakdown post). I'm sure some people would read that and think, "Well, that's because you're totally sacrificing quality!" but I want to take today to bust that myth and share with you our favorite features of IKEA kitchens. To be completely honest, we would 100% go with the IKEA kitchen systems again. The pros FAR outweighed the cons and we have been thoroughly impressed. I'm not just saying that now, when we have a great kitchen to get all *heart eyes* over, but the entire process from beginning to end was just smart, efficient, and great for those of us who are control freaks. Let me just jump right in:
Modular System + Online Design Tool
Not only are IKEA systems completely modular - meaning, they have enough dimensional diversity to be mixed and matched to fit any requirements - the online design tool allows you to create your kitchen entirely from scratch (or from a template). I have tried the design tools for other large home improvement stores, and I can tell you that none of them can beat IKEA in terms of ease of use and functionality. Sure, sometimes it's slow and freezes up, but it's not nearly as rip-your-hair-out annoying as the other places. Plus, based on your room measurements, you'll see notifications when one cabinet is too close to another and may cause doors to hit something or not open properly. You can also change door fronts, countertops, handles, etc... in one fell swoop and see your itemized list and total cost whenever you like. The modular system came in very handy when we made a measurement mistake and one of our cabinets wouldn't fit. We simply took back the one that wouldn't fit, and bought a different size - voila! - crisis averted.
(I should also mention, they even have a design tool for bathroom and office renovations)
Cost
Obviously. We did our renovation - cabinets, countertops, lighting, everything - for under 8K. When we had a similar, smaller layout quoted at Home Depot, it clocked in at 12K.... just for the cabinets... which were lesser in quality to the ones we got from IKEA. Yeesh. Which brings me to my next point...
Quality
The quality of IKEA cabinets is not the highest on the market, of course, but they are really sturdy. We're not at all worried about the wear and tear. And even then, if one of the fronts gets wobbly or a drawer track breaks, you can easily buy replacements or let it fall under IKEA's 25 year limited warranty. But again, they don't at all feel "cheap" and we love the quality.
Ordering, Set-up, and Rail System

When you make your order in-store, the workers are knowledgable and will go through each and every piece to make sure you will have everything you need. It takes a couple hours to go through it with them, but considering it costs nothing extra to have an experienced worker make sure your design is okay, the time spent is fine by me. They tell you about shipping options or pick-up FYI's and it's very smooth sailing.
It's also super nice to have your entire kitchen before you even start your demo work, just waiting to be put together. Which by the way, though time consuming, is SUPER easy and helps save you moolah.
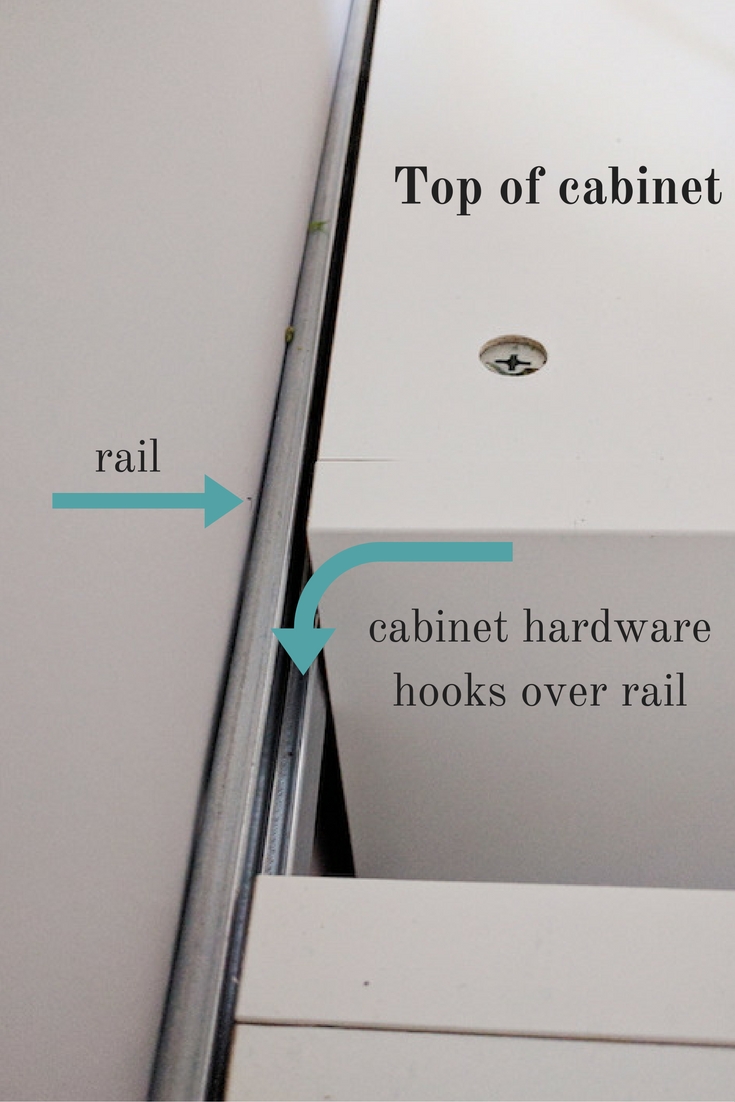
The rail system is amazing. Ever thought about that fact that wall cabinets are actually hung on a wall one at a time? Getting them all to line up and not start sloping down or up can be really hard. IKEA comes with these long rails that you simply screw into some studs, make sure it's level, and then slide your cabinets on. It makes it so easy and less stressful. Of course it still takes some measuring to be sure your cabinets are the right height from the counters, but it's much nicer than their competitors. Oh, and the base cabinets are rail-hung too!
Door Hinges
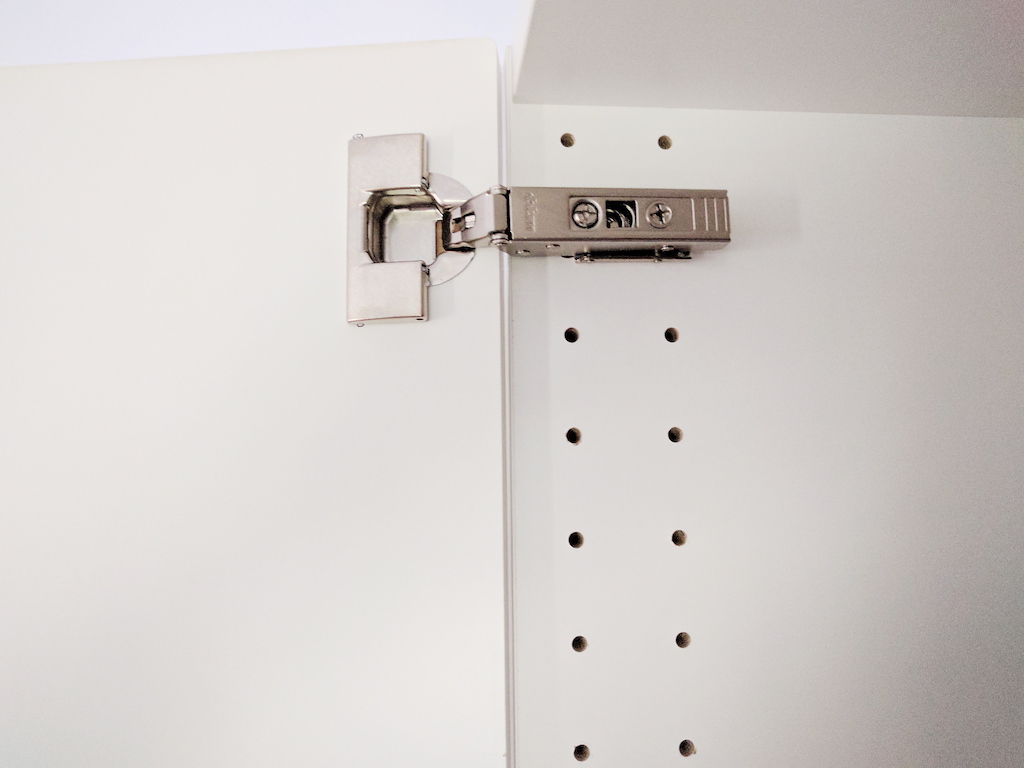
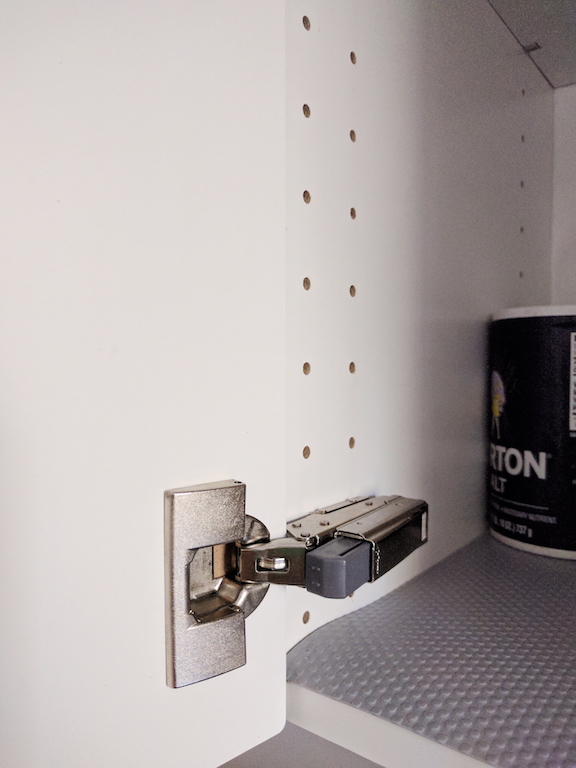
I'm not all that great with power tools, but IKEA's hinges are so ingenious. The holes on the frame of the cabinet are already there which makes screwing in the hinge a piece of cake. On the door front, you just push a metal piece in place (no tools required) and it tightens itself. The piece on the front, snaps easily into the piece on the frame, and you're done. Once it's on, you can use a small screw driver via two holes on each hinge to adjust the door front so it's exactly centered on the frame or lined up with the other cabinet doors. Then, you can add a small "soft close" clip to one of the hinges to finish it off. We probably put all our door fronts on in less than twenty minutes. If you're curious about what I mean, this guy's 2 minute video shows you how easy it is. Honestly, it's almost therapeutic to put on these hinges because it's so painless.
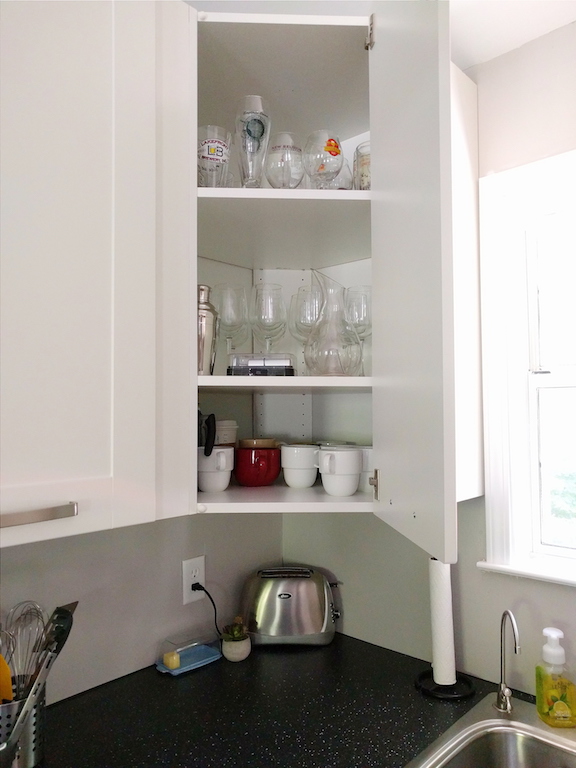
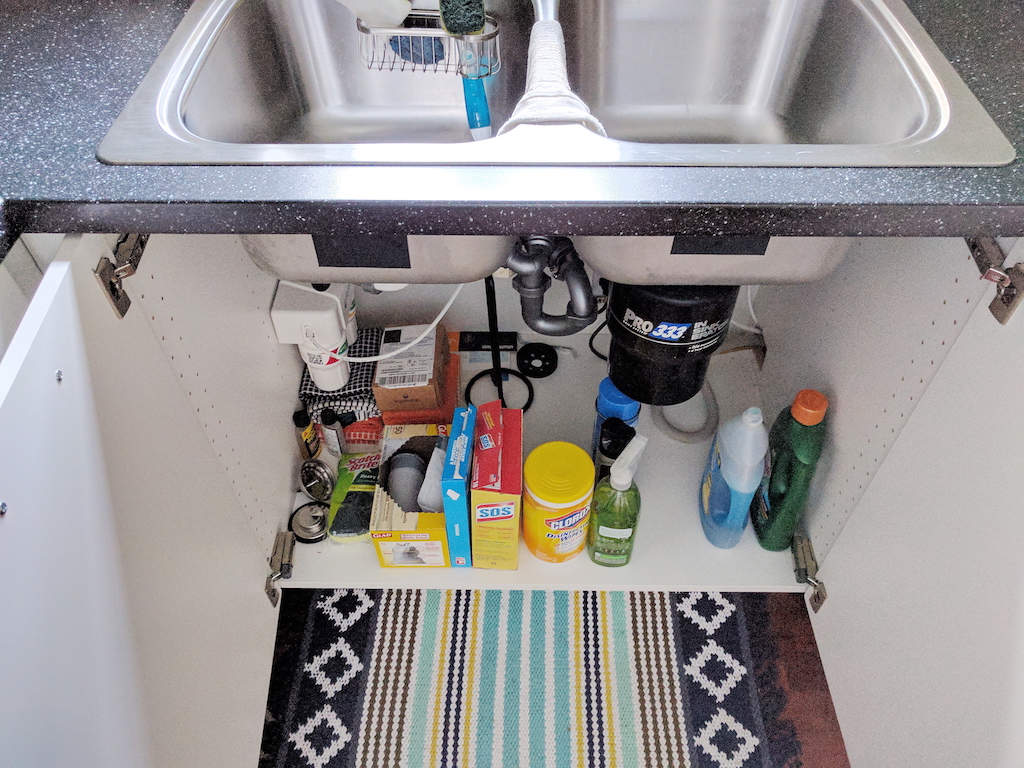
No Gaps, Lips, or Separators
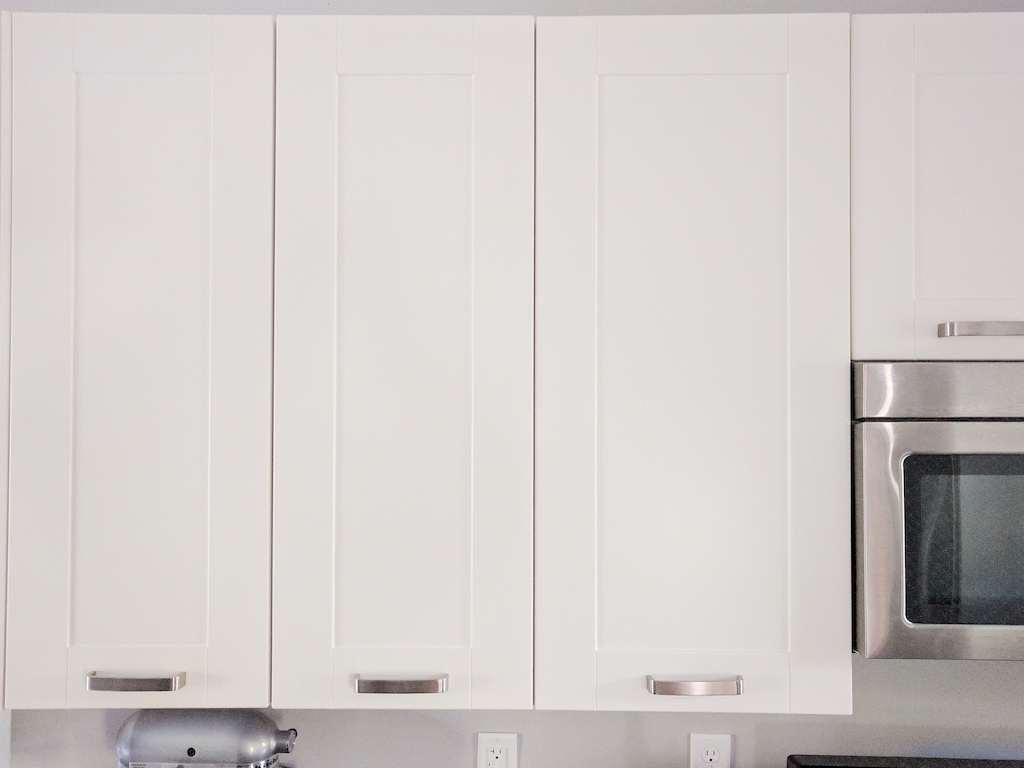
No gaps, meaning all your doors are flush with one another. There are no wood gaps that show between the door fronts.
Along with that, there are also no lips on the insides of the cabinets. So when you pull a glass off a shelf, it will slide right out instead of hitting a lip on the bottom of the shelf or on the side of the cabinet.
Have a two-door cabinet? There won't be a piece of wood running down the center. I love this feature especially under our sink as it makes organization super clean and simple. Tom loves it because if he needs to work on plumbing under the sink, he doesn't have to squeeze into one side. He can open both doors and have free range to lay underneath!
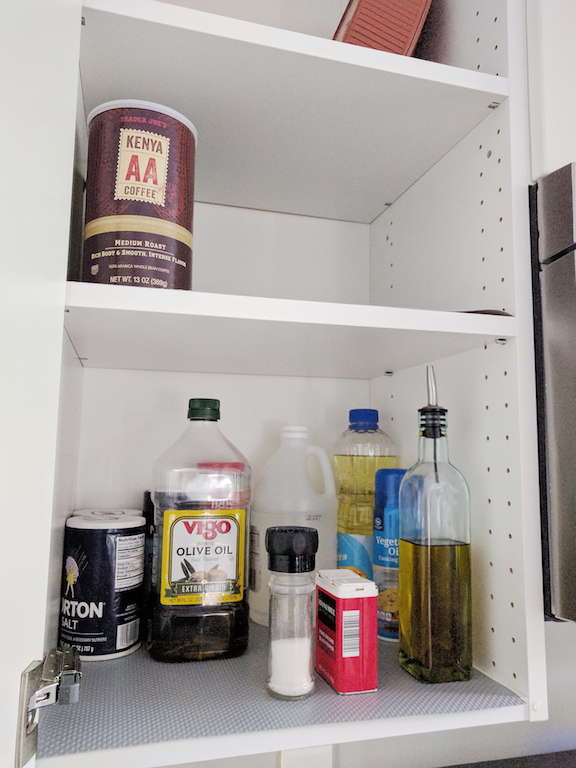
Wall Cabinet Depth of 15"
The standard depth of most wall cabinets is 12-13" (I believe) but IKEA's are 15". Meaning, I can fit one stack of plates in the back of a cabinet, and still fit another stack in front of them. If we didn't have a pantry, the depth of those cabinets would be such a life-saver in terms of storage. I absolutely LOVE the added depth.
Drawers, Drawers, and More Drawers
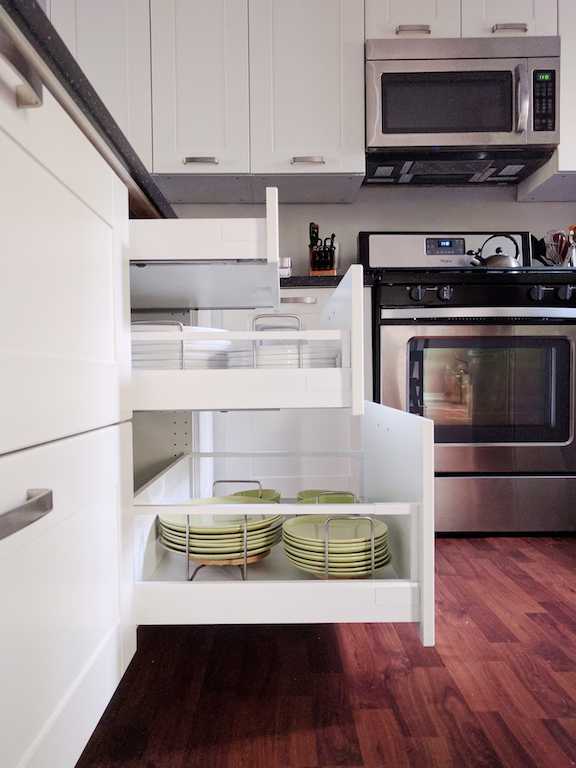
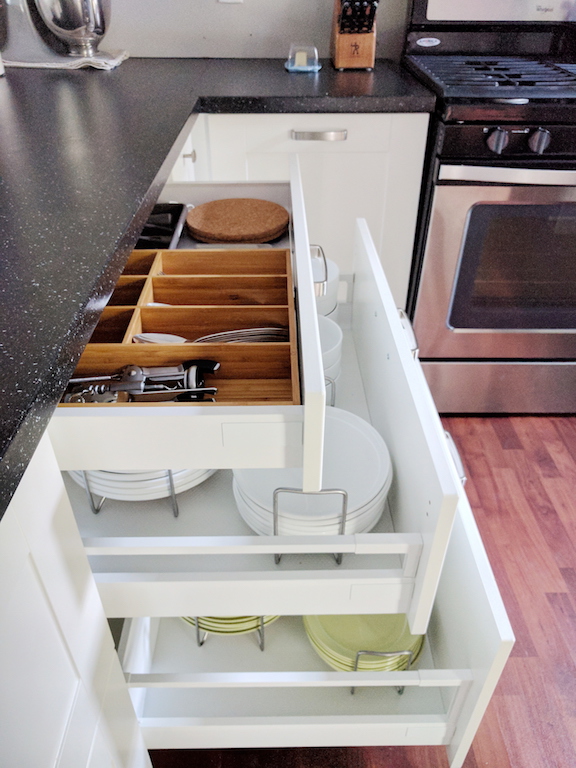
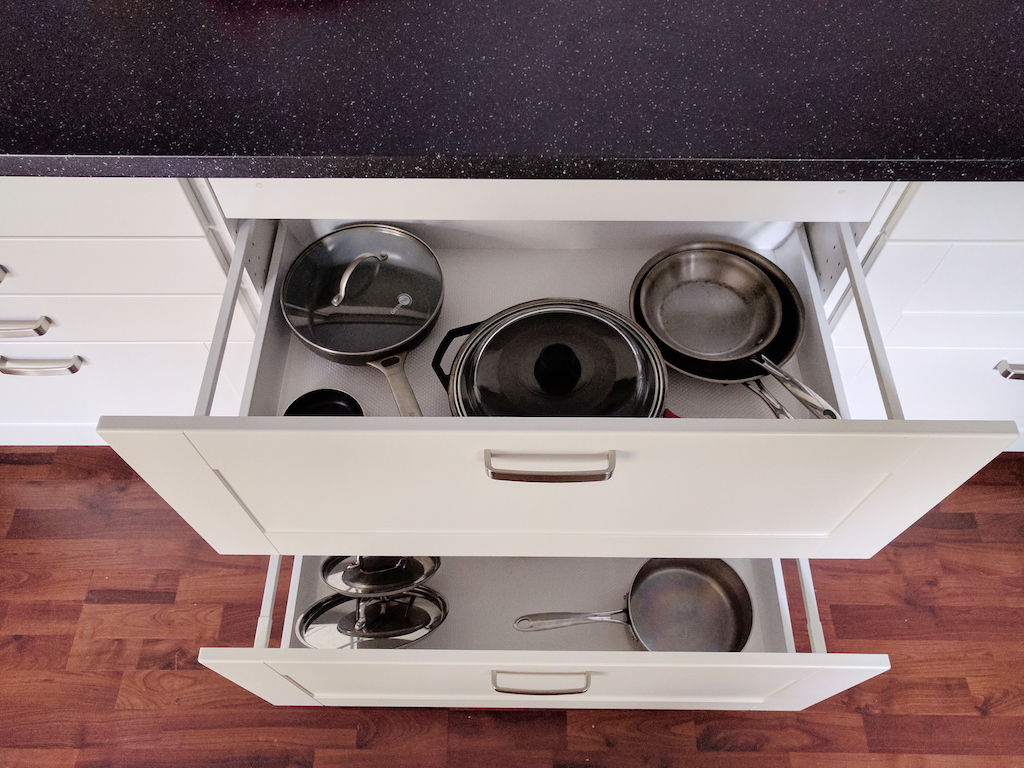
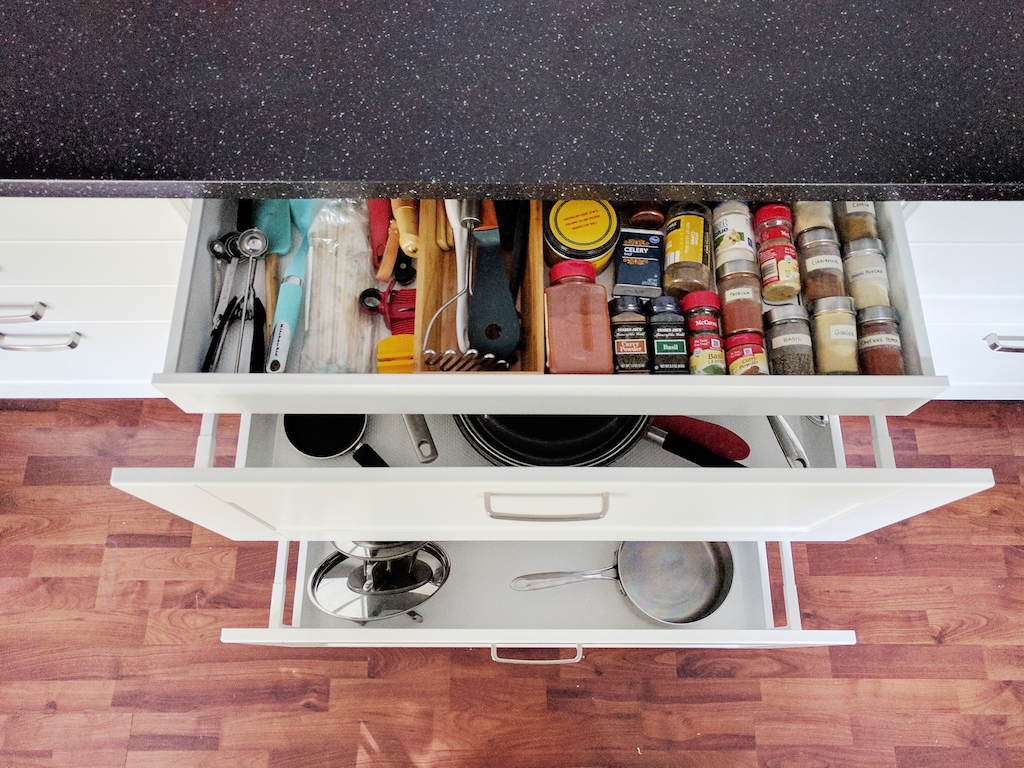
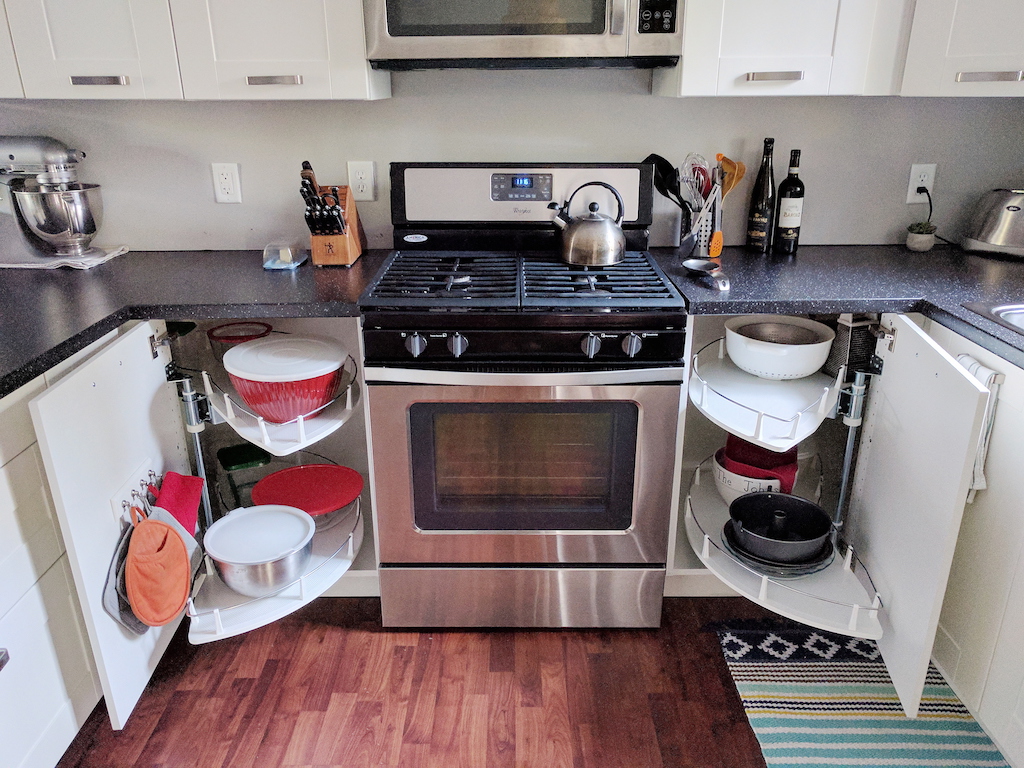
Our base cabinet drawers. I am in love. Nothing like not having to dig to the back of a cabinet on your hands and knees to reach that big stock pot. Guys, they come all the way out. It doesn't stop with 2 inches left to go, they go all the way. Drawer organizers, corner pull-out lazy susan, etc. The organization of the base cabinets is the greatest. They are also soft close and can come with hidden internal drawers too. Endless options and combinations. Which again, on that subject...
Easy To Change
Don't like the door style or colors? Just get some new fronts instead of scrapping the whole thing. Not crazy about the drawer configurations? We could swap the drawers of our two 30" wide base cabinets anytime, or just go buy entirely new drawer combos in that width whenever we'd like. No problem! Anything can be undone with such ease and adjusted after the fact with no repercussions.
Countertops
We paid only $250 for probably 45 linear feet of counterspace... which is amazing. Most of IKEA's countertops would require you either cut and install their laminate options yourself, or hire someone to do it for you. We honestly love the quality of their laminate. We cut and installed ourselves, and it doesn't look cheapy to us at all. I think if you live in a great big home with top tier features, a stone or solid surface would make sense, but not in our little starter home :) We also don't give two hoots about the hoopla behind granite, so we'll gladly stick with a nicely done laminate. Plus, if it gets ruined, or we tire from the look, it's only $250 to replace or update!
However, IKEA does offer quartz and acrylic options that they do through area third parties who will measure, cut, and install for you.
I'm sure once I hit publish I'll think of even more reasons we love our IKEA kitchen, but this is what I've got for now. We are so happy and grateful to have this wonderful kitchen at our fingertips each day. We feel like home chefs and somehow even just pouring a bowl of cereal feels fancier now! As I read this post over to Tom a few moments ago, he said he would add that even if IKEA were more expensive than their competition (Home Depot, Lowes, etc) he would still get IKEA again. The quality is better and the overall features and how it's put together are just smart.
Looking to do a kitchen renovation with IKEA and have some questions? Leave me a comment!

DIY Moss Frame
Lately, Tom and I have been feeling a little restless. Now that most of our big projects are done, we're on a hunt for a new one.... or we're trying to decide if we should permanently work remote from an RV for a year while we travel the country (I'm kind of kidding about that one). Regardless of where this restlessness sprouted from, it's caused us to tap a little deeper into that creative part of our brains.
Admittedly, I am not usually one for DIY decor. I've done enough of it to know that about a month later, I'll find exactly what I just made at Target... and it looks better and is cheaper. It's like my personal curse. It happens every time!
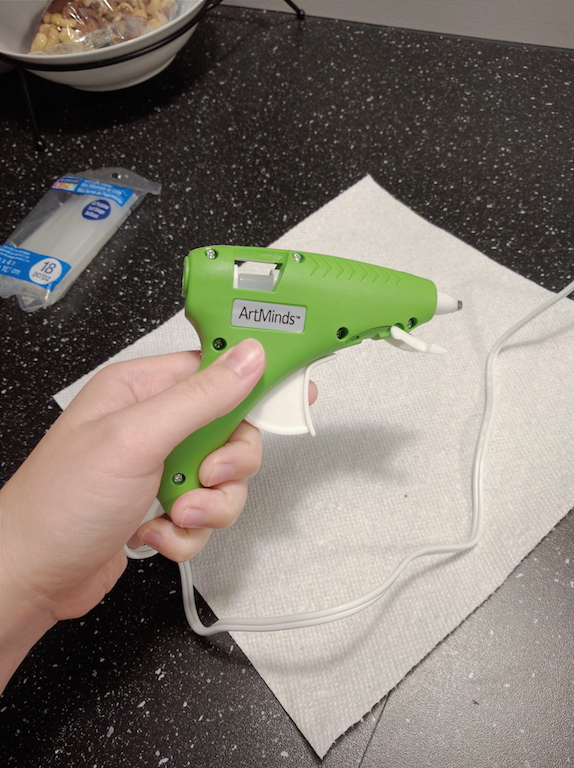
But amidst this funny little season, we've been having some fun. Let's just say, I discovered the way of... THE HOT GLUE GUN. Best four bucks I ever spent. Lemme show you what's up:
On a recent excursion to Michael's with Tom, I started to meander through the fake flowers while he found a good frame to mount a recently acquired print from Goodwill. 'Twas in this time that a small lightbulb grew atop my head... and the moss-covered-frame was born.
Materials
- Frame (I used this one) $6
- Hot glue gun and glue sticks $8
- Bag of moss $10
Total: $24 (though there is plenty more moss and glue for another project)
Directions
See the photos below.
Basically, just glue chunks of moss around the frame and you're done! It was actually really fun, and I'm very happy with the results. I may hang it as-is, or add a very minimal print. We're hoping to create a bit of a gallery on either side of the TV and so far we've gathered a nice start. I snagged that lovely Monet print at Goodwill for $6 as well - thrifting is the way to go, my friends!


What do you think? For about twenty minutes and minimal effort, I'm not disappointed in the least! Time to moss up everything I own... get it "moss up" ...like, "mess up"..?

Living Room Moodboard
As our final projects come to a close, I can finally begin to dive into decorating our spaces. Most of our rooms are very minimal in decor because 1) we actually do strive to live a minimalist lifestyle, so we don't gather much stuff anyway and 2) because any and all money has been going to bigger ticket items up until now.
We basically did our house in phases. This isn't that unusual, as probably a lot of people unknowingly do this, but here is a brief breakdown of our phases.
Phase 1: Basic aesthetic changes (smooth ceilings, paint walls and trim, update light fixtures, paint existing vanities)
Phase 2: Demolition and renovation
Phase 3: Decorate, fix errors in previous phases, final touches
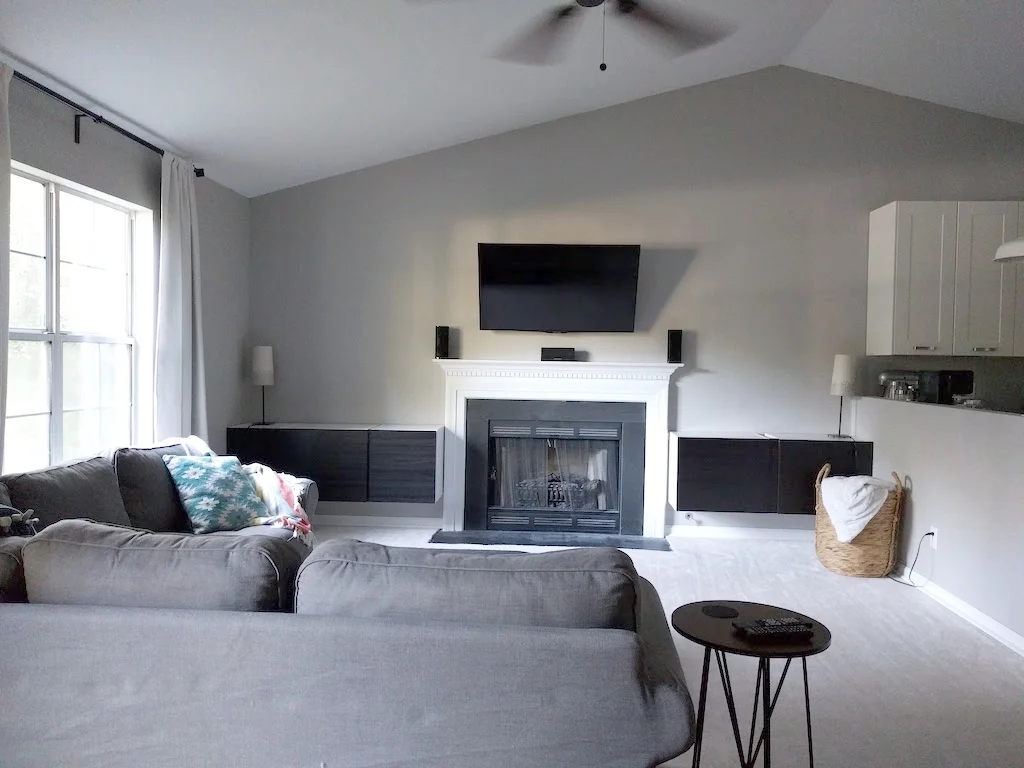
Here is the current state of our living room:
(and can we just swoon for one minute over the hidden cords?!)
Here are some ideas of how to brighten up our space and make it "ours":
Facing the other direction:
If you follow me on Instagram, you may have noticed our DIY coffee table - so that portion is already taken care of.
We are now on the hunt for the right lamps, chair, art, and throws. The colors I'm using bring such life and dimension to our otherwise boring space. It will still look very minimal, but put-together and welcoming. The mixture of textures - wood and ratan, metal legs, plant life, woven pouf, soft pillows, and warm lighting - create a good balance.
Part of me actually wants to create a huge gallery wall up and around the TV. What do you think of that idea?
Anyways, just a short and sweet update on our work-in-progress. Check out my Living Room Pinterest board for more ideas and inspiration (below). Have a happy week, friends!

When Are You Ready To Renovate?
Have you been eying up certain rooms or areas of your house wondering if you should tear a wall out, add more storage, or change the entire physical layout?
Well hold your horses.
Whether you're going DIY or not, I'll give you the advice others have given to me:
Give it a year.
Live in it, try it out, figure out what drives you crazy, and what you absolutely love. You may be surprised. Things you thought you'd despise may become your favorite features, or things you swore you'd change, may have a rhyme or reason to their placement. Spend your time sifting through other ideas.
There's more than one or two ways to create built-ins, for example. We could have spent a lot of time and money on the same old built-ins that everyone else does in their home. Instead, we sat on it. We looked up costs of every different idea and weighed out what look we were specifically going for... and lo and behold, we found the most cost effective and fitting solution possible.
We knew upon buying our home that we'd be renovating the kitchen. It was small, crowded, and a terrible use of the potential space. We lived in it for several months, and each month grew increasingly frustrating. We literally couldn't do tasks we had been used to doing. Like rolling out pie crust... with such minimal counter space, some things were downright impossible. We used our kitchen table as extra counter space, but when guests came over, that felt really embarrassing. I hate to say it, but it was!
Admittedly, we didn't give it quite a year, but the layout really affected our every day life, so when an IKEA kitchen sale presented itself, we jumped at it. We had spent days and weeks and hours of the previous months, talking about the logistics of the design and financial bits and pieces, so we were sure of exactly what decisions we'd be making. We had lived in it long enough to know what needed to change, and what wasn't as bad as we had thought. Some of the layout that we were sure we'd change, we actually kept with a few small tweaks. Getting advice from the right people also really helped us gauge our capabilities and sway us away from spending more than was necessary (thanks mom and dad).
I'm so glad we took (almost) a year to live in it, though. It brought up a lot of important questions that I'm going to share with you... just in case you're on the fence about starting a renovation.
1. If you'll be living in the home during the process, can you handle the chaos of things piled up in rooms temporarily as storage? Will you be able to handle the dust, no kitchen (if that's what you're renovating), not being able to walk in certain areas without shoes?
2. Do you know how much this is going to cost? All the way down to the smallest nail? Make sure you're not low-balling this, because sticker shock sucks.
3. Do you have a reputable contractor that will be timely and fair? Are you ready for the contracting team to be in your home in early morning hours or late at night? Can you trust the deadline he tells you, or the put up with constant noise?
4. If you are not staying in the home, do you have elsewhere to go? Will that cost you extra, or are you staying with family who may get tired of you being there if the project goes beyond the deadline?
5. Things will inevitably go wrong, or you'll hit a speed bump. You can't prepare for them, so I won't ask you if you're ready... but I hope you're not expecting everything to line up perfectly!
6. Can you handle the stress of the time, money, and labor commitments? Along with the costly, split second decisions you may need to make along the way?
7. Have you thought through your design and are fully aware of the workings? Like the cost of switching from gas to electric or vise versa? Or if moving some plumbing will be a small job or large? Will adding more lighting add more to your expense than you thought - or will it even be possible? Do you understand what needs to be done to stay up to code?
8. Do you realize the renovation may be the bane of your existence during its entirety?
How do your answers look? Regardless... DO YOU. I'm no pro, and I certainly can't guarantee your success, but hopefully you snagged a few ideas to get your renovation dreams going!
Have you done a reno before? What would you add?

Choosing Appliances
Just before we started our kitchen renovation, I posed a question to my readers about kitchen ranges and got some very helpful responses. The answers I received varied, but if I remember correctly, most of them leaned towards gas.
To summarize the scenario we were going through, I had grown up with electric ranges (coil or glass) and had no issues cooking with them. When we bought our house, we had gas - much to my husband's delight. However, because of the age of the stove, it was unwieldy and inefficient. This left us a little disappointed and had us rethinking whether we should keep using gas, or switch it out for electric or induction. The previous post spells out all of the pros and cons we discussed for each model.
After we finished the renovation process, we decided we would continue using our current appliances until holiday sales went into effect (specifically, fourth of July sales)... but we actually found some great deals a couple weeks early and jumped. During the two months prior, though, we had shopped around in order to identify exactly which appliances we were going to watch for price-drops.
Now, I want to share with you why we chose the appliances we did. Some of these reasons might offer some points to think about when shopping for your own!
These are the appliances we chose and why:
Gas Range:


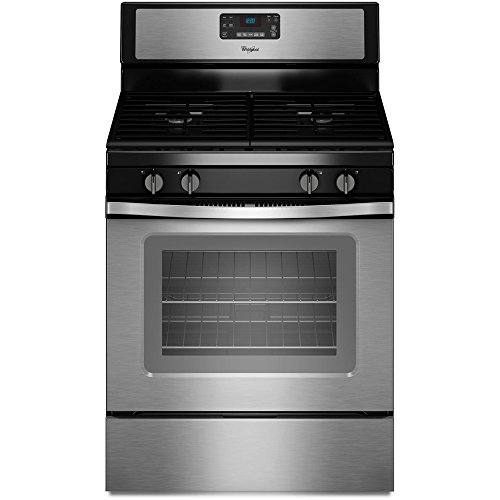
When push came to shove, we realized that switching from gas to electric would not be cost effective. I won't get into it, but it just would have been several hundred dollars more, for only a little added convenience. We figured a new gas model would ease our frustrations, and we were right!
We chose this one, partly because of the grates. I really wanted an option that would make it easy to place platters or cookie sheets on top, without them getting wobbly or falling between grates. These are almost flush with the countertops and I think it looks really sleek. It's also so much easier to clean than four-grated versions because it's just the two large pieces that actually groove together and are super easy to set aside while you wipe down underneath. Boiling water doesn't take as long and it lights really quickly too. Our old one used to basically burst out in flames when you flipped on the lighter - so scary.
The oven heats up soooo much faster than our old one, as well! I love to bake, and it cooks so evenly. It's a no-fuss range and it has been a joy to use.
Microhood:
A fun fact about IKEA appliances: they're all Whirlpool brand. We ended up with Whirlpool appliances all around, and it was actually by chance. I'll admit, it is a brand that I trust, but more than that, I really appreciate the look, price, and usability of their models.
This is the only appliance we didn't think too much about. We saw it, we liked it, we ordered it. That's about it! It works great and heats evenly, but one of the things we like most (strangely) is the overhead light for the stove. It's very soft, but bright and adds a good ambience to the kitchen when we're not actually in there. It might sound like an odd thing to notice, but all our previous microhoods or regular hoods had a great big bulb that always shone directly in my eyes. Since I'm so short, I was never able to escape it, so having this new one is amazing!
Bottom Freezer Fridge:
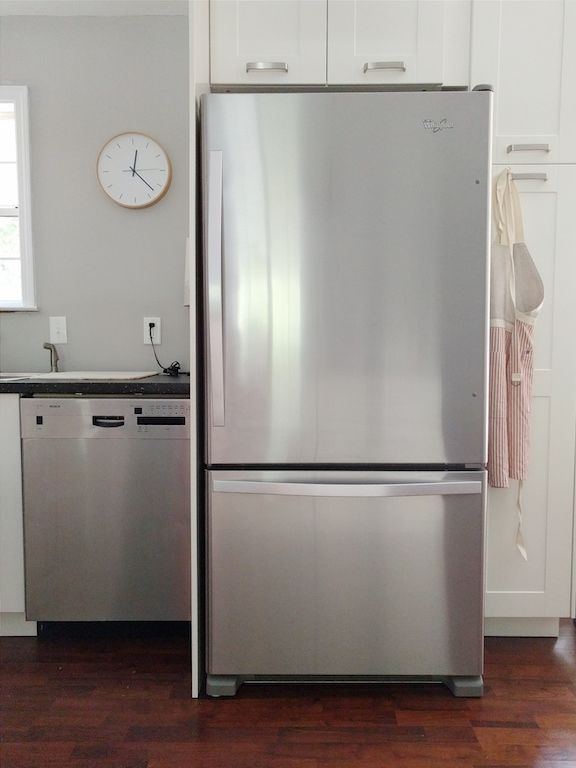


I had this fridge picked out years prior, and I have several reasons for the choice:
1. My parents own this fridge, so I'm really used to it.
2. I personally dislike french doors on fridges because so many times I have my hands full, and having to finagle two doors open while trying to fit a 9x13 pan in the fridge is very annoying to me. Plus, I always find myself opening both doors anyway, because I want to be able to see everything at once. This may sound a little Type-A, but when I can't see everything every time I open a fridge, I often forget I have something and my food goes bad and gets tossed.
3. We have a water filter on the sink. Door water filters are fine if you need them, but we don't because we have this fancy filter thing that my parents have ordered for all their kids. I also hate that door filters take up internal space on fridges.
4. Bells and whistles look like dollar signs to me. I'm sure many little features can add convenience to people's lives, but what happens when the circuit board on your water thing or touch-screens fail? You have to pay hundreds to get them replaced. No thanks.
5. We don't keep important things in the freezer. I don't mind having the freezer low, because we don't really have much in our freezer at any given time. I'd prefer my entire fridge to be at standing height :)
These are all totally personal opinions, but maybe they'll give you something to think about.
Dishwasher (pre-existing)
We love this dishwasher. We have no idea how old it is, but it runs like a dream. It's super quiet and can run a cycle in less than 30 minutes. We've heard wonderful things about Bosch and when the time comes to replace this puppy, we'll be going with Bosch again.
I'll be honest, in the beginning of our kitchen designing process, we were set on getting really fancy appliances (and countertops - more on that later) but after hours and weeks of research, the reviews spoke for themselves...
The basic tried-and-true models just win.
This isn't to say that we will only ever get these exact appliances in our lifetime, but I am pretty dead set on always getting a solid, basic model without the bells and whistles. More than added convenience, I just want appliances I can count on to always work exactly how they're supposed to.
Oh, and as an added bonus, all our new appliances happen to have the same handle style!
What about you? Would you consider some of these ideas in your decision making?

Cost Breakdown : The Kitchen
So renovations are supposed to be this crazy financial burden, right?
Well, yes and no.
No doubt, this renovation was the most costly update to our home, but it was a fraction of what it easily could have been. In fact, when we had Home Depot and Lowes give us a design and estimate, it was well over 12K for the cabinets alone (and they were using smaller room measurements than we ended up with).
We still have a few small bits and pieces to add, of course, because curating your home from a blank slate takes time. We are still learning our style, but we definitely lean towards a mid-century modern minimalist look. It's important to me that the items I put on display are meaningful or serve a purpose. I'm just not one who cares for excess :) There is nothing left to do in this home that is necessary for living our daily lives, though, so it is nice to relax and enjoy finding those final little pieces as they come.
However, now that this project is behind us, I have gone through and sorted out all the costs and will be breaking it down for you. I have not been shy about telling our real life friends how much this thing was, mostly because I think people really should know that a kitchen renovation does not have to cost an arm and a leg. Granted, we saved boatloads by doing it ourselves, but even then, we really hunted around for the best quality for the best price, and I'm thrilled with how it all turned out. I'm super satisfied with IKEA... not only their products, but their customer service. The process for this project (especially since it was DIY) meant we had to have a lot of involvement. IKEA is well aware of the fact that their customers may be doing this themselves, so they are happy to answer any 'dumb' questions concerning installation or what each item listed is used for. That being said, living 40 minutes away from a store was pretty essential to our success with them. For more photos, see the reveal post.
Okay, okay. Enough yammering on... here is the cost breakdown:
Demolition
Blades: $12
Brown paper & tape: $15
Trash bins: $20
Shop Vac & filters: $65
Total: $112
Ceilings
Scaffolding: $0 (We owned a ladder and a bunch of weird wooden island things that came in super handy)
Mud: $35
Industrial sander (rented): $50
Primer: $30
Paint: $40
Total: $155
Walls
Materials for half-wall: $60
Drywall: $70
Mud and tape: (used what was left from ceilings)
Primer: (used what was left from ceilings)
Paint: $80
Trim paint: (already owned from previous projects)
Outlets: $100 (switches, covers, GFCI, boxes)
Electrical: $200
Trim brush: $6
Paint rollers: $10
Total: $526
Plumbing
Piping, valves, p-trap: $160
Total: $160
Appliances
Stove: $499
Fridge: $979
Microwave: $250
Garbage disposal: $50
Sink: $180
Already owned faucets and dishwasher.
Total: $1,958
Other
Cabinets (including handles): $3,900
Countertops: $256
Lighting: $140
Ceiling fan: $35
Misc decor (towels, placemat, planter, drawer liners, utensil trays, plate holders, spice holder and bottles, cutting boards, coffee container, candles, etc..): $300
Total: $4,631
GRAND TOTAL: $7,542
The pictures really don't do this place justice. Our cabinets are huge and very sturdy, our appliances are wonderful (yay for an ice machine!), and the counter space has made such a monumental difference in how we prep and cook.
So for less than 8K we completely re-did our kitchen and part of our living room (it still needs some built-ins on either side of the fireplace). Again, thousands were saved by the fact that we did not hire out for any of the work, but regardless, we did such in-depth research on how to pull this off without breaking the bank and I am pretty proud of how it turned out.
Do you guys have other questions about this project? I would be more than happy to cover any specific topics that you are wondering about!

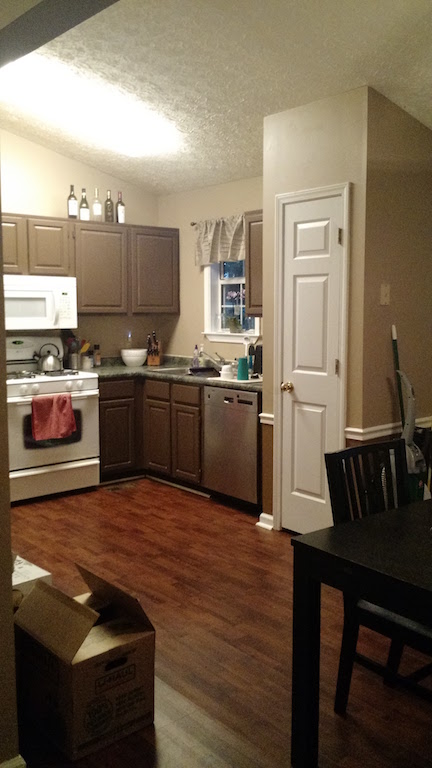
Kitchen Reveal
It's been quite the journey to get to the kitchen renovation finish line, but we have made it... and in pretty good time, if I do say so myself! We have been up and running for a couple of weeks now, but just recently scored some awesome deals on new appliances that we had been waiting for. These deals showed up earlier than expected, and what's better, if the prices go down at Best Buy or a competitor in the next 45 days, they'll match it.
I'm not being paid to say this, but I gotta give a little plug to Best Buy. They were incredibly easy to work with and their price match guarantee was super easy. They didn't even raise an eyebrow when we showed them a price almost $200 under what they were charging. Then, at no extra charge, they had our new appliances loaded into our house about 48 hours later. It was amazing!! I just think it's important to acknowledge great customer service that goes beyond what's expected and they certainly proved that to me.
Back to the reveal and the photos... because let's be real, I'm lucky if you're actually reading what I'm typing right now. You're here for the pictures, I know, I know.
If you need a refresher on the progress photos try Progress 1 and Progress 2.
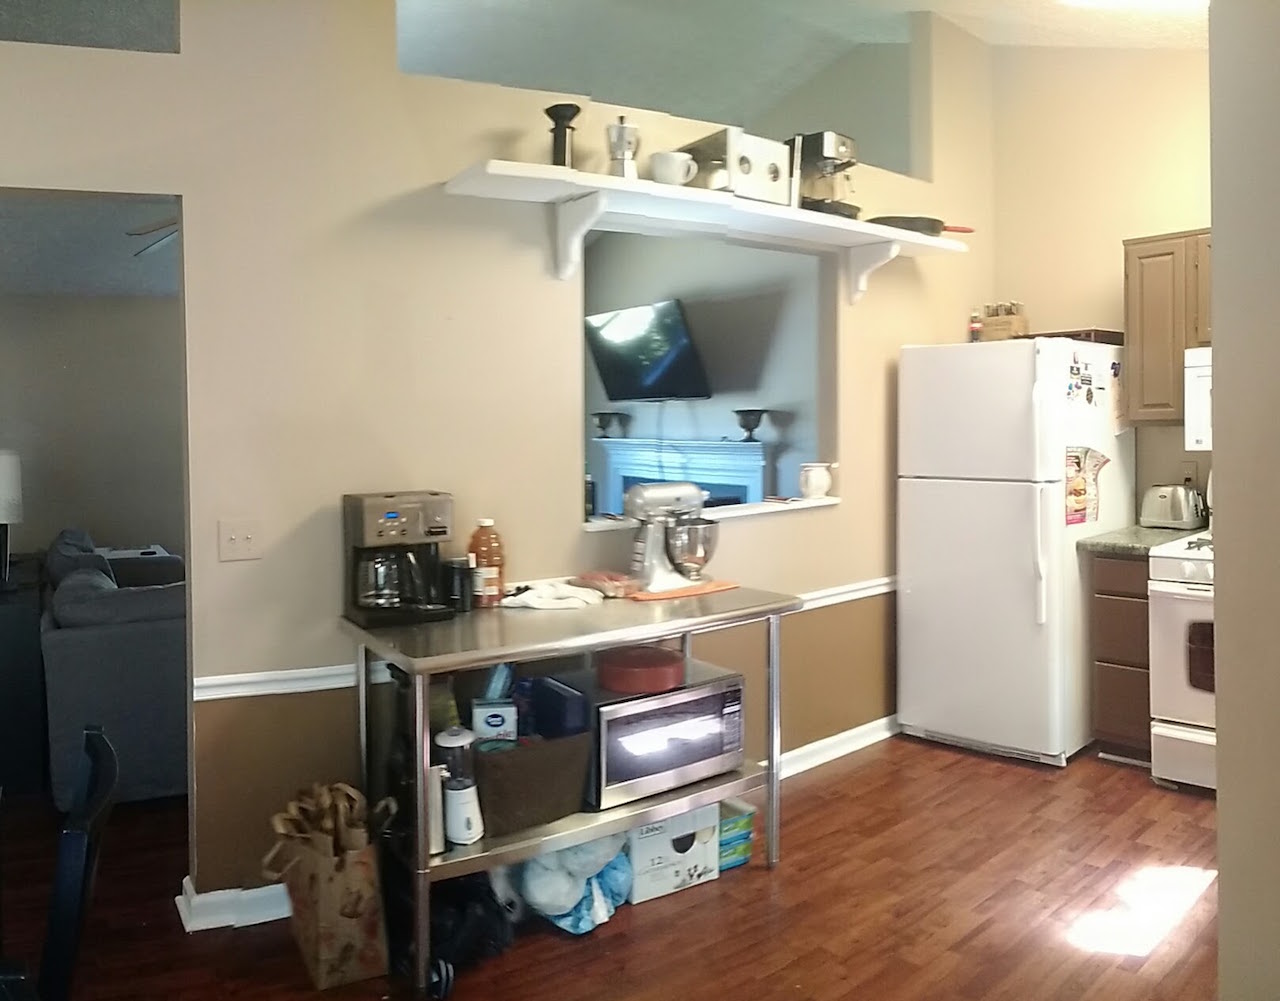
Keep in mind, we still have some pieces to add in terms of decor and a backsplash and so on, but now that we're able to use the space, those things can come along later - bit by bit. And if you're wondering at all where something is from I'm just gonna go ahead and simplify the answer for you: IKEA. The lights, the counters, the handles, the table, the couch... There are some exceptions, but I actually chuckle a little when I look around and am surrounded by IKEA! I am soooo happy we chose them and I'll get more in depth on that in another post.
Okay, okay, now I mean it... PICTURES (click to enlarge):