

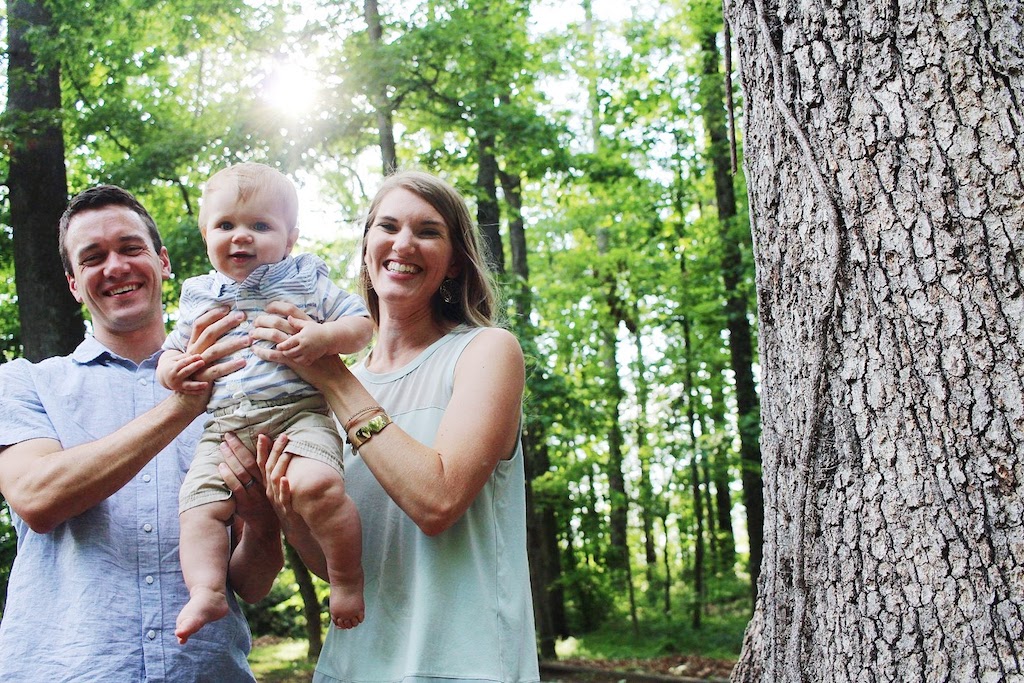
The Secret to Becoming an Atlanta Foodie
This post is sponsored by Dining Out Atlanta
Before moving to Atlanta, Tom and I had been waist deep in the foodie culture of Milwaukee.
(Side note: If you don't know about the Milwaukee foodie culture, and you live in Milwaukee, then you should get a strong sense of FOMO because the food there is unreal)
Foodie culture, to me, isn't pretentious or even overtly serious. It can be, sure... but to me, it's a celebration of the innumerable ways food can be prepared, served, and indulged in. It offers a peek into the creativity of those who put their livelihood into the making of delicious foods in the hopes that those who try it, love it as much as they do. Foodie culture is fun, fascinating, and so enjoyable.
That being said, it can be an expensive hobby to constantly try new restaurants and dishes. We budget our foodie dates, probably like a lot of people, but sometimes this can restrict how often we're able to go out. Not that that's a bad thing, but if you can find ways to make going out more budget friendly without sacrificing quality or quantity, wouldn't you?
Well... since you asked...
Let me introduce you to our secret weapon, our new bff for date nights, and our foodie exploring guidebook: The Dining Out ATL Passbook
Follow that link and scroll down to see all the great restaurants it includes!
(By using my code JOYpass2017 you can get one for only $35)
This little book holds tons of two-for-one entrees and other deals at over 70 restaurants across the metro Atlanta area.
Think of it this way... say a typical entree costs $12. By using the passbook three times you've already broken even and the passbook has paid for itself. Every time you use it after that, it's saving you the cost of an entree every time you go out!
As far as the restaurant options... well, let's just say you'll never have to worry about great ambience, variety, or cuisine options. Everything is covered in this great little sidekick to your dining out adventures in Atlanta.
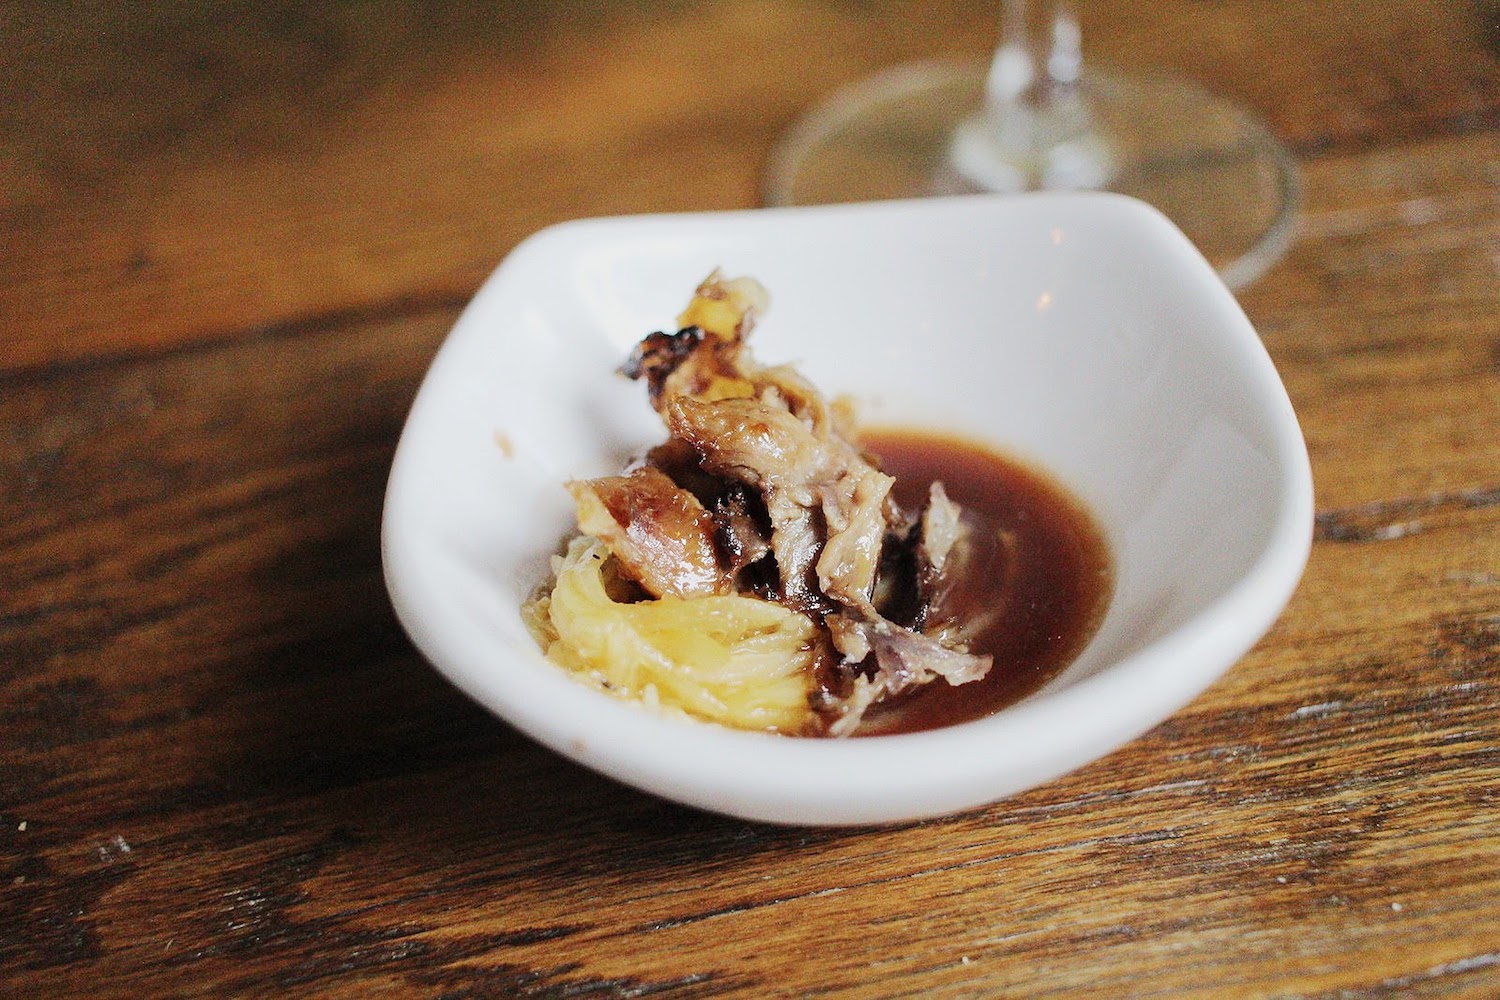
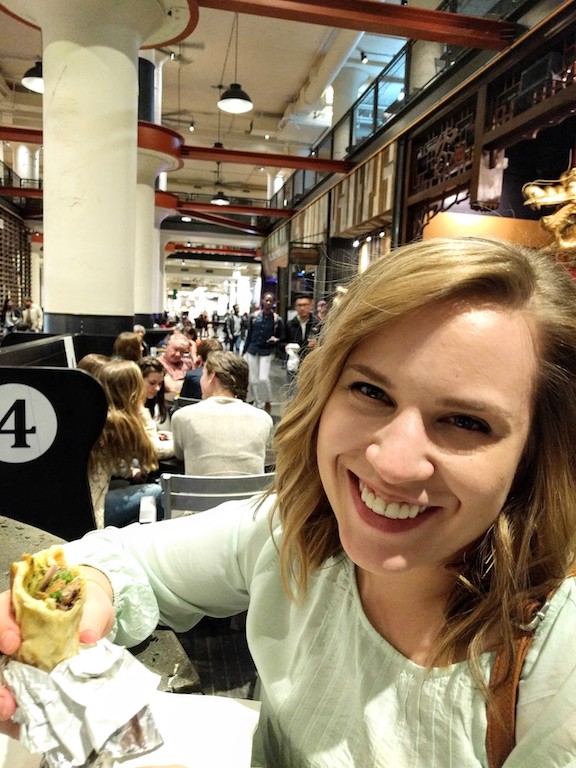
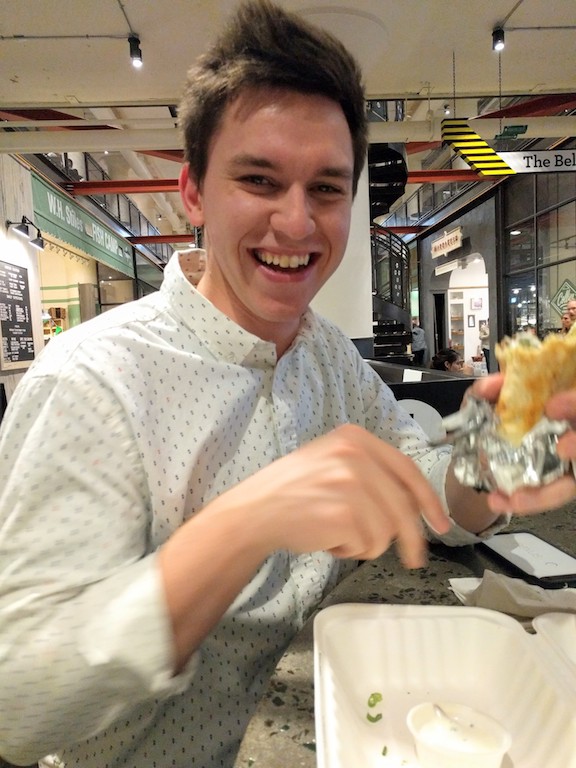
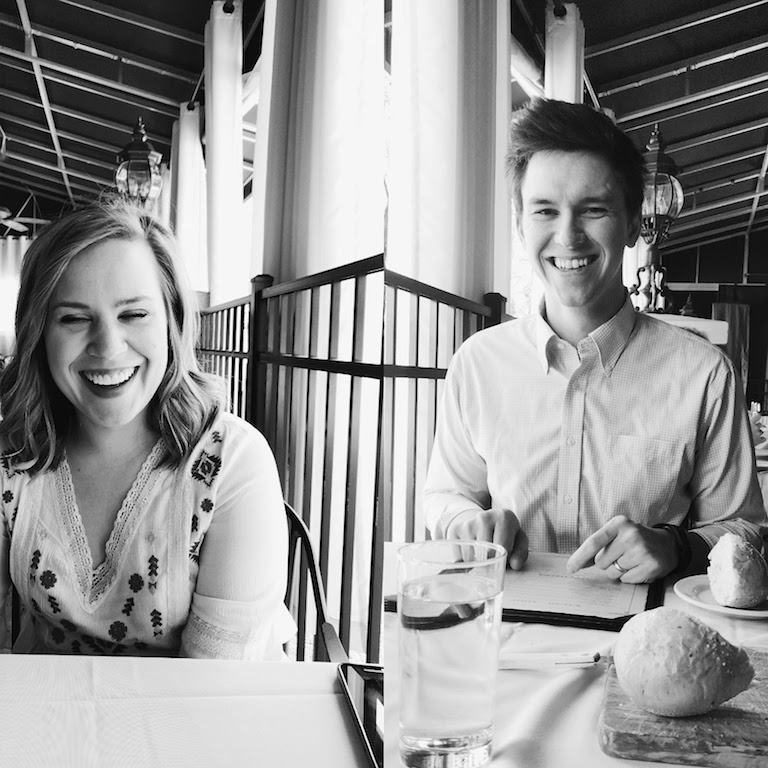
Now that I've informed you of our secret way to be foodies without breaking the bank, let me share with you Anis Bistro - one of the amazing restaurants found in the passbook.
Anis Bistro is a French restaurant that is owned and operated by Arnaud Michel, who grew up in Montpellier, France. Visit their website to learn more about the restaurant.
As a new ambassador for the Dining Out ATL passbook, I was privileged to be able to attend an event at Anis Bistro. We were quite literally wined and dined, and I am thoroughly impressed. Arnaud was an incredible host, and I loved talking food and France with him (especially since we're visiting France in the fall) and because French food happens to be my favorite cuisine. You guys know I wouldn't talk about or endorse anything on my blog I don't 100% think is amazing, and Anis Bistro is no exception. If you're in or around ATL and you're looking for a perfect date night, GO HERE. Order the wine, DEFINITELY have the chocolate mousse, and savor your bites because it is all ohhhh sooo good.
Of course, save yourself some moolah and grab the Dining Out ATL Passbook, though!
Order one here and use the code JOYpass2017 to save $64.


If I'm being honest, it's super hard to add food photos to my posts because my mouth literally starts watering. Hope you enjoyed this foodie post!
Don't forget to use the code JOYpass2017 to get one for only $35!
Do you have a favorite cuisine? French food always wins in my book!

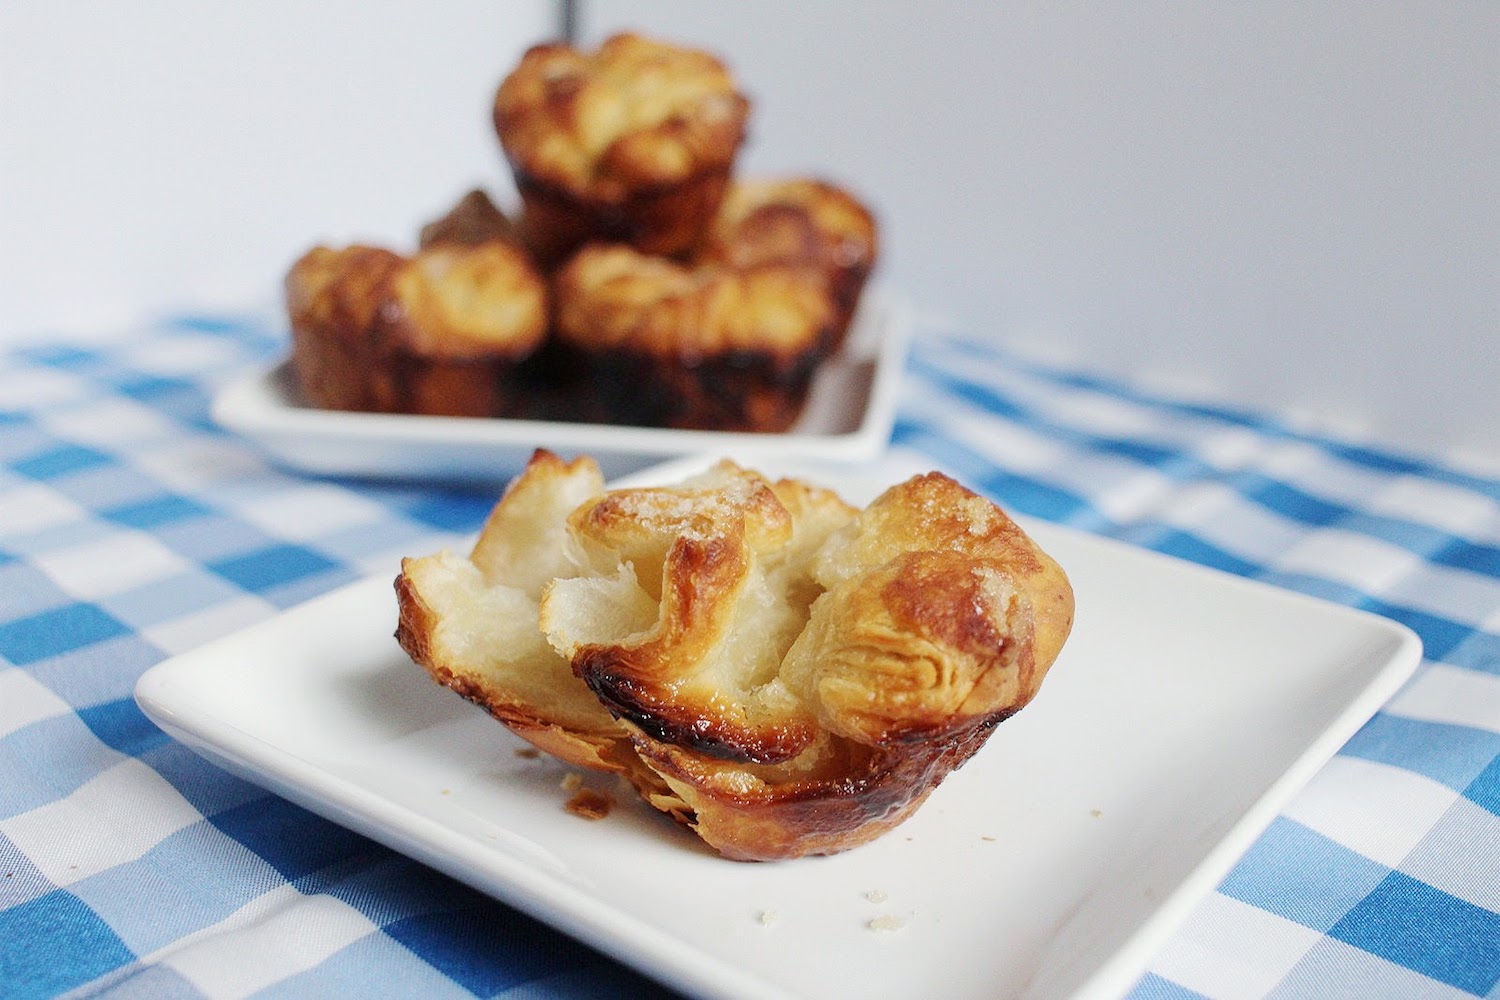
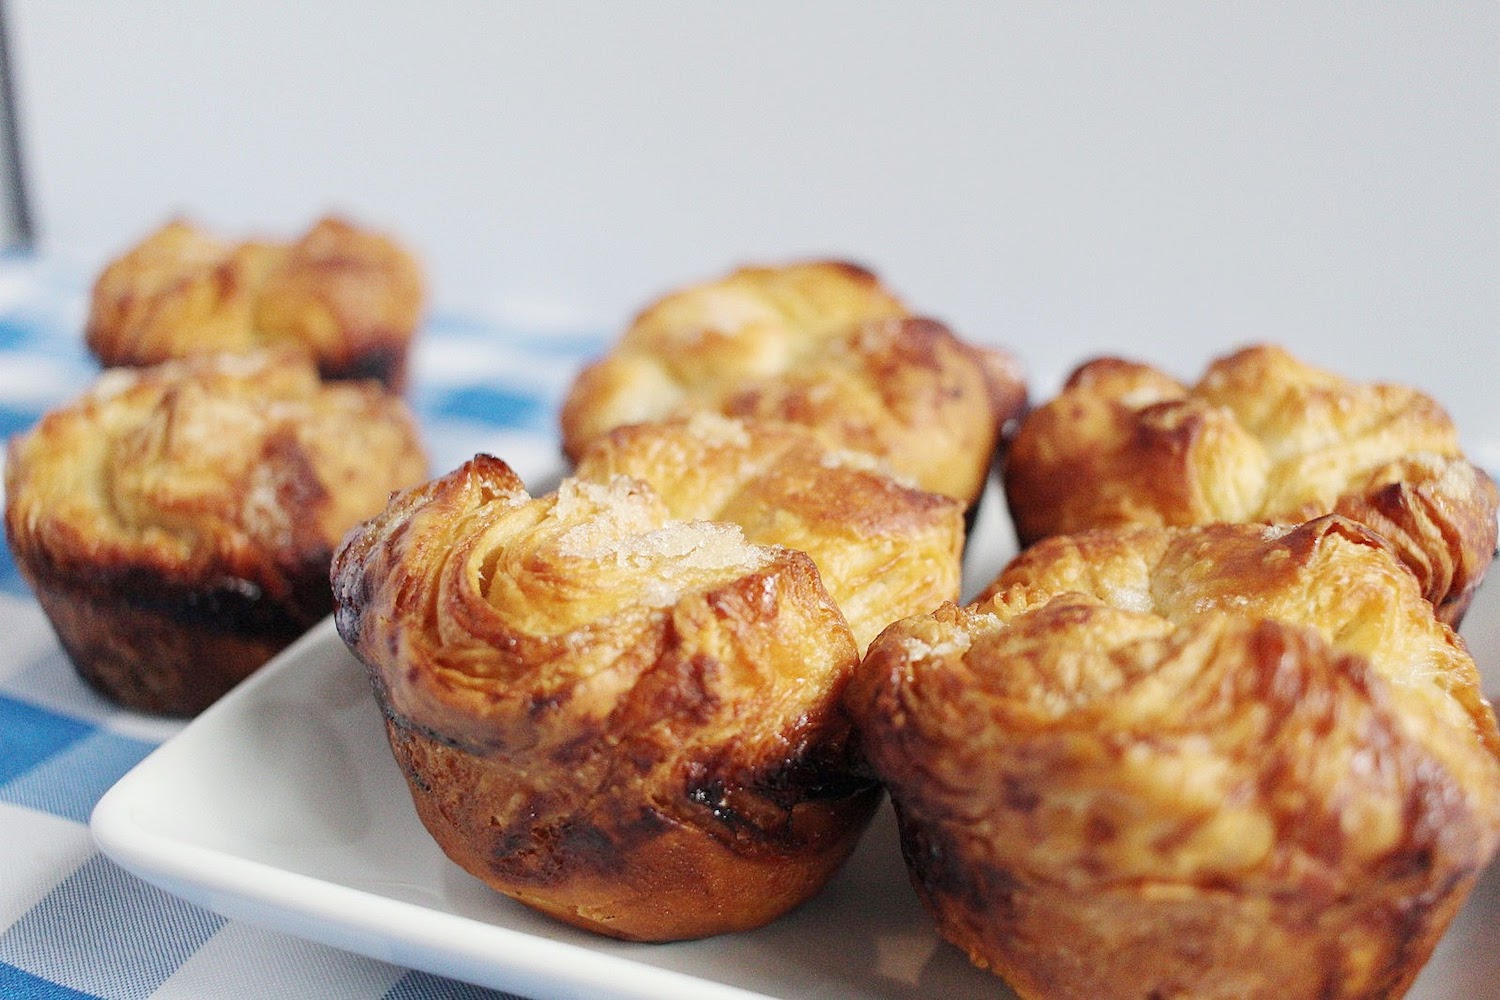
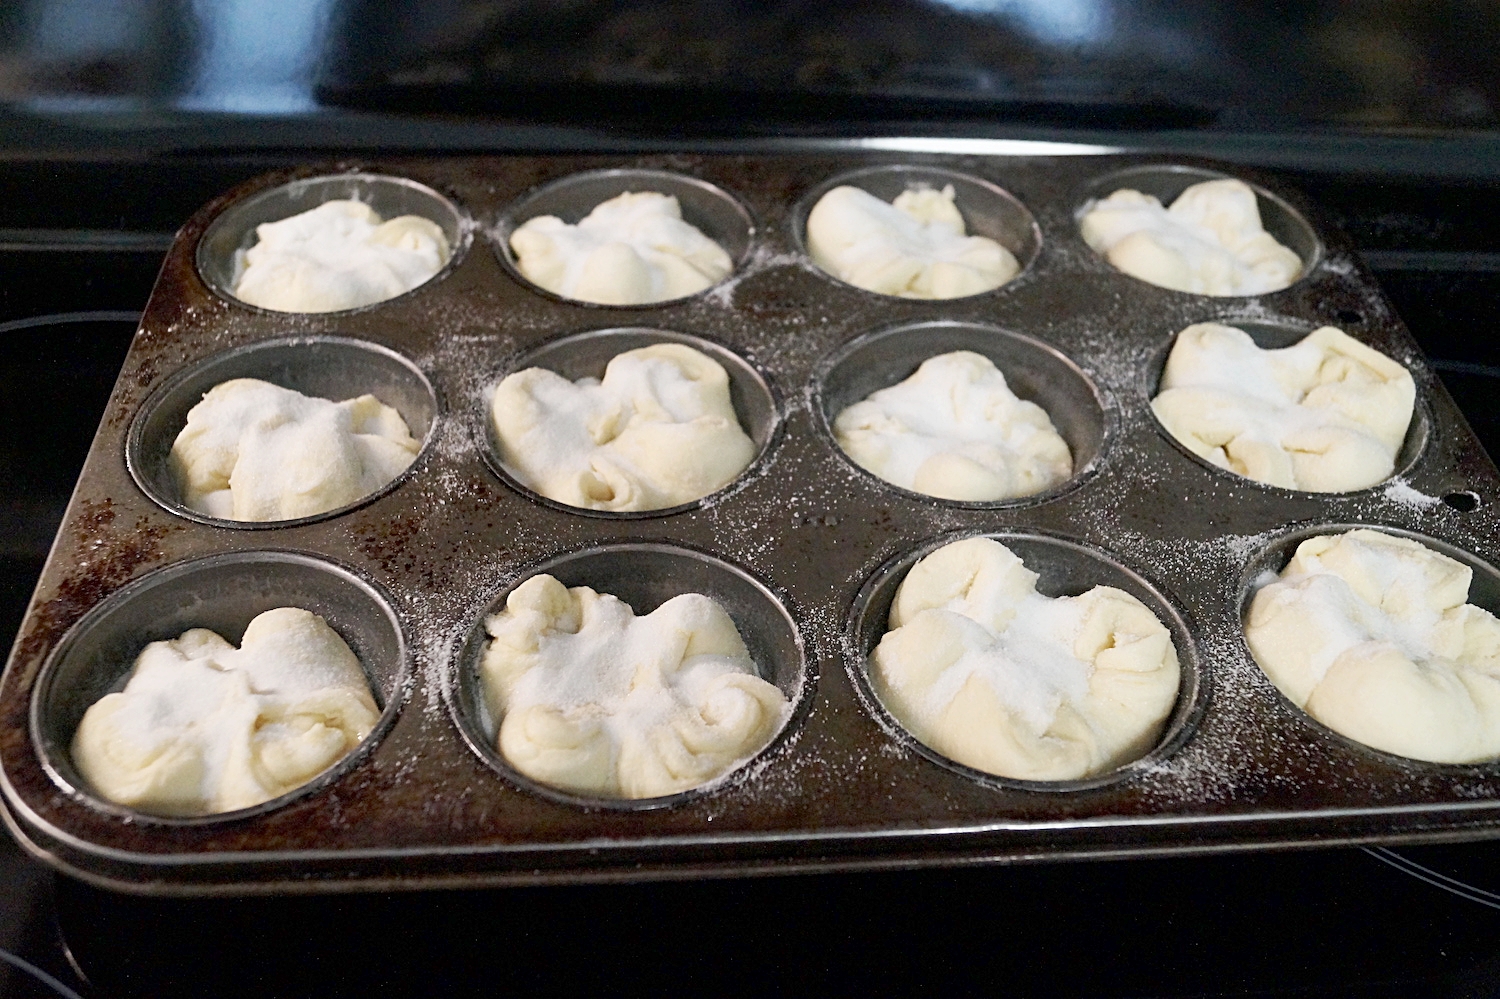
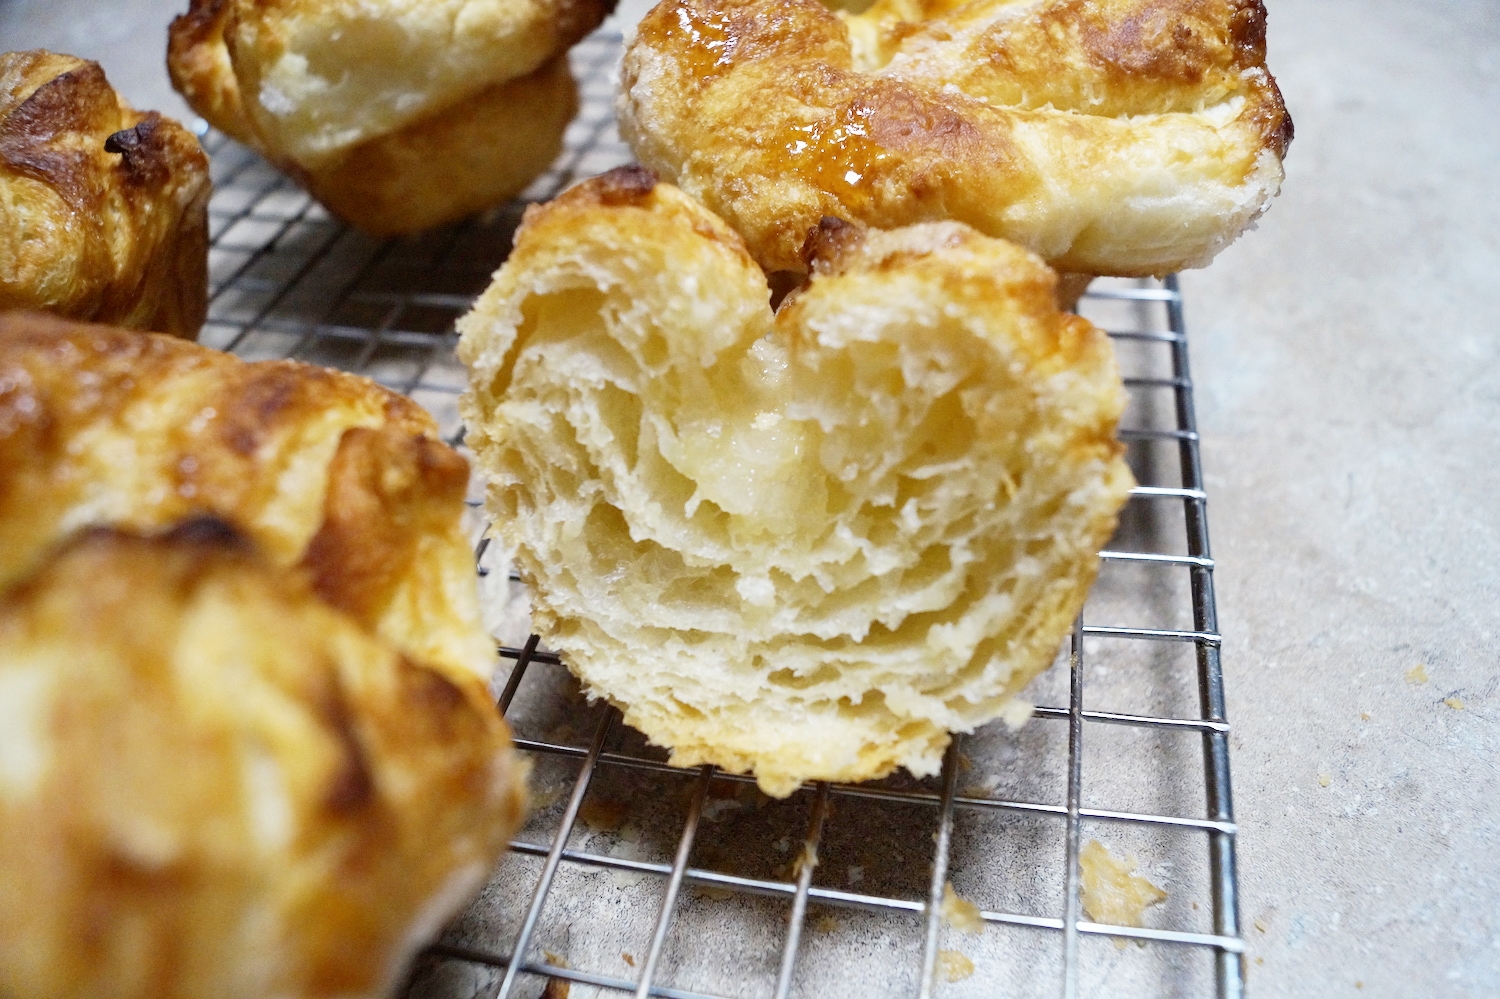
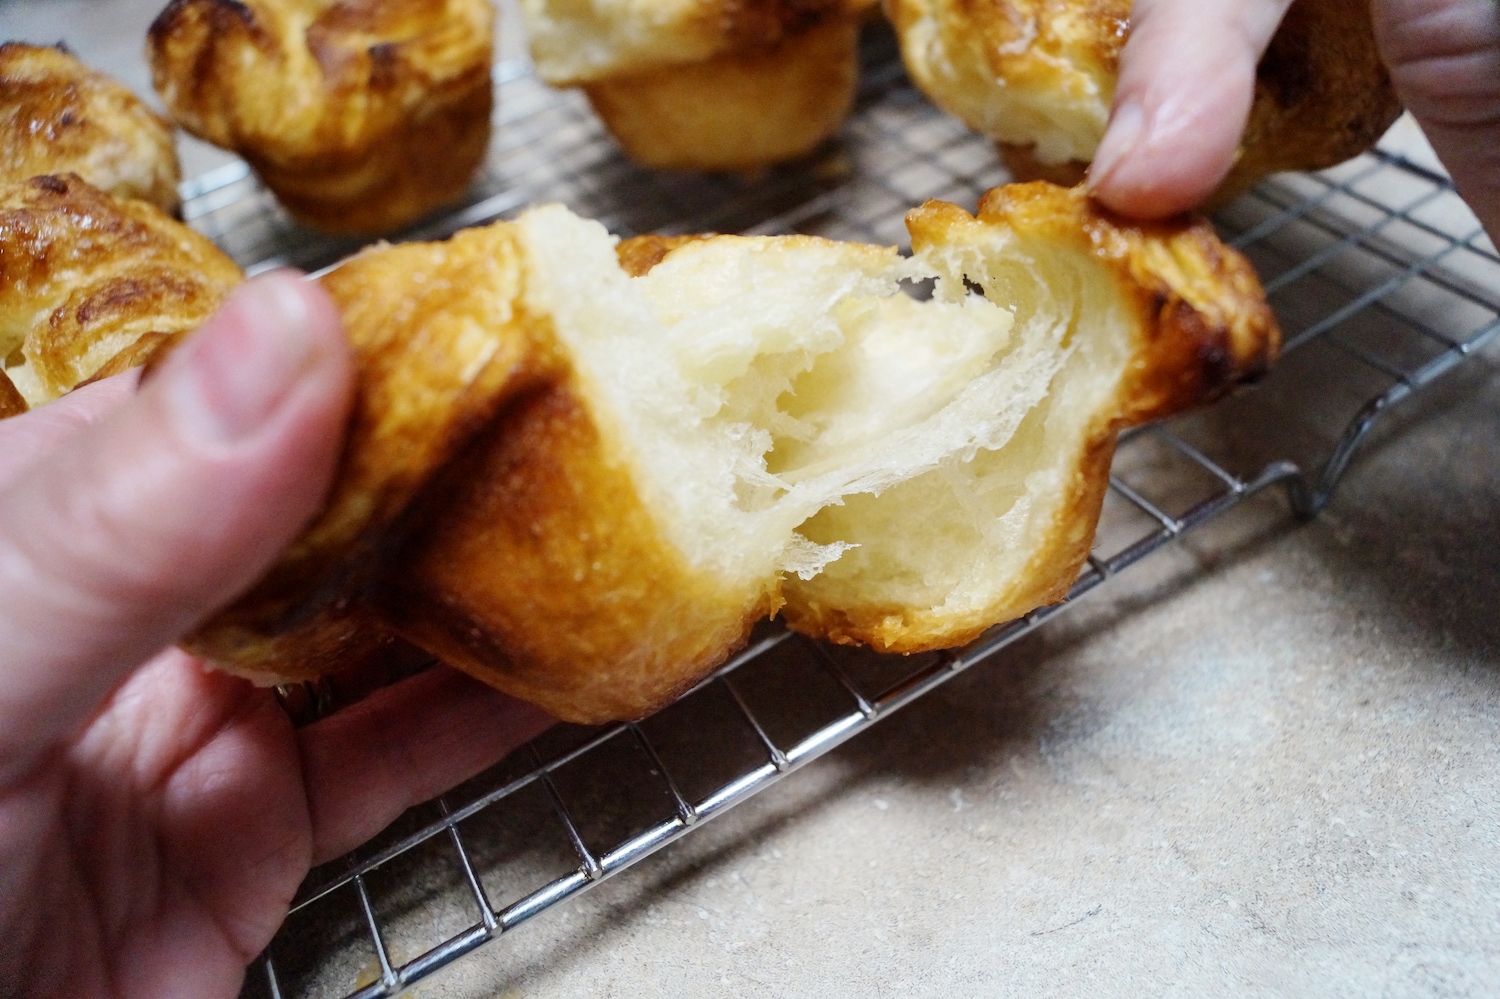
Bake #7 | Kouign Amann
In case you're not up to speed, this is the seventh bake in The Great Blogger Bake Along series. Read about it here.
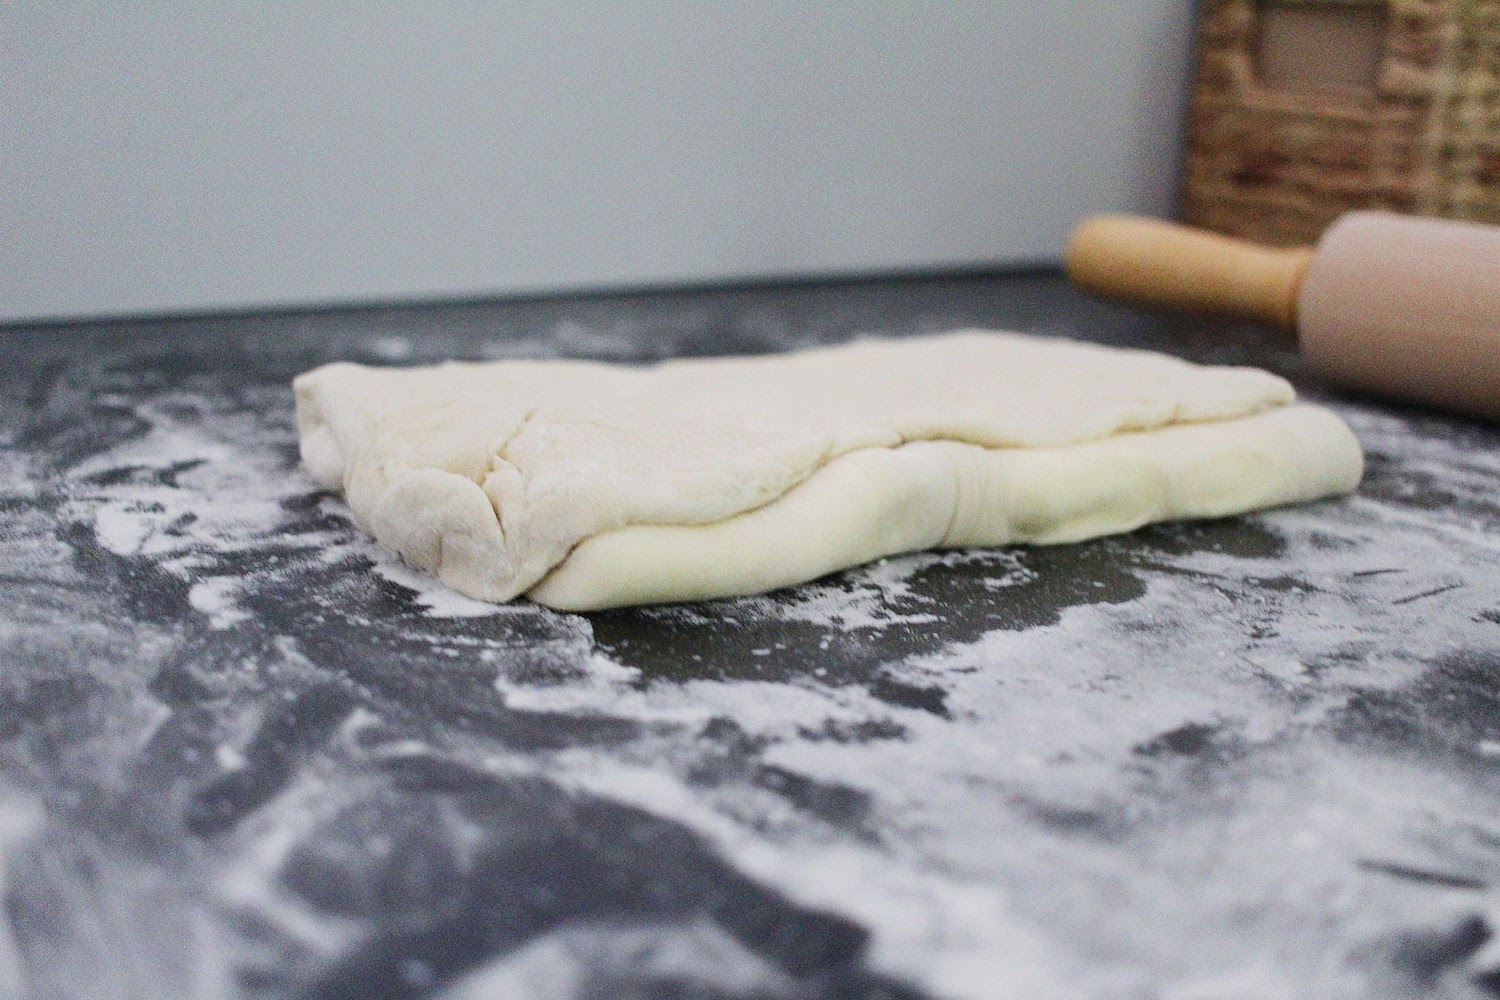
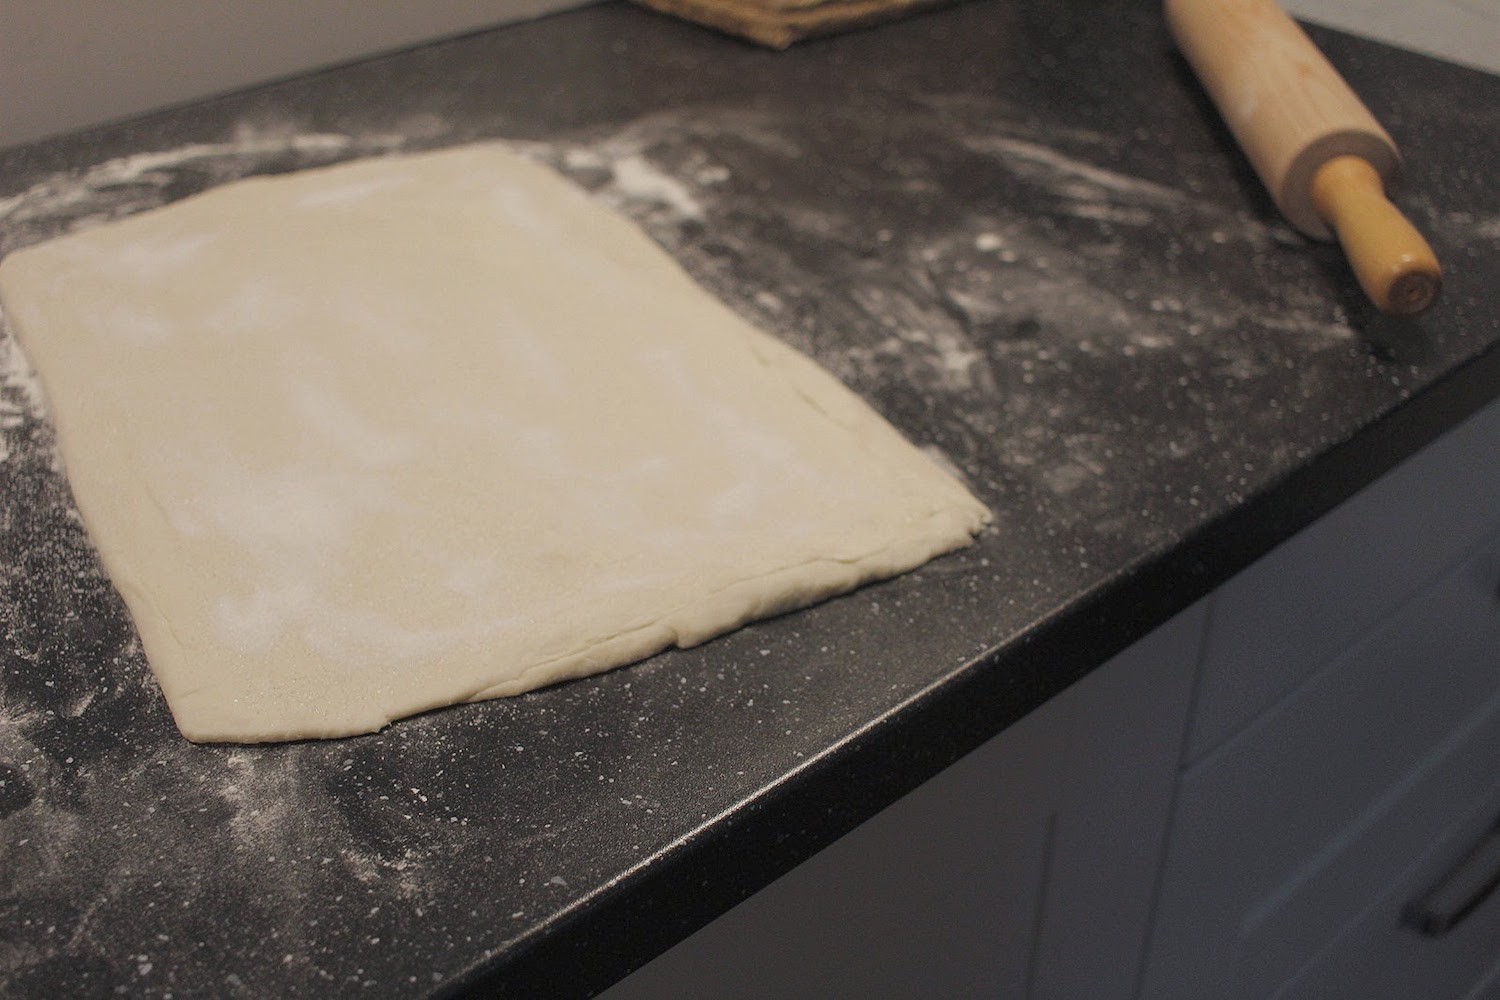
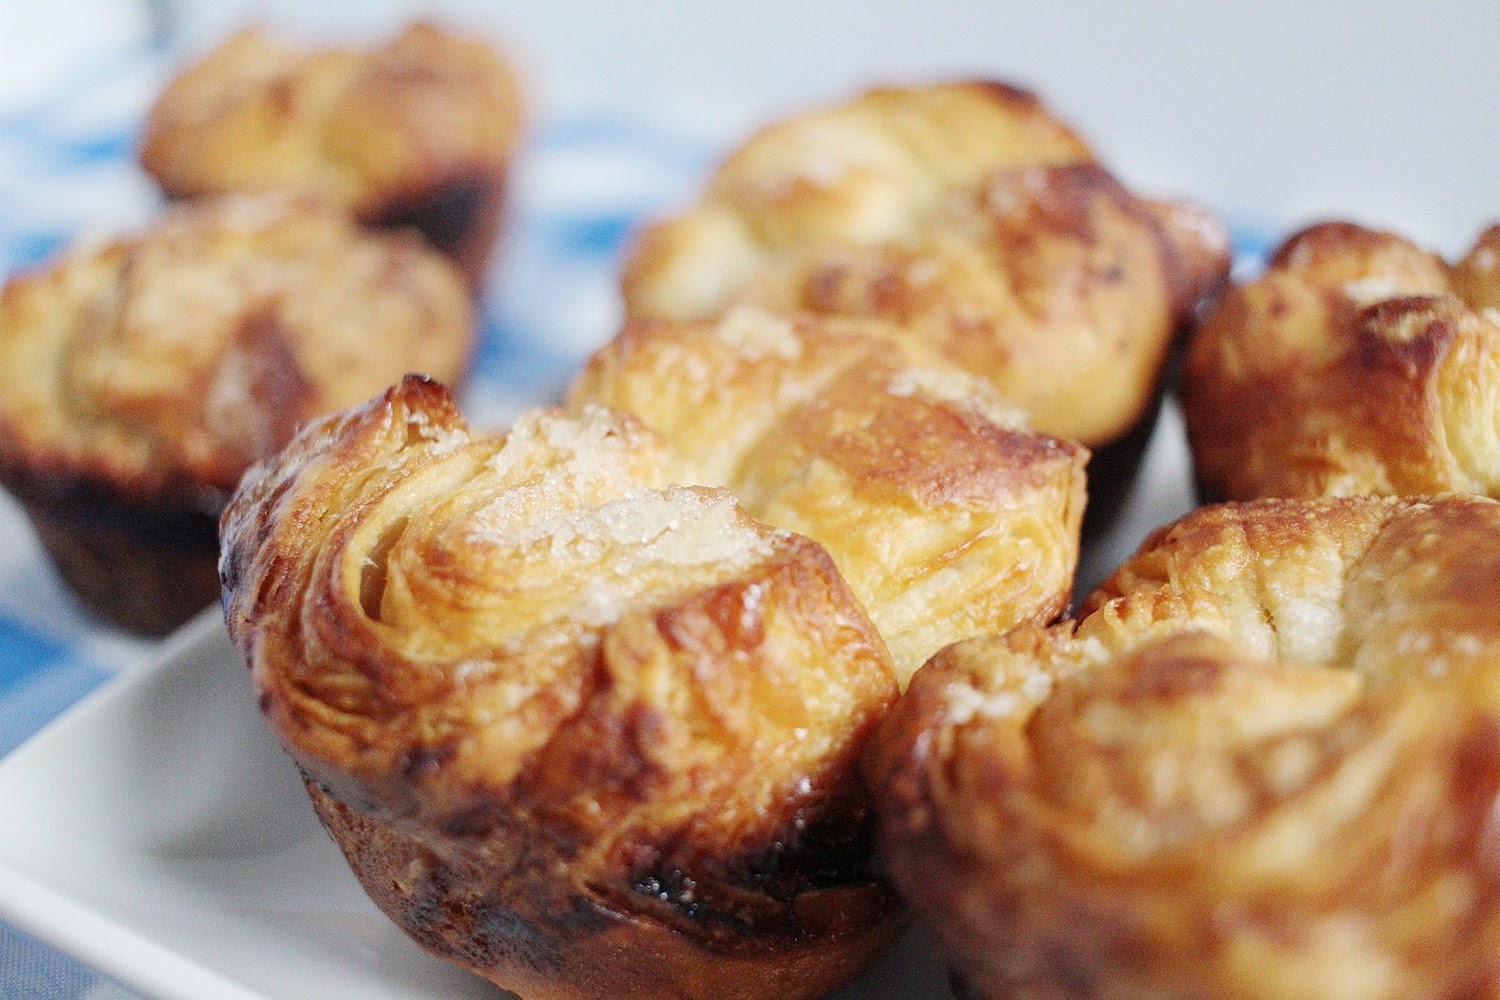
Stop what you are doing, go to the recipe link in the next paragraph, and make this. This has been the favorite bake in this house so far. Or maybe the florentines? Regardless, I think it's safe to say we're going to love the French and Italian cuisines on our Europe trip in the fall. Florentines and ciabatta are Italian, and these delicious pastries are French. I even got the stamp of approval on my Kouign Amann pastries by a real Frenchman earlier this evening!
The Challenge
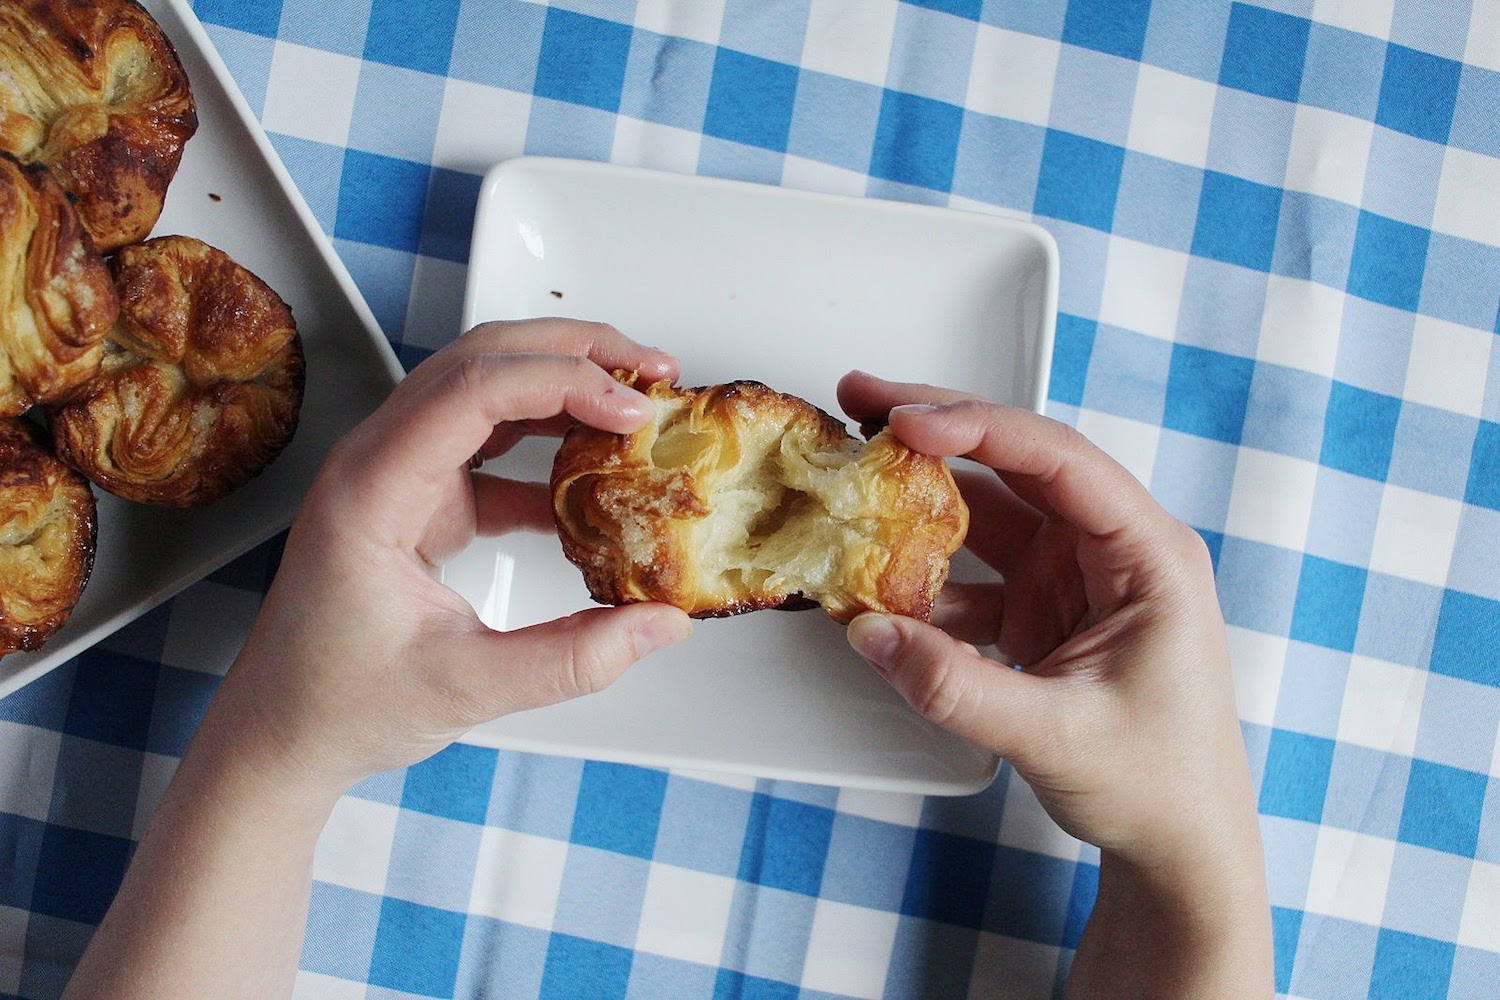
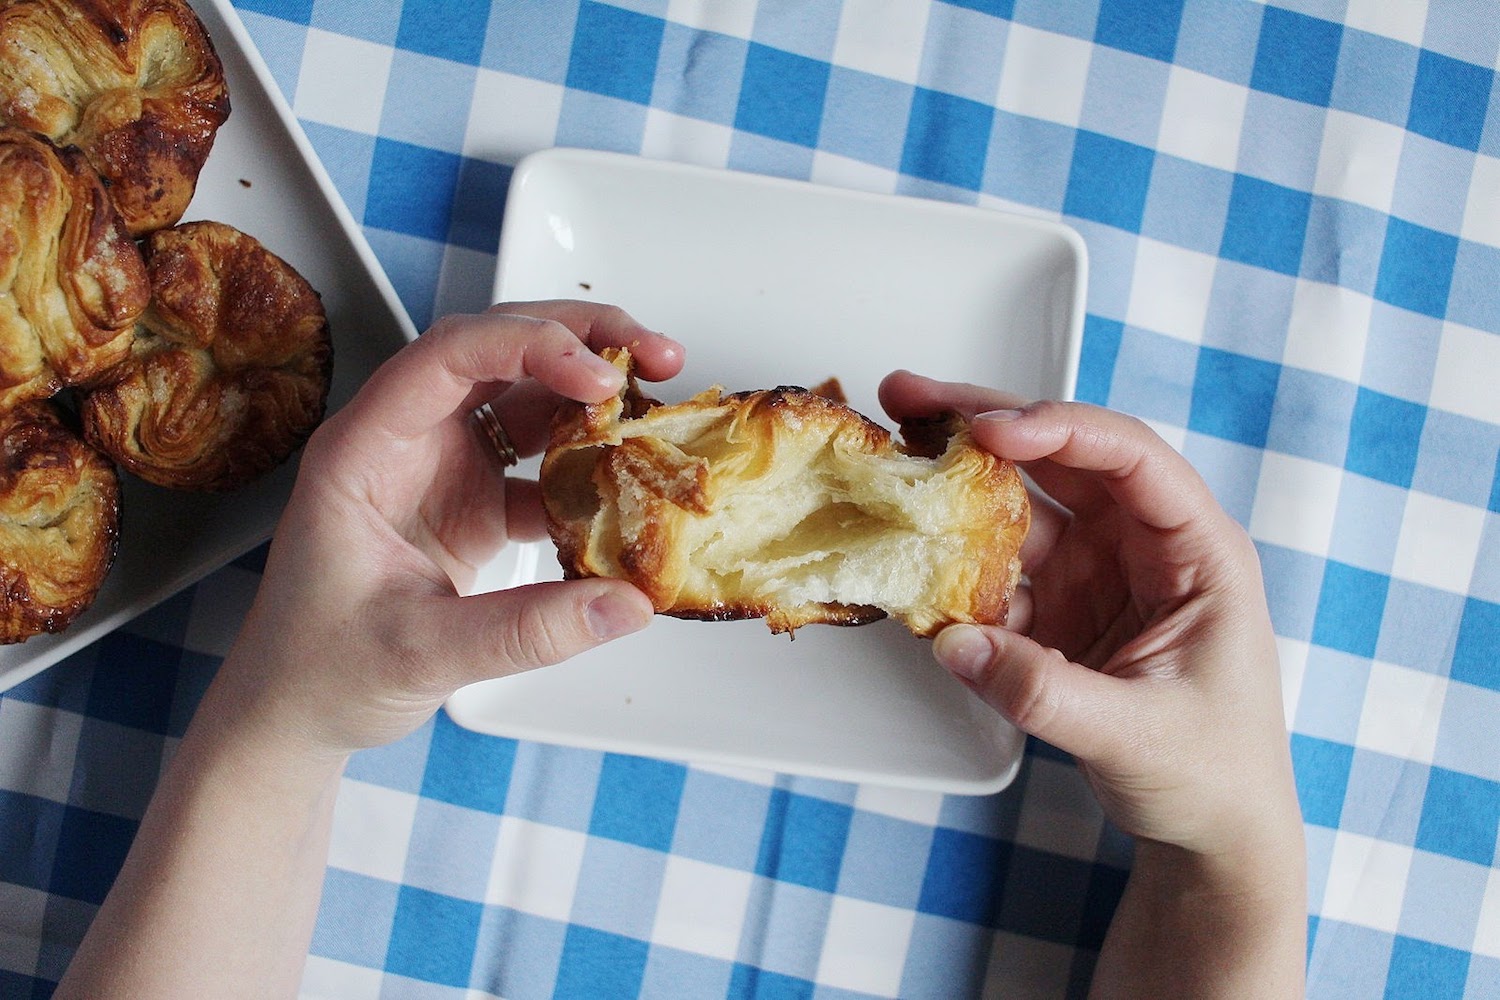
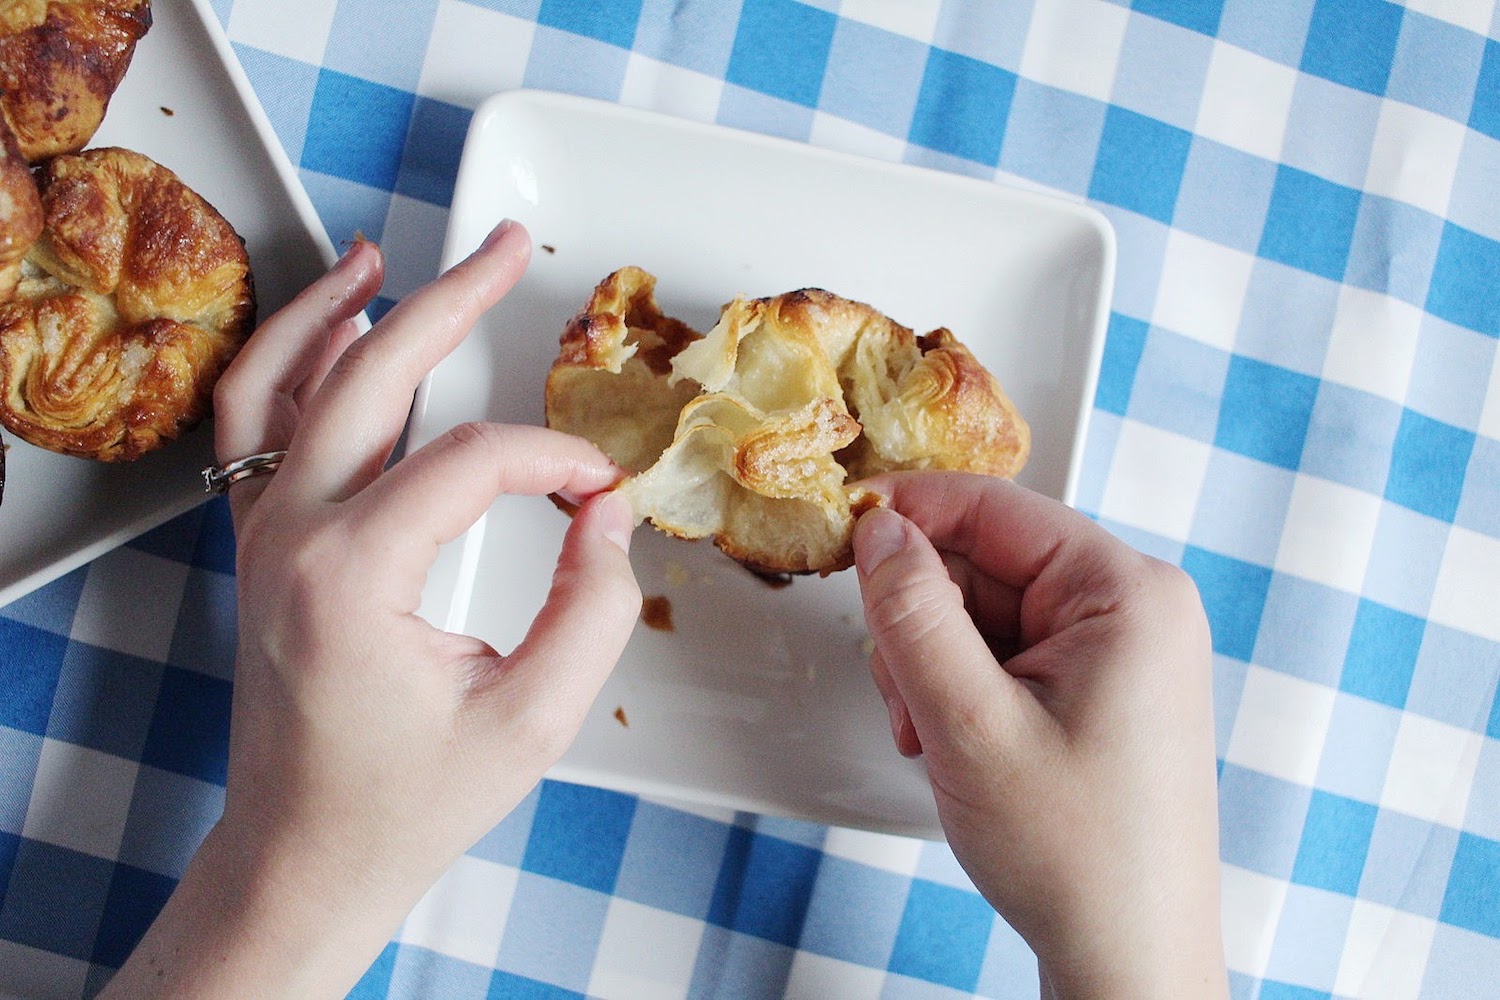
Kouign Amann pastries with a crusty outer layer and perfect, buttery, sweet layers inside.
The Outcome
Incredible. Truly. My sugar may have slipped out into the side of my pastries, causing them to burn slightly, but TBH... I'm gonna make these ALL the time now. They come out like a sweet croissant. The layers are so mouth-watering, buttery, airy, and delectable. My husband arrived home from work shortly after they were removed from the oven, and I thought he was going to pass out from the overwhelmingly delicious flavor and texture - haha! I think he gobbled up two or three before I could even finish taking photos to share with you! This wasn't hard by any means, but took patience between chilling the layers of butter and dough. So worth it. Make these, you guys. You'll feel like a French pastry chef and want to strut your stuff to the owner of a French restaurant in Atlanta. No? Just me? haha.... ;)
Would either of us bake this again?
Well I think that's obvious... YES! Tomorrow maybe?! I'm in love.
Here's the glamour shots...


Here's my mom's report
Amazing, Amazing!
After last week's debacle with the Prinsesstarta Cake, I was looking forward to this since there were simple ingredients and minimal steps. Even though it required a commitment because of the chilling of the dough it was still easy. I have three basic cakes I really like and tend to use. Many adaptations can be done with fillings and frostings. Fancy cakes that are labor intensive and expensive don't trip my trigger. Bread on the other hand does appeal to me... any bread item. I rarely buy it in the store since it has an unappealing texture and preservatives. Give me a fresh bread that I have to freeze in order to keep fresh any day! Making homemade croissants has been a goal of mine and these made me think of them. They were pretty close with exception of the shape and these are sweet. Absolutely delicious! Light and crisp on the outside beautifully layered on the inside. If you want to feel like a french pastry chef make this recipe. There were no problems making them and am happy for the experience. A fun fact: the final proofing can be done overnight in the the refrigerator and baked fresh in the morning. If you do this, make sure you set them out long enough for the dough to reach room temperature before baking. What a great B & B breakfast item. Go for it, you won't be disappointed!


I can't wait to bake these again and perhaps add some fun flavors to my layers! Nutella? Chopped pistachios and honey? Cheese and garlic chives? The possibilities are endless! Don't forget to use the hashtag #JoyLynnBakeAlong and join along on this super fun challenge. Coming up next...
Wednesday, May 31st
Bake #8: Povitica

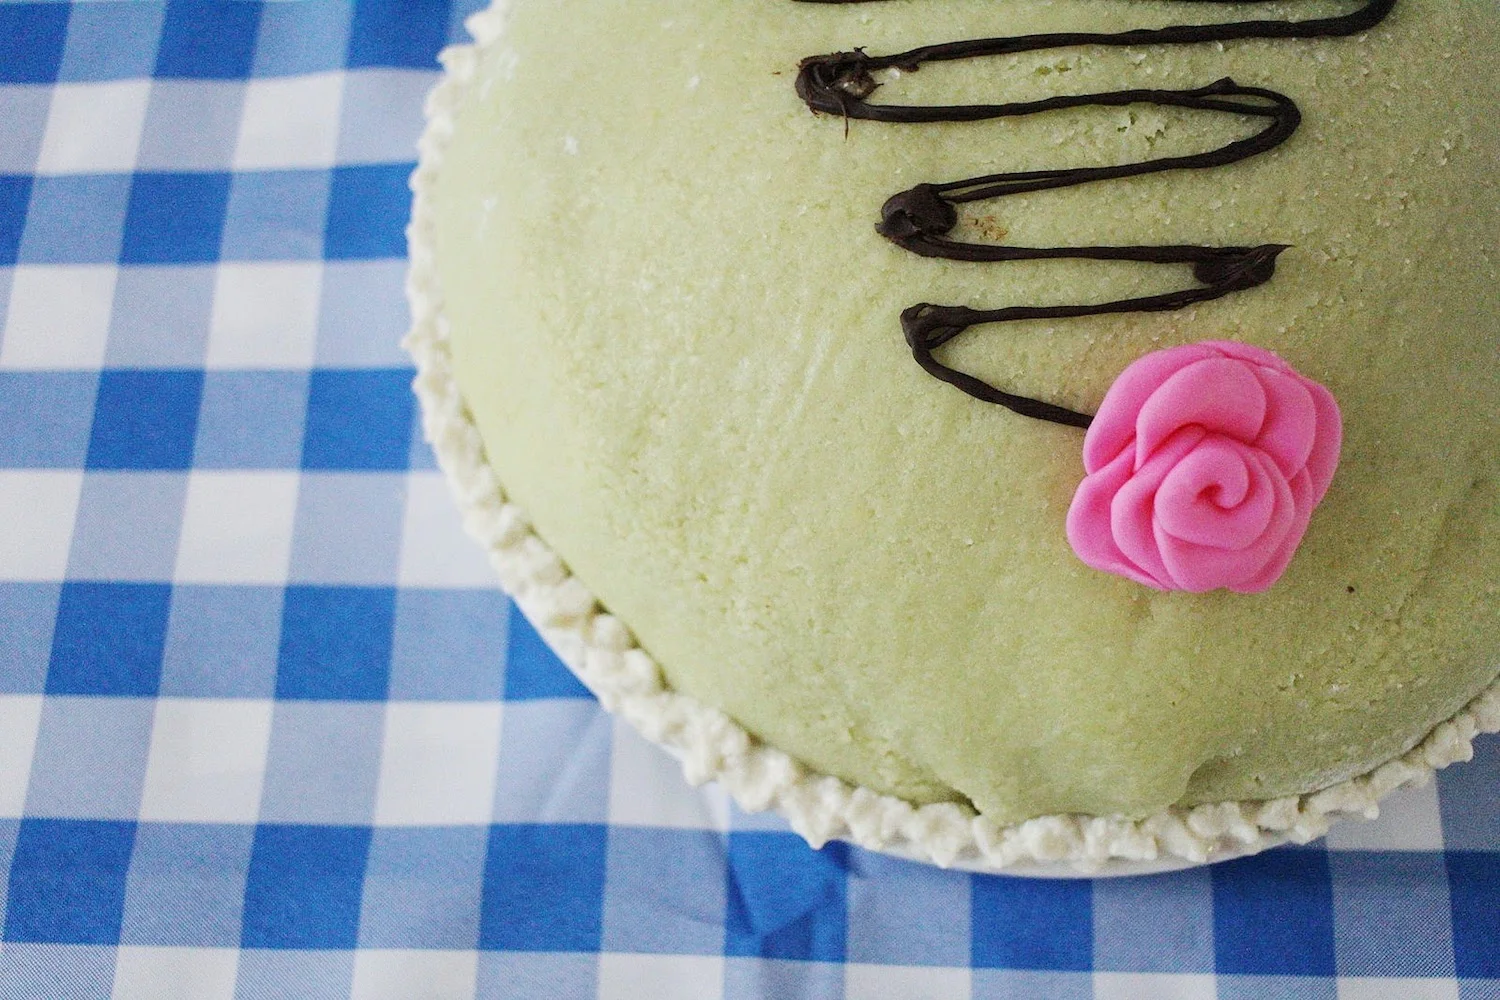
Bake #6 | Prinsesstarta (Princess Cake)
In case you're not up to speed, this is the sixth bake in The Great Blogger Bake Along series. Read about it here.
Oh good gravy. This flipping cake.
First let me say, it's delicious. Like, REALLY good. This was the first bake that my husband legitimately LOVED. He practically licked his plate clean! It was complex, and now having done it once, I would be better prepared to do it again, but holy moly. This was HARD. I'll expand in a moment.
The Challenge
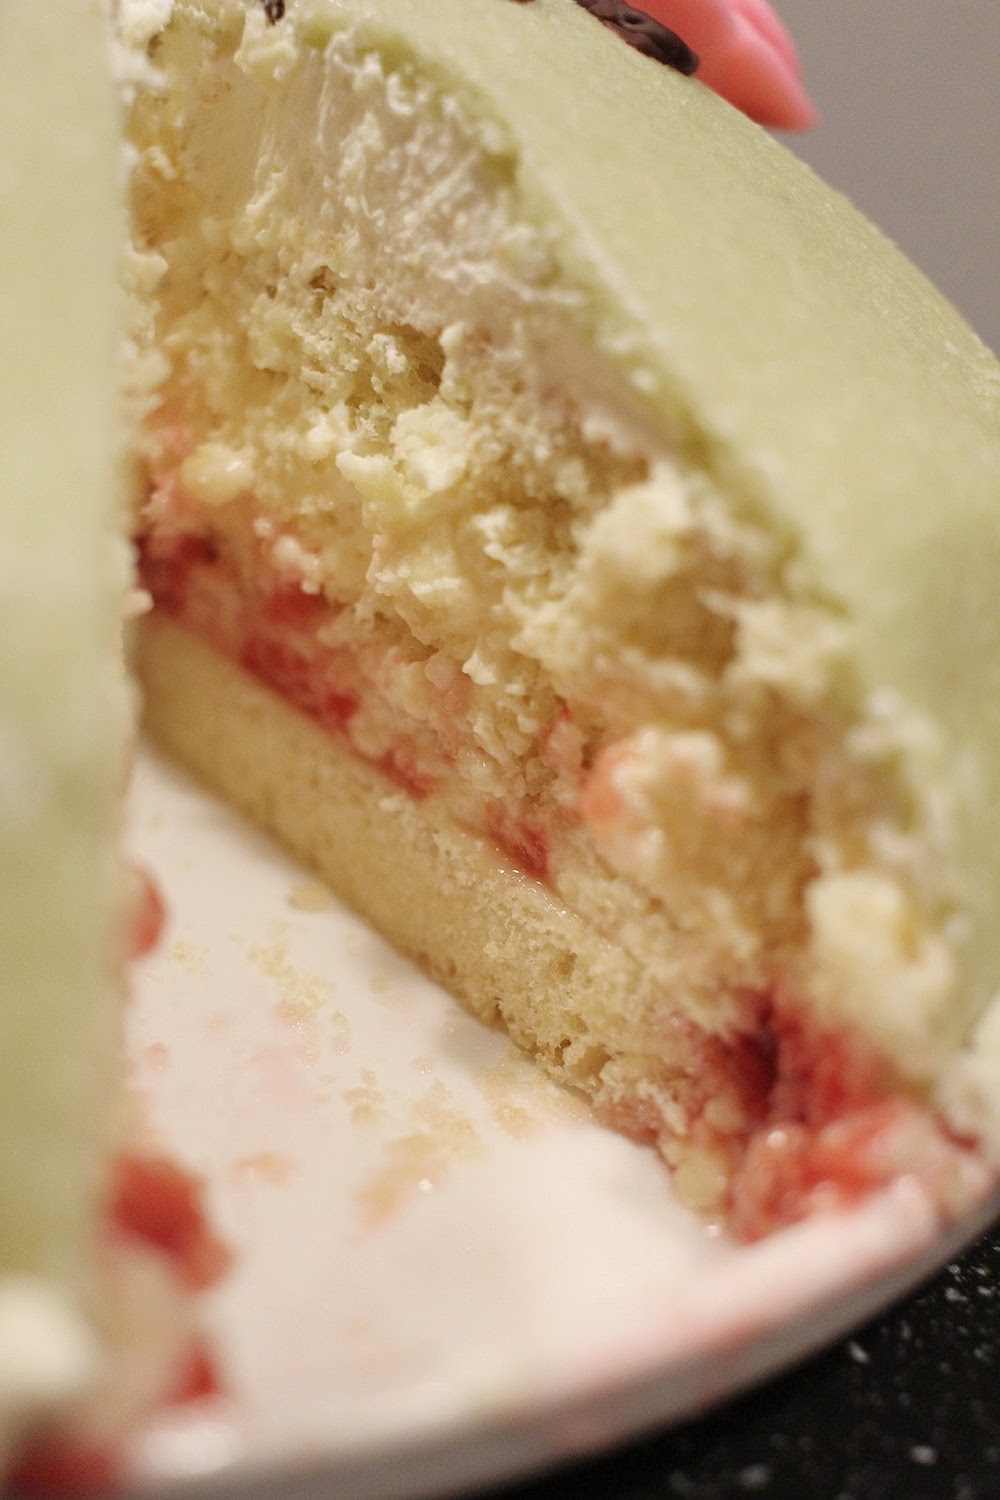
A Prinsesstarta (Princess Cake). This cake has layers of sponge, custard cream, raspberry jam, whipped cream, and marzipan. It needs to have nice layers and a dome top.
The Outcome
Okay. I'm gonna talk about the process, so hang tight while I go bananas up in here. This was a HOT MESS and it took me SIX straight hours.
First you have to make this fussy sponge. Mine was raw when the timer went off, so I had to keep it in there longer, and it didn't get a good rise either. Then you have to slice the dang thing in three even layers. Well, it was whilst slicing this cake I found chunks of flour that didn't get "folded" in properly. Whatever, I got it sliced just fine so I moved on.
Then you make a custard. Guys. I've never made lumpy custard IN MY LIFE until this day. It tasted fine, though, so I let it be. But it was sooo lumpy.
After that, you make a jam. It turned out delicious and I want to put it on everything, but mine didn't set quite right which was annoying. I let it cool completely, so I don't know what the heck I did wrong, but it was a smidge soupier than I would have liked.
Then, you make marzipan. Oh for the love of all that is holy, who thought of making marzipan?! You grind up almonds and add raw eggs and a butt-load of sugar and some almond extract. It was sticky and kind of slimy, and it just seemed off, so I figured I must not have ground my almonds enough. So I tried to run the mixture through a food processor... which did nothing. I moved on. I rolled my marzipan and cried as it got stuck to the counter. I put parchment paper over it and under it and everywhere, but that didn't make it any easier when it came time to pick the thing up and place it atop the cake... but somehow I did it! I'm actually pretty happy with the outcome of the marzipan.
Finally, you whip up a tiny leftover amount of whipping cream and do a little piping along the bottom of the cake. However, my whipping cream DIDN'T WHIP and it was all I had left, so I made a butter-cream frosting real fast. You also have to make a little flower out of pre-made fondant, and do a small chocolate decoration. All of these little bits and pieces just added up to a ton of steps and clean-up, making it incredibly time-consuming. Again, it was very tasty, though! If you're looking for a big challenge with a tasty result, this is your bake.
Would either of us bake this again?
Oh gosh. I don't know! It was definitely a test of patience, knowledge, and experience, but not exactly something I think I'd jump at the opportunity to make again. Maybe for the right occasion, but definitely not on a whim! My mom would probably agree. We laughed wondering if we'd have even got it done much faster had we baked it together! Ha!
Here's the glamour shots...


Here's my mom's report
Are you looking for a good laugh? You'll want to read this. Here goes...
I was looking forward to another challenge, but discovered that lack of knowledge can lead to disaster. I began making this cake at 9:00 A.M. There were multiple steps and one that I added because crushed almonds were unavailable to me. It seemed so simple to run some almonds in the food processor until they became the fine sand like texture required. However, any longer in the processor and I would have had almond paste. But close enough and all would be well. Next, the pudding. First milk and a $5.00 vanilla bean. Then the egg mixture, blending them both and cooking till thick. Fine, done. Oh, and after research I discovered that UK corn flour is US corn starch, not a fine version of corn meal. Thank goodness or this would have been a complete flop! Making the jam filling was easy, I just added corn starch to the sugar and let it cook a bit longer reducing it and it thickened nicely. The cake (sponge) went together fine. The assembly for me wasn't a problem. The next time I would whip ALL the cream called for at once reserving what is needed for decorating. The directions had sooooo many steps which I would streamline.
The marzipan was next. It actually went together pretty well, but the rolling out and getting it onto the cake was a mess. I was flinging powdered sugar all over even though it said a thin layer, each time I tried to pick it up it ripped. By now I was sweating and getting panicky. My husband suggested using a pizza peel, which we did. Oh, and the green food coloring was not a pretty shade of soft green. The "Grinch" came to mind. At this point, who cared! I laid that green blob over the cake and it was done. Drizzled some chocolate on, put on that fondant rose, and sat down in a chair. It was 5:00P.M. when I finished. How this was made in 2 hours I will never know. Joy and I have had some serious laughter over this one. The final blow came when it was shared with family. My son-in-law and the rest of us did like it. The marzipan was tasty but later on too rich and we didn't eat it, just peeled it off. He did describe the texture this way. "You know, the dry skin you get on your knees or elbows? It reminds me of that." Zoom in on my pictures and you'll agree!


Phew! What a challenge! I'm proud to have done it, but glad it's behind me! Don't forget to use the hashtag #JoyLynnBakeAlong and join along on this super fun challenge. Coming up next...
Wednesday, May 24th
Bake #7: Kouign Amann

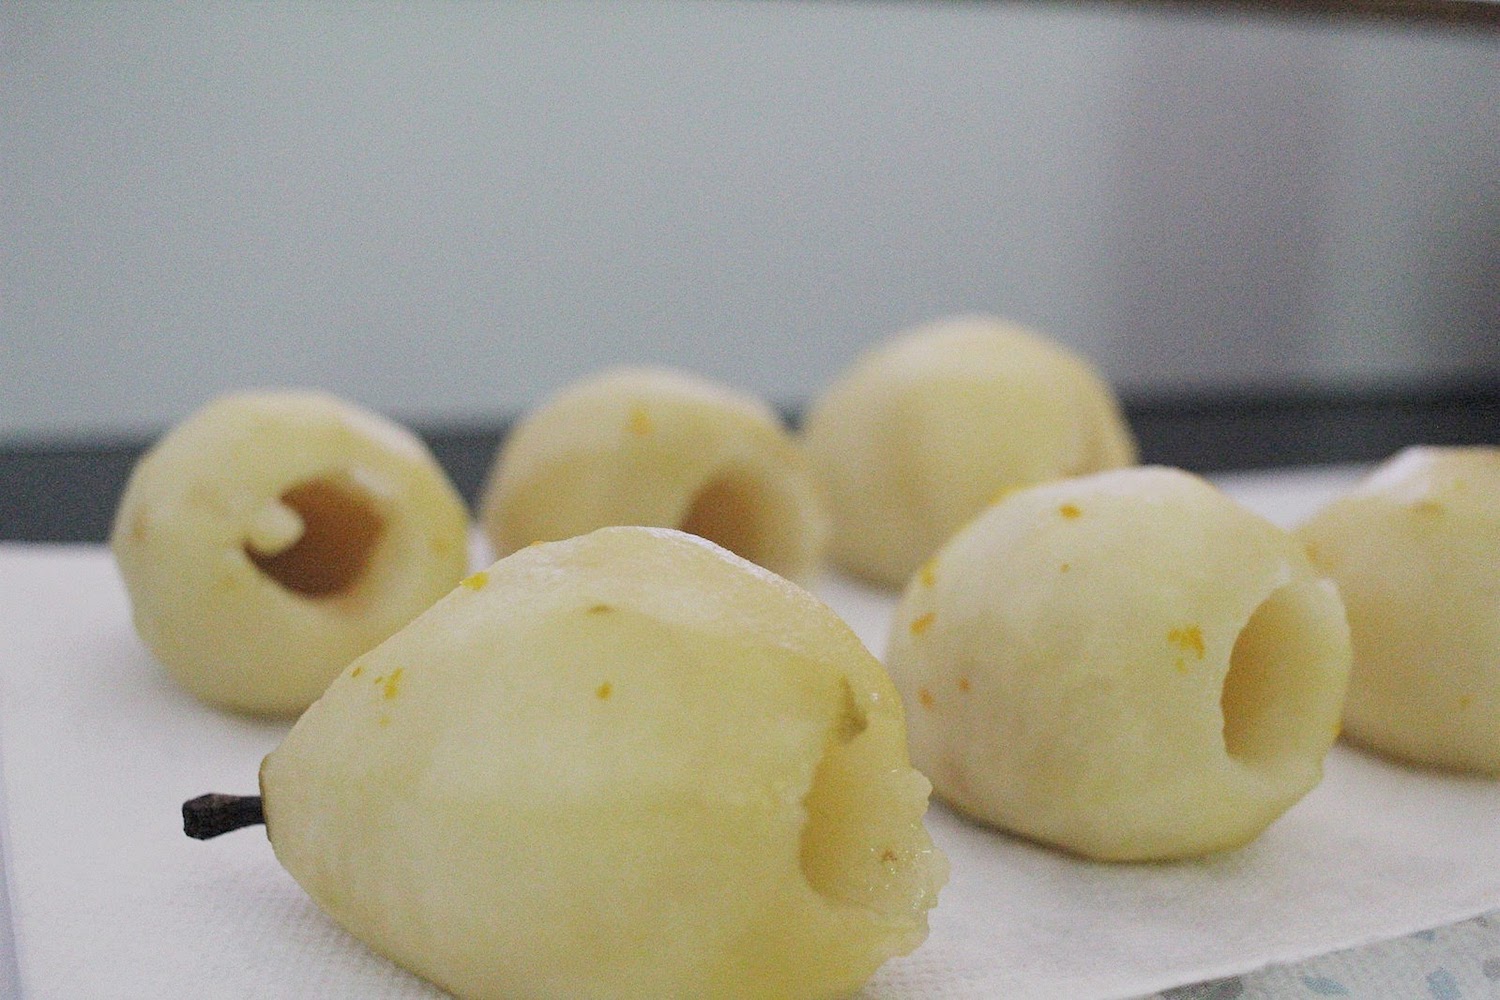
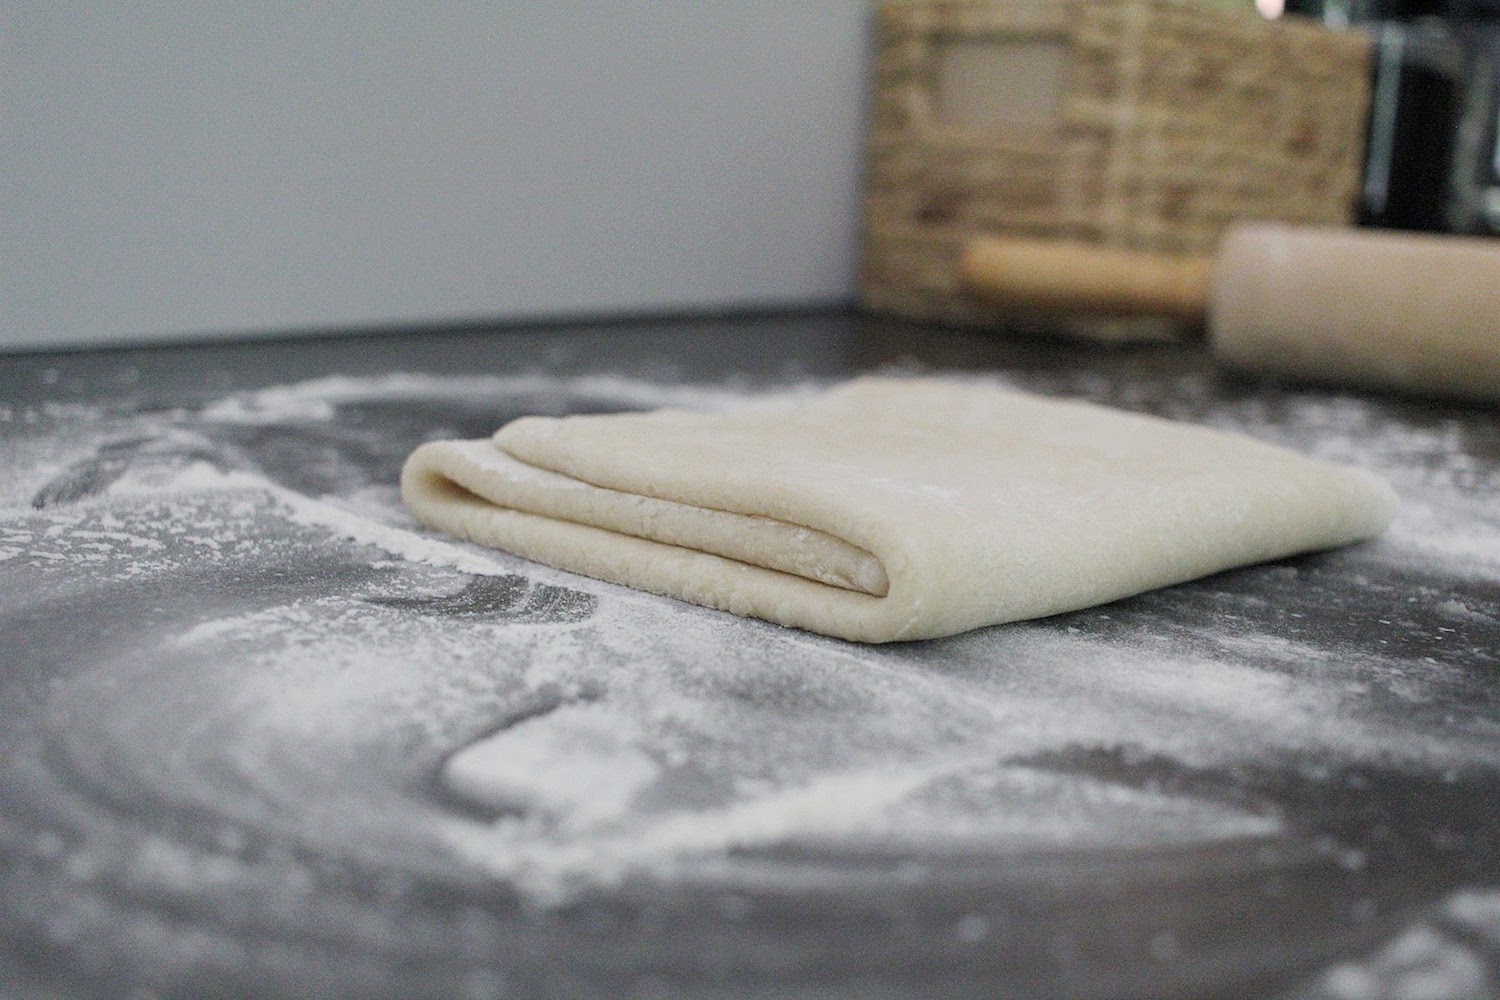
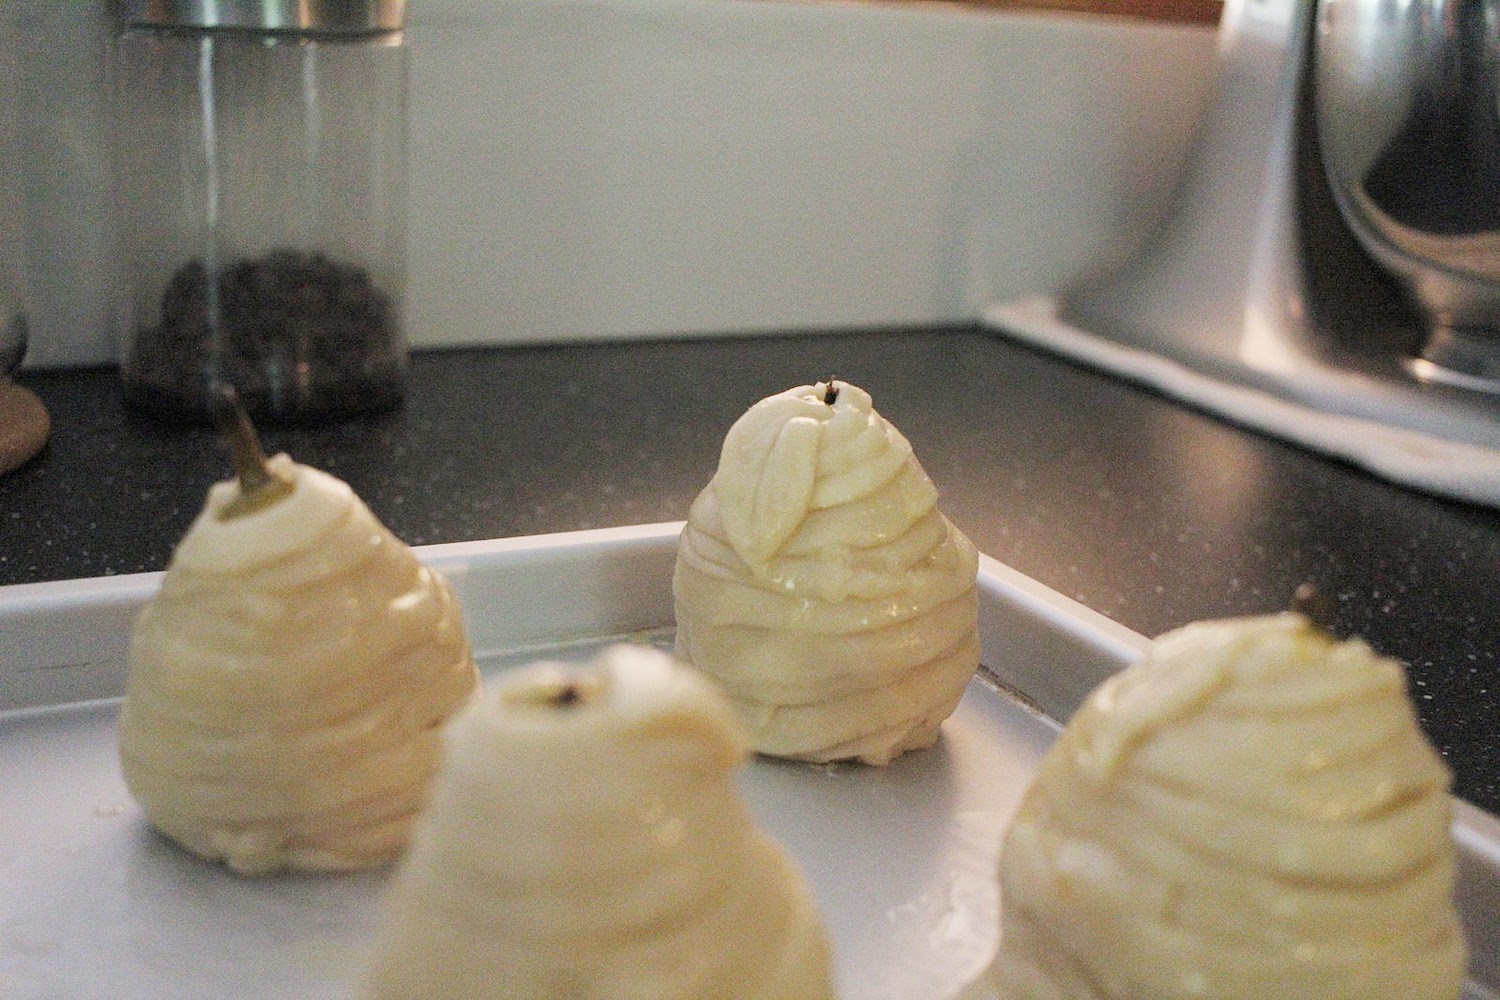
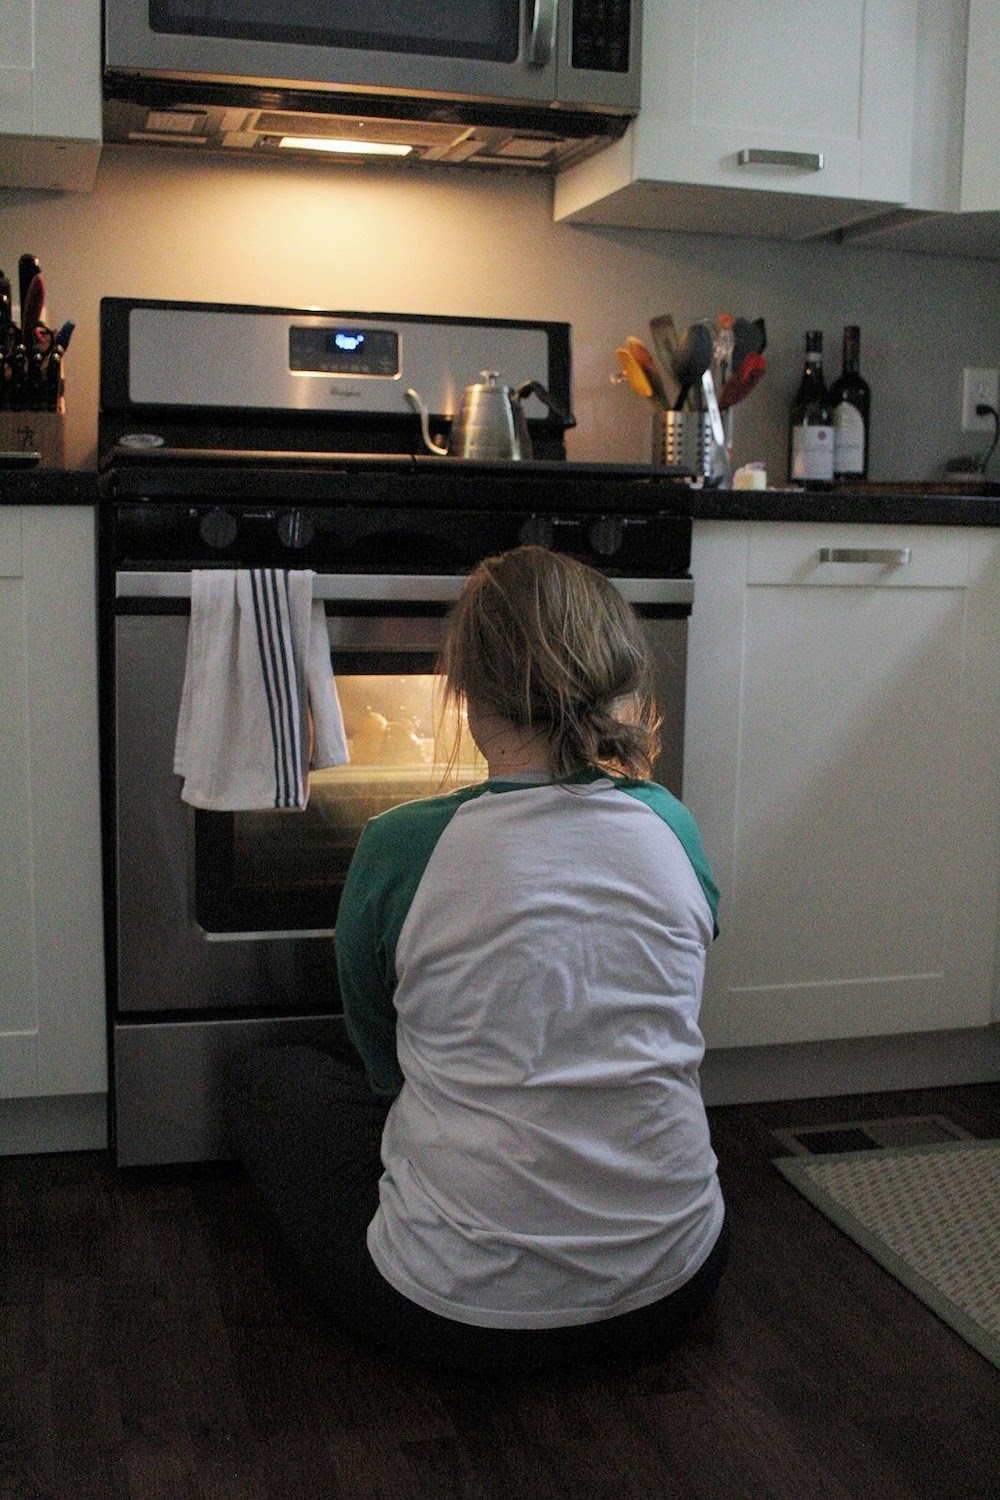
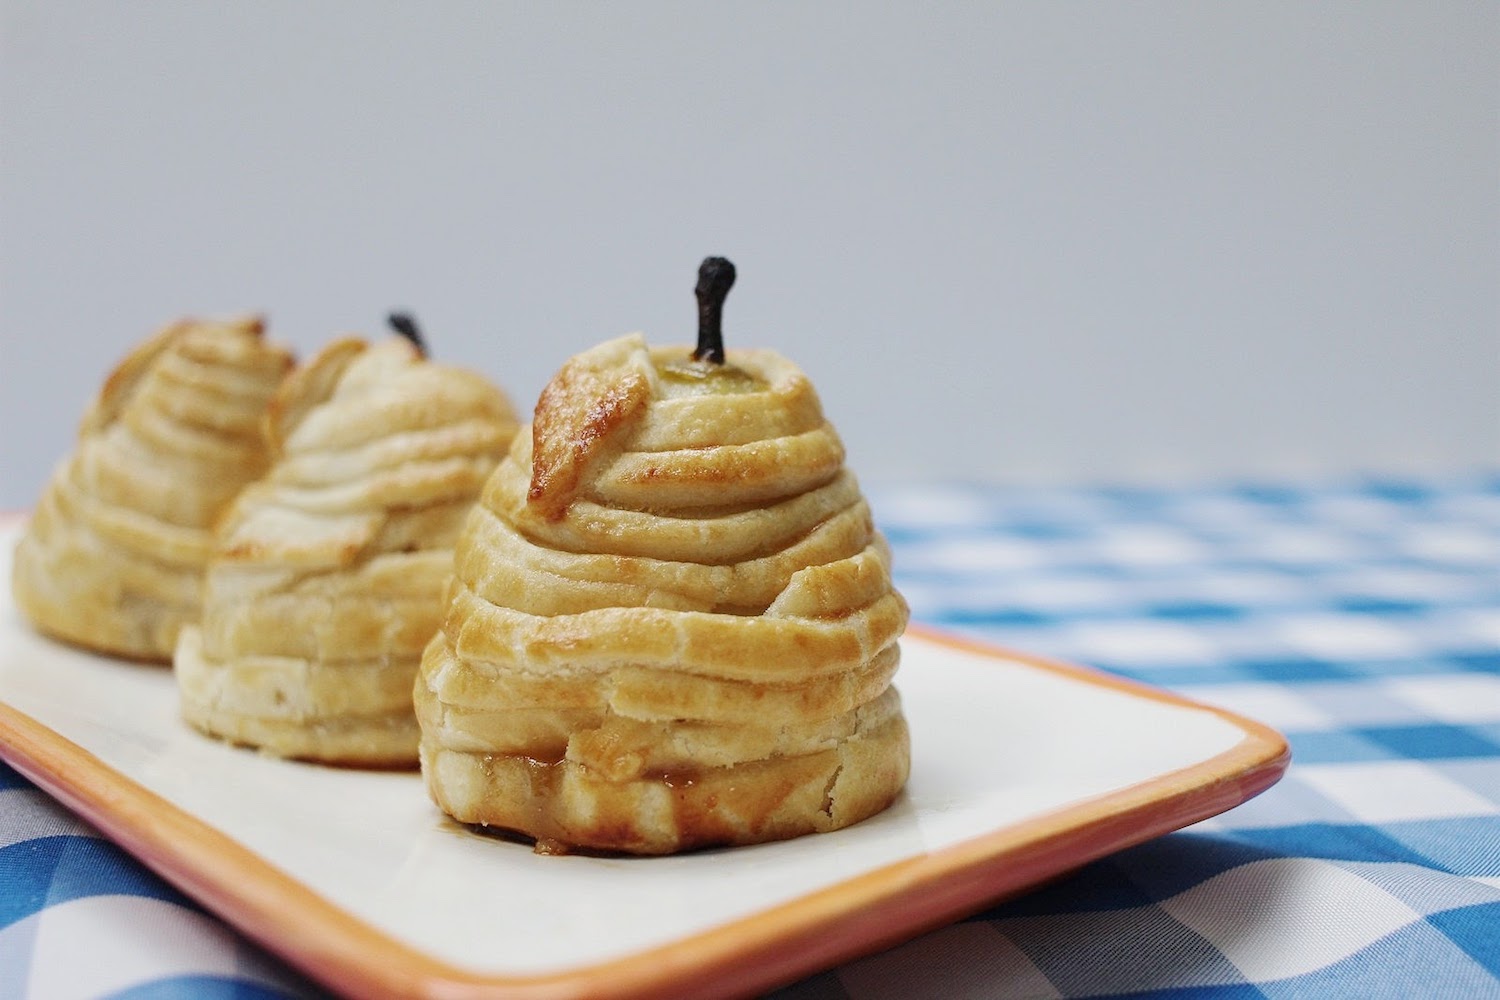
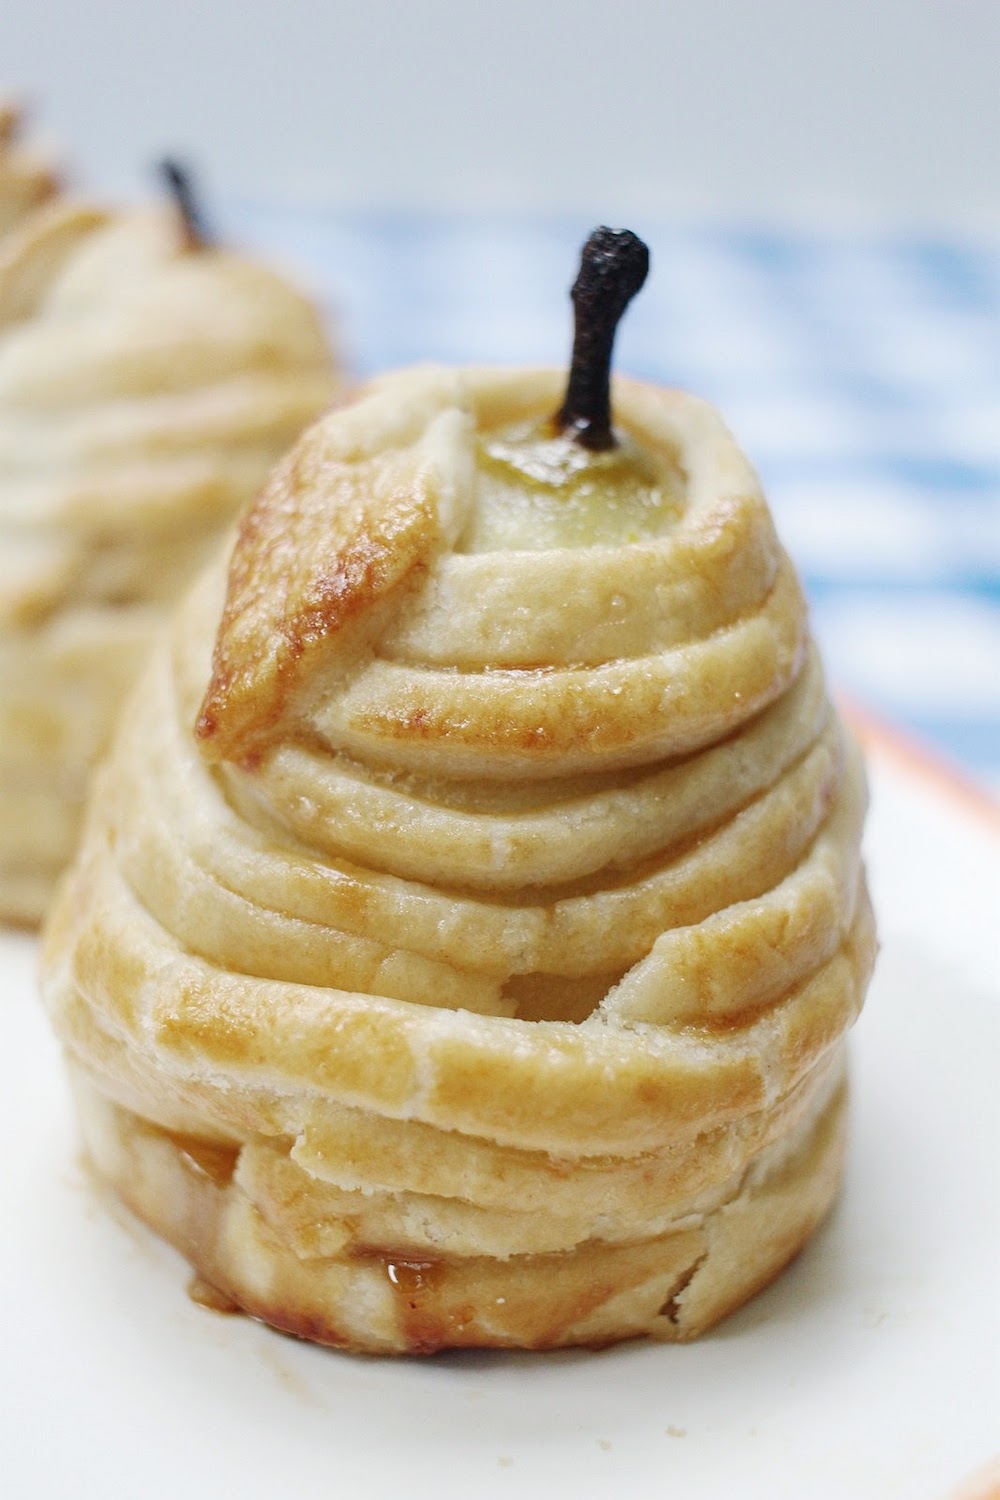
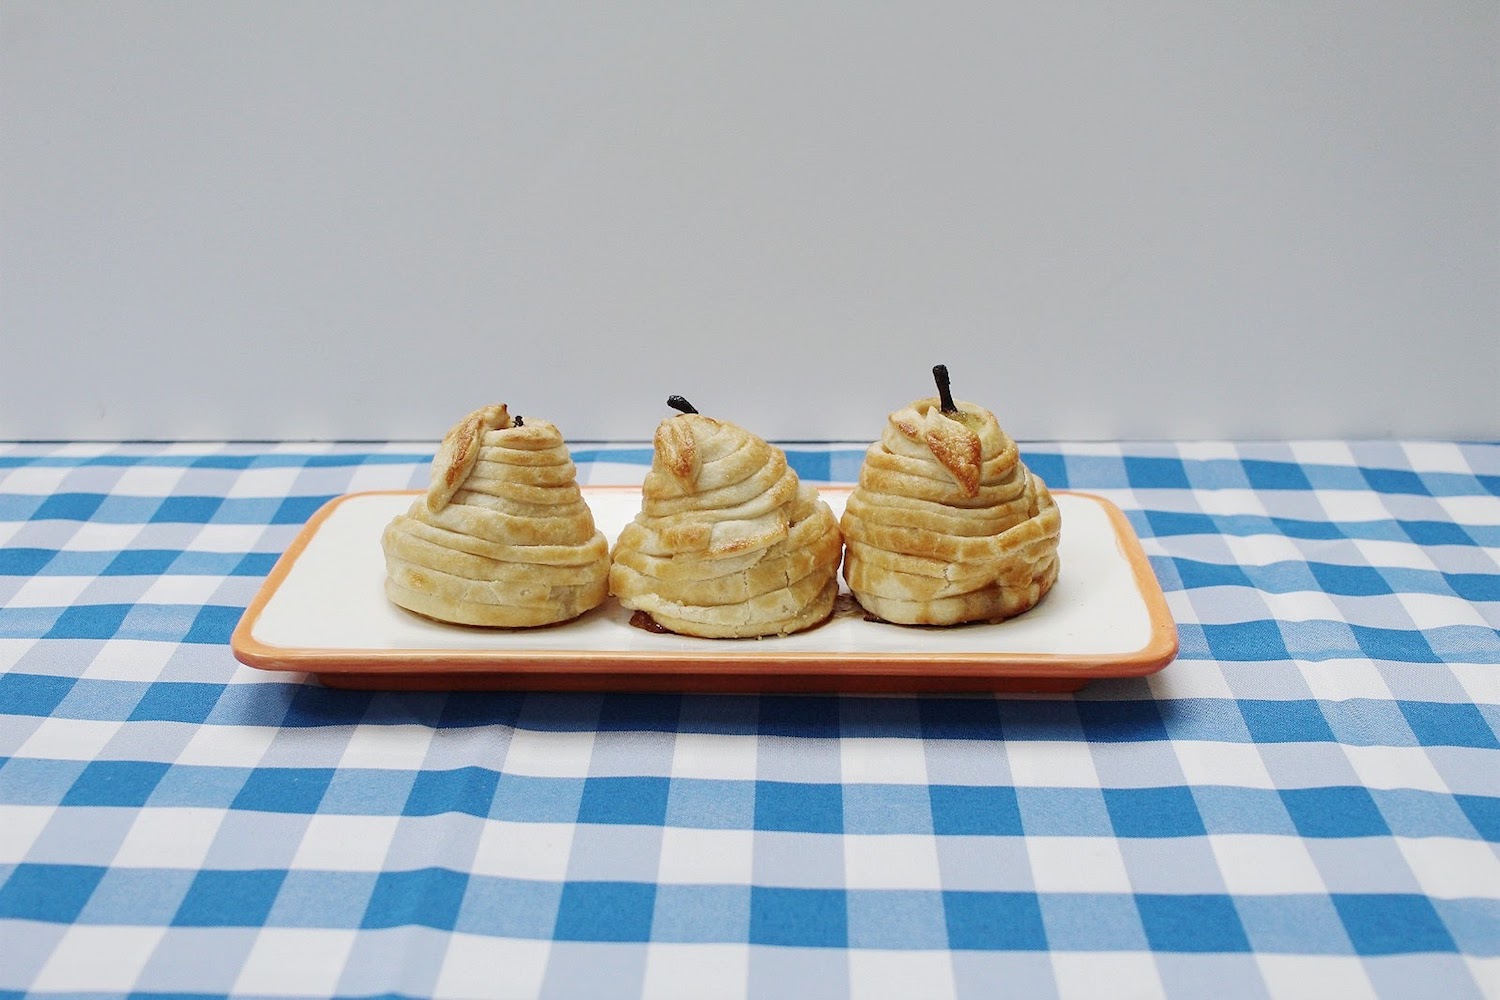
Bake #5 | Mini Pear Pies
In case you're not up to speed, this is the fifth bake in The Great Blogger Bake Along series. Read about it here.
Finally. The one I was most excited for! They looked so delectable and flavorful and fun to make, that I was just counting down the days until I got to make these. It did not disappoint in terms of 'fun to make,' but it did disappoint in other ways... hmmm read on...
The Challenge
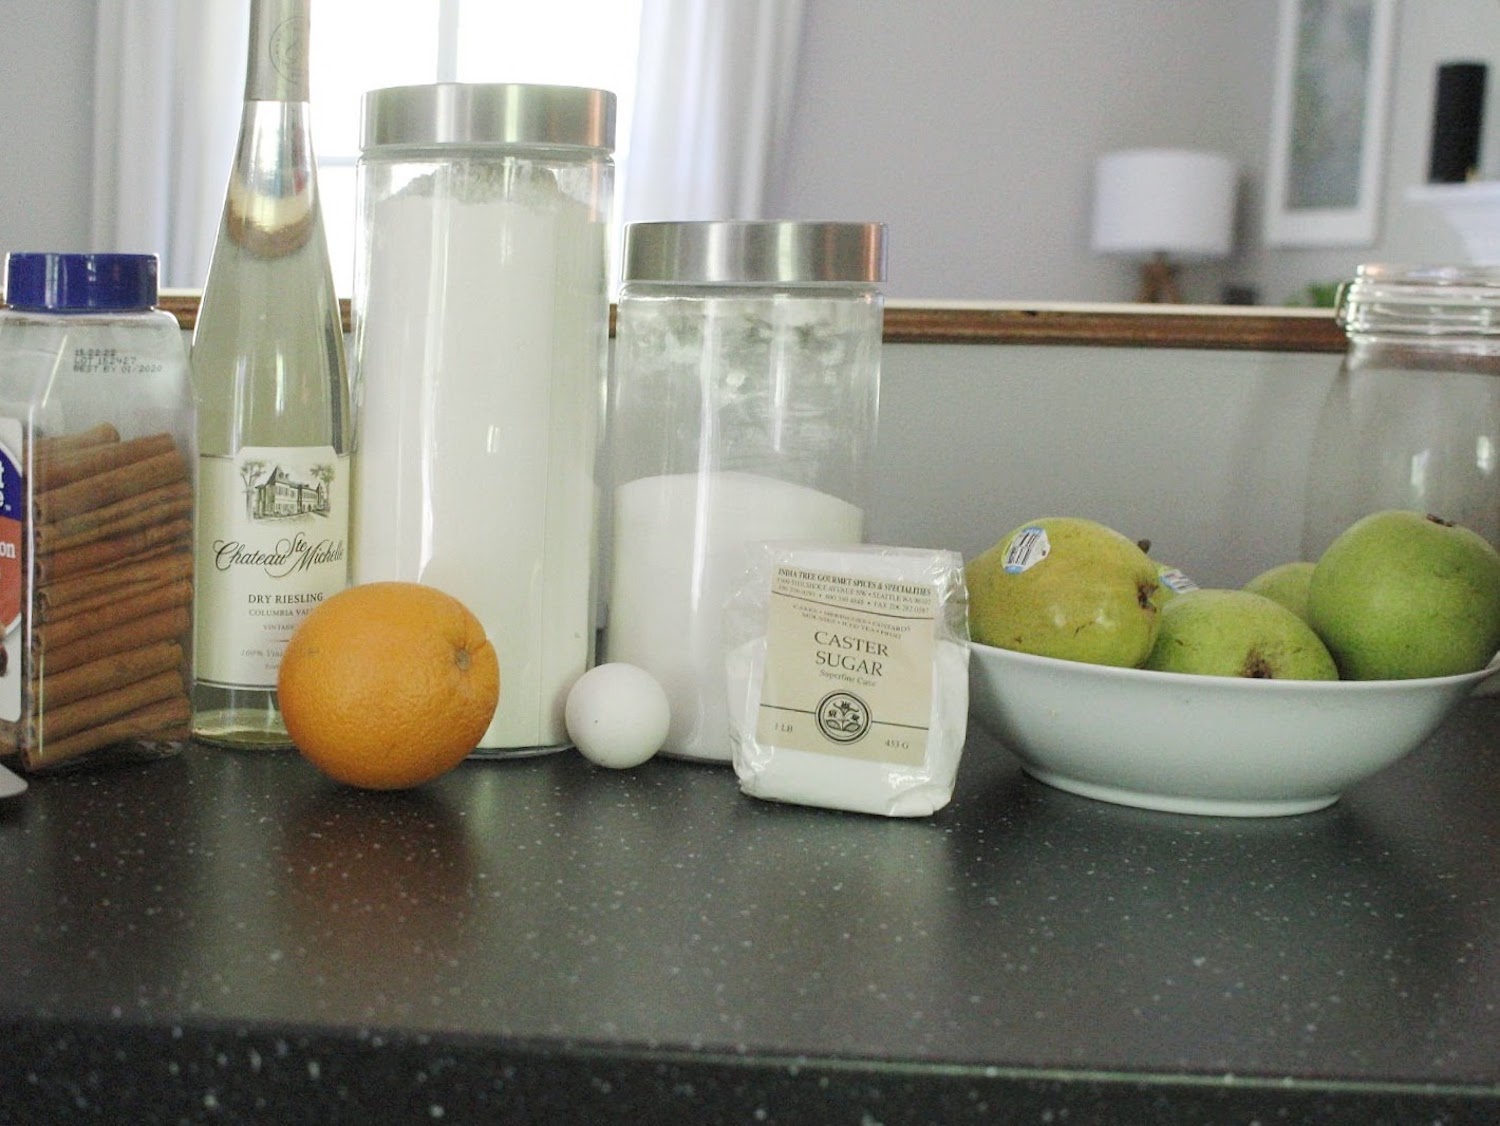
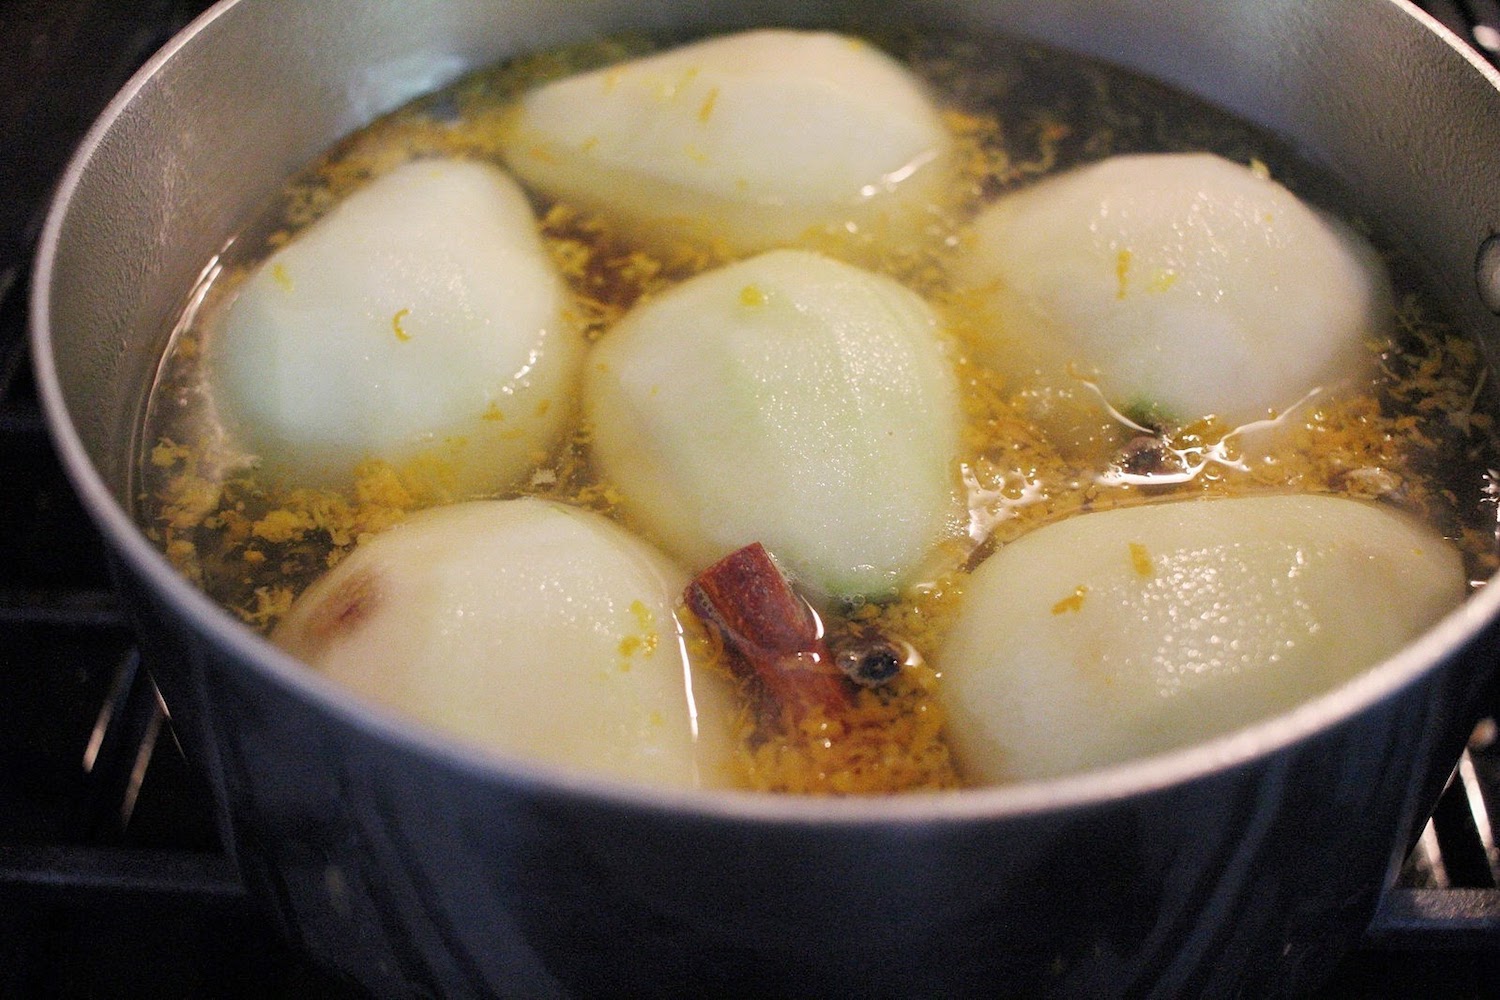
Make mini pear pies with a homemade rough puff pastry, and poached pears. Make sure the puff pastry doesn't slide down the pears and the pears aren't over-poached making them too soft to hold the pastry.
The Outcome
Guys... this was such a disappointment!!! So the puff pastry called for lard and butter and flour. Has to be good, right?! It was AWFUL! All I could taste was the lard and without any salt, it was just bland. The pears were poached in a water, white wine, sugar, cinnamon sticks, and orange zest mixture on the stove. After that, it's wrapped in the pastry and baked, so it has to turned out all caramelized and pie-like, right? Nope again! For such a yummy poaching mixture, they still came out almost flavorless and completely disappointing.
Would either of us make this again?
I would make it again, only with some serious adjustments. It was a genuinely beautiful dessert and I loved the process of making it, but the overall taste wasn't what I had hoped for. I let my mom do her puff pastry differently, and I think hers turned out better, so again, with those adjustments, it would be well worth it to make this again. It needs a little more sugar and salt to bring out the flavor, and I know they'd be amazing with those additions.
Here's the glamour shots...


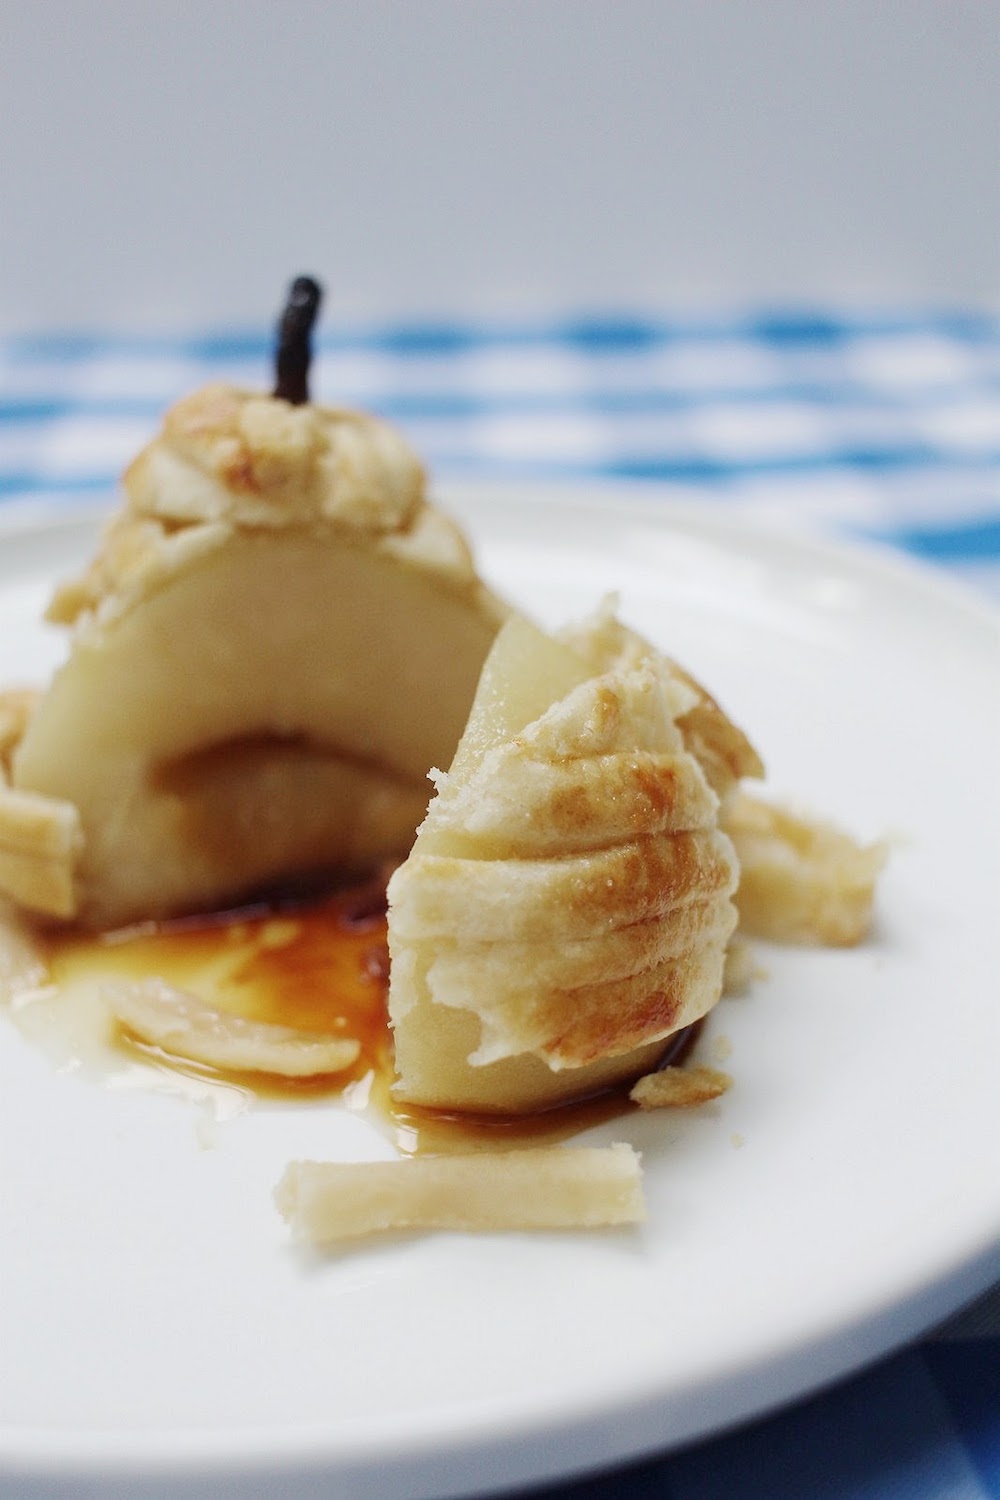
Here's my mom's report
This challenge turned out pretty well. Mostly because Joy made hers well in advance of mine and I learned from her and was given permission to change it up a bit. Having returned on Tuesday from a trip it was a late night finishing up in time for posting.
Here is my review:
The recipe called for butter and lard. Joy made hers according to those directions and was very unhappy with the flavor of the puff pastry. We both felt a proper puff pastry would NOT include lard. Therefore when I made mine I used only butter. I think it turned out very well. It's time consuming, but worth the effort. The rest of the preparation went very well. The end result was pretty good. It called for firm pears and apparently mine were too firm because I was unable to eat them with a spoon, I needed to slice the pears. In my opinion a poached fruit should be very soft, but I suppose they need to be somewhat firm in order to wrap them easily with the puff pastry. Somewhere in the middle is where they need to be. My picture shows how I think they should be served. The thickened sugar mixture made a tasty, and pretty glaze over the pear. All of these challenges look impressive, but not all of them taste that amazing. This one was one I would serve if I could be sure the fruit would be soft.
Again, if you're looking for a genuinely fun little challenge, give the pies a try. They are so pretty, and with the adjustments are genuinely yummy, and unique way to have pie. Don't forget to use the hashtag #JoyLynnBakeAlong and join along on this super fun challenge. Coming up next...
Wednesday, May 17th
Bake #6: Prinsesstarta (Princess Cake)

Pear + Gorgonzola Flatbread
Do you ever go out to eat and have something so amazing, yet so simple that you feel you MUST recreate it at home? This happens to us every couple of months, and I think I have more fun trying to recreate the meal, I forget to notice whether or not it actually ends up tasting the same. However, this particular flatbread is one I'm quite sure is a near replica.
We first had this mixture of flatbread flavors at our favorite area wine bar, and for the weeks following, it kept cropping back up in my mind, reminding me of how good it was. Finally, I decided to just give it a go. The last time I tried to recreate a flatbread it turned out amazing... might as well try it again! Let me dive right in with ingredients and directions and, of course, photos.
Ingredients
Flatbread (I always buy this for my flatbreads - you can find it at almost any grocery store)
Crumbled gorgonzola cheese
Shredded parmesan
A ripe pear
Fresh basil (about 6 leaves)
Caramelized onion (about 2/3 of a large onion)
Honey
Directions
Preheat the oven to 400F
Start by caramelizing the onion. Slice it thin. Preheat a pan with some butter and olive oil on a high heat. Add the onions and keep the heat high-to-medium high. Stir occasionally but let the onions get browned. It's okay if they look a little burned, but stir to evenly brown them. Remove from heat when a majority have been browned and set aside.
Chop the basil. Slice the pear thinly, but be sure and remove the core parts.
Place the flatbread on a baking sheet. Layer from bottom to top: onions, basil, parmesan, gorgonzola, pear.
Drizzle with honey and bake for 15 minutes.


Oh man, you guys. This is just soooo flavorful and delicious. It's like all the foods you'd gather separately for a wine tasting but instead baked into perfect harmony. Though, you should probably grab a nice white wine and settle in with this because it would be perfection. I promise you'll start to crave this tasty little beast. Feel free to add some walnuts or pistachios for crunch, or whatever else would pair well with it and then TELL ME ABOUT IT because foodies gotta stick together, amiright?

Mini Lemon Cakes | Showstopper Bake by Cameron
The day has finally arrived! I get to share my friend Cameron with the blogging world! I've known Cameron for almost a decade through my college friends, but we've probably only spent a handful of times together in person. We've bonded over weird Facebook posts and memes, and more recently, over our shared love of The Great British Bake Off. Just looking through Cameron's Instagram will show you that she challenges herself to master not only taste, but technique and creativity. She is a true Star Baker and I'm so happy to have her here today. Also, keep an eye out - I think Cameron may be catching the blogging bug and she's going to hopefully have a blog up in the future for you to follow! :) Okay, and read everything below because I swear Cameron is like a super interesting person. AND she got noticed by one of the bakers on the show on Instagram and I'm SO jealous!
I was always the kid in school who had cucumber sandwiches for lunch instead of peanut butter and jelly. I had fairy cakes at my birthday parties instead of store bought ice cream cake. I left shortbread for Santa instead of iced sugar cookies. None of these statements are complaints by any means, I was always lucky to be in a household that embraced food from all over the world. My mom is Canadian, by way of California, and the daughter of a Scottish Australian mother and a Canadian father. These influences have always left me with a strong attachment to my British heritage and its culture. This obsession with all things British has been a strong undertone in all my cooking. I began taking baking seriously about five years ago. It started off with mastering the family shortbread and then moved along to pavlovas and then down the rabbit hole of pastry and a stack of cookbooks and baking textbooks as tall as I am.
I first discovered The Great British Bake Off in a deep dive of English TV shows. I grew up watching Keeping Up Appearances, Monty Python, Absolutely Fabulous, and Fawlty Towers. As I got older I started finding all sorts of new shows I loved, both scripted and reality, on BBC and Channel 4. I found an extension to run on my laptop that allowed me to access to the BBC iPlayer, that was it.... I was obsessed with Bake Off. I thought about it all day, I couldn't wait until the next Wednesday when a new episode would air. Besides the interesting recipes and challenges, what I loved most was how genuinely kind the contestants were to one another all while remaining fiercely competitive. I have my own opinion on the Diana vs. Ian bin-gate drama. Many of my bakes are inspired by the contestants. I once recreated Chetna’s white chocolate and pistachio cake. She liked it and commented on it on Instagram.....you better believe I screenshot it!
When Joy approached me about contributing showstoppers for her blog I was instantly on board. I loved her idea of including her mom's feedback as well and challenging herself to creatively bake outside her comfort zone. I wracked my brain deciding what to feature for this first showstopper bake. I bounced back and forth between mini British bakes and bread. In the end it became clear….an homage to my British heritage... a classic lemon drizzle cake with my own twist... homemade lemon curd (a family favorite) and a honey goat cheese mascarpone filling.
"My friends poke fun at me for being pretentious... “honey goat cheese mascarpone filling”....I can see the eye rolls! I promise it's totally worth it."
Now let the baking begin! For this recipe start by making the lemon curd. Give the filling enough time to cool and set before filling the cakes. Once it comes together put it in the fridge until you’re ready to assemble the cakes. There are several different methods for making lemon curd. I prefer using a bain-marie, placing a sauce pan on the stove top with water on low heat. I then float a bowl in the water filled pan and begin adding the ingredients. Sugar, eggs, zest, and lemon juice are added to the floating bowl and whisked until the mixture begins to thicken. Ideally, the objective is to reach a temperature of 165F without boiling the mixture. Once it has reached the desired temperature, begin adding the butter in small amounts at a time. If you are not getting the thickness you need, you can add more butter. Once it has come together you can sieve the curd to get eliminate the zest, however I like to leave it in.
Now the “pretentious” as well as rich and delicious goat cheese mascarpone filling. Best to prepare this before the cake batter so that the rich flavors have more time to fully set. Begin with heavy whipping cream in a tall narrow glass bowl and a hand mixer. I've always found that the cream whips better if it has less space to escape the beaters. Once I get a nice amount of volume I add in the sugar and continue beating until the cream is smooth and the sugar granules are no longer detected. Once the cream looks set I add the mascarpone by gently folding it in to keep as much air in the cream as possible. Finally add the honey goat cheese. I recommend allowing the goat cheese to reach room temperature. Once it's all combined allow it to set in the fridge.
Now we get down to the star of the show. This cake utilizes the creaming method. This means that you start by creaming your butter and sugar together first, doing this produces a fine crumb with a dense and rich texture perfect for slicing. By fitting your mixer with a paddle attachment and continually scraping down the sides will produce an evenly creamed mix. You are looking for a smooth texture, and then begin slowly adding your eggs. Allow your eggs to come up to almost room temperature. You will notice that if the batter or eggs are too cold the mix will begin to look like it’s curdled. Don't panic... just keep mixing until the batter becomes smooth again and add another egg. Once that is done fold in your dry ingredients as well as the zest. I used an ice cream scoop to measure out my batter into the square molds, but traditions round cupcake tins or other shaped tins work as well.
Once the cakes are done in the oven, you are looking for the cake to spring back when you touch it and the sides of the cake have come away from the tin. Let them cool a bit in the tin and then place them on a cooling rack. Once they are cool, slice the cakes in half and using a wooden skewer poke holes on the inside of both sides. This will allow the syrup to be absorbed into the cakes. Make sure the cake is cool before doing this step. Once the syrup has set you can start to assemble. Using a piping bag, pipe five dollops to lemon curd on the bottom half. Then follow up with four dollops of the goat cheese mascarpone mix.
Typically, a lemon drizzle cake has a sugary crispy top, however mine did not achieve the desired level of crispiness. Shifting into problem solving mode, I diverted from the traditional and created a mixture of leftover lemon syrup and lemon curd and brushed in on the top and finished it with Swedish pearl sugar for a sweet, delicious, and eye pleasing finishing touch.
Overall these little cakes are begging to be center stage of any tea party. In my opinion they are the perfect marriage of sweet with a juxtaposition of savory tartness from the goat cheese and lemon. The end result is balanced perfection. These little bakes make me yearn for a cup of tea, some sunshine in an English garden, and good friends to share with!
Mini Lemon Cakes
Ingredients:
Lemon Curd
- 285g sugar
- 4 range-free eggs
- 2 large lemons, zest and juice
- 140g of butter
Honey Goat Cheese and Mascarpone Whipped Cream
- 237mL heavy whipping cream
- 2 tbsp granulated sugar
- 8 oz mascarpone cheese
- 4 oz honey goat cheese
Cake
- 175g butter (room temperature)
- 175g sugar
- 3 range-free eggs
- 175g all purpose flour
- ⅛ tsp salt
- 1 1/2 tsp baking powder
- 1 lemon zested
Lemon Syrup
- 100g sugar
- 1 1/2 lemon, zest and juice
Method:
Preheat oven to 350 degrees
Cook for
Lemon Curd
- Make lemon curd by whisking together sugar, eggs, lemon juice, and zest in a bowl over boiling water. Allow the mixture to thicken, ideally reaching 165F; do not allow it to boil. Then add butter in small pieces until the mixture is thick enough.
Honey Goat Cheese and Mascarpone Whipped Cream
- Whip cream in a bowl until cream begins to form.
- Add sugar, 1 tbsp at a time, and beat until sugar is fully incorporated and you are unable to feel granules of sugar in the cream.
- Add the mascarpone cheese by folding it into the cream, being sure not to over mix and loose the air in the cream. Once incorporated add the room temperature goat cheese in the same manner.
Cake
- Set your oven for 350F, use convection mode if available on your oven.
- Using a paddle attachment combine room temperature butter and sugar. Blend together until the sugar is incorporated completely and the mixture is pale in color and fluffy in texture. Again, you should not feel any granules of sugar left.
- Gradually add room temperature eggs.
- Once the eggs are incorporated, sift in the dry ingredients of flour, salt, and baking powder. Then fold in lemon zest.
- Coat baking tin with butter or cooking spray and fill according to how you would like to enjoy your cakes. In this case I used an ice cream scoop per square muffin cup.
- Bake for 15-20 mins, remember your looking for the cake to begin coming away from the sides of the tin and a spring back texture.
Lemon Syrup
- Combine sugar, lemon juice, and zest in a saucepan on medium heat until the sugar dissolves and a syrup forms.
Don't forget to follow Cameron on Instagram for more mouth-watering bake photos!

April | 2017
What a full month we've had! Not only terms of our schedules, but full in joys and accomplishments and celebrations. See below for the photos and summary!
This month's happenings:


Favorite Links
Now that we've announced our trip to Iceland and Europe this fall, I can show you guys the fun tips, videos, and articles I've found on travel to these places. I love this video by Gal Meets Glam on their visit to Iceland this past winter.
In preparation for our big trip, we're also working on making some lifestyle changes. We've joined a gym and I've been working at keeping my portions under wraps. Recipes like this make it seem like a totally enjoyable change to make!
We've been on the hunt for water resistant jackets for Iceland that can roll up really small as we'll also be going to France, and we found them at Target! I'm so excited to wear this blue jacket!
As today is May 1st, check out this post on my Facebook page where I explain my FAVORITE song about the month of May. Hint: it's from a 1960's favorite movie of mine!
P.S. Don't forget to check back this Wednesday for a special guest bake by my Star Baker, Cameron!

Iceland + Europe | Vacation Announcement
A couple weeks ago, I spilled the beans on our vacation via my Instagram story. If you didn't catch it in the 24 hour window, you wouldn't have heard the news... sooo here's the official announcement:
We're going to Iceland and Europe this fall!
As a little background:
For the last year, Tom and I have been discussing the need for an honest-to-goodness vacation. Of course, it kept getting put on the back-burner over and over (as these things often do) while we dealt with other life circumstances, prioritized family visits, hosted lots of visitors, worked on our renovation, and then moved forward with adding our dog. We kept saying "we'll talk about it in a couple more months" until that couple more months turned into a year or so. Now, it's been over FOUR years since our last vacation... which was our honeymoon. So to say we're excited about fulfilling our dream to visit Europe, would be an understatement.
We've taken a few trips in the last four years, mostly to visit family, or with me as a tag along to Tom on a business trip, or for a super fast overnight to celebrate a birthday or something, and they've been so wonderful... but we've not had what I would call a vacation in all these years.
About two months ago, I started putting my foot down and being really adamant about prioritizing a vacation for this fall. We've had a rough year and I think life's curves have put enough weight on us to merit an actual need more than a desire for a vacation. We need the respite, the escape, and the adventure without work or reality tapping us on the brain to remind us to pay attention to them. We'll take plenty of photos, but it'll be mostly a time that we can be disconnected from pressures, and just enjoy the time together - uninterrupted.
Here's how it happened
After a few months of daydreaming together about potential places, we decided to just start casually looking. We followed a few places around the world for low flight prices, and every now and then something would come up and we'd consider it for the day, only to see the price spike the next. Italy was of particular interest, but when prices went from $400 to $700 in a matter of 12 hours, we thought it was off the table. So we hunted around the Caribbean, and Cabo, and various other locations.
About a week after the realization that we needed to be prepared for spontaneity in purchasing flights, Tom saw something we couldn't pass up...
For less than $900 (total - this price includes BOTH our roundtrip tickets), we could fly into Reykjavik, Iceland - stay for up to a week - and then continue on to Paris.
Tom read me the deal and we stared at each other.
For a long time.
We started to smirk.
Then I asked a few more questions and we decided we'd keep our stay in Iceland brief so we could explore the surrounding areas and countries by France for longer.
"Joy, are we doing this?" he asked.
".... what's our reason not to? The flight price certainly isn't a reason. Tom. Let's do it. I don't see how we could possibly regret doing this. We've dreamed of going to Europe... and ICELAND?! Who goes to Iceland?! Actually, I think we'd kick ourselves for NOT going and passing up such a great deal and experience. Seriously. I'm ALL in. Let's do it!"
Two minutes later, we confirmed our tickets.
For three full days, we'll bop around Iceland. For another twelve days, we'll land in Paris, and then perhaps mosey into Switzerland and Italy - but we're open to suggestions! We are so insanely excited for this trip! We're really hoping to get to the small Italian winery that makes our favorite wine in the Barolo region.
We've been scouring Airbnb for places to stay, but it's so hard to know where we'll want to spend the most time! Now that we have the flights booked, we'll have a lot of planning to do, but I love planning and organizing, so I'm enjoying it. Plus, it feels SO good just to have something amazing to look forward to, and it's started to motivate us to get in better shape so we can enjoy walking and hiking around as much as possible and not feel like we need to rest a lot.
Here's where you come in
Have you ever been to Iceland?
How about France, Italy, or other surrounding areas?
LET'S HEAR YOUR TIPS! This will be our first time overseas and if you've got anything that might help some European or Iceland first-timers, leave me a comment or contact me.
What should we pack for Iceland AND Europe? Do you have some favorite luggage or backpacks? Would it be easier to take trains or rent a car? We're not too interested in the tourist attractions - what would you suggest to the back-country travelers? How do you leave room for souvenirs? Do you know some amazing places to stay? Any certain kinds of clothes or shoes you know are great for lengthy travel? What kind of adapters would we need for phone and camera charging? Anything you can think of please share it - I'd love to hear about your experiences!